Audio Priorities: What Matters a Lot (And What Doesn’t)
This is a guest post by Ethan Winer, co-founder of RealTraps and author of the book The Audio Expert. This story first appeared in Trust Me, I’m a Scientist on June 4, 2012.
“I have a tax refund check coming soon, and I plan to upgrade my home studio. I’m wondering what I should buy to take my studio to the next level. I’m getting about $2,500, and I’m trying to decide between a really nice mic preamp, a high-end converter, or maybe a passive summing box. What will give me the most bang for the buck?”
Every time I visit an audio forum I see at least a couple of posts like this one. Inevitably, the replies will suggest various pieces of electronic gear and provide hearty endorsements about how they can make a life-changing improvement to any setup. But is buying a new microphone preamp or other piece of kit really the most effective way to improve the quality of your recordings? This article focuses on the science of audio, so we’ll be looking at some numbers as we identify the areas where you might find the most significant gains. But first, a bit of history.
Electronic Circuits
Back in the 1960s and 1970s, good audio gear cost a fortune. All equipment had to be assembled by hand, and high quality components like inductors and transformers were especially expensive. Furthermore, the market for recording studio products was minute compared to that for TVs, radios, and other consumer devices, which helped keep prices high. But when the 741 integrated circuit op-amp was introduced in 1968, it set off a chain of events that would forever change the audio industry.
By 1970, IC op-amps were available at Radio Shack for only $1.49. These “integrated circuits” let designers create high quality audio devices with fewer parts and simpler layouts, eliminating the need for inductors and transformers. Coupled with the printed circuit board technology that would replace point-to-point hand soldering, this meant that high quality audio devices could be manufactured quickly and cheaply for the first time.
Of course, the fidelity of the earliest IC op-amps was not as high as what we enjoy today. One important obstacle was their limited “slew-rate”, a term which describes how quickly the output voltage can change. While these early op-amps could handle high frequencies well enough at low signal levels, they couldn’t put out 20 kHz signals at the high levels expected of pro fessional audio equipment.
Clever designers were able to use these early IC op-amps to do the bulk of the work in circuits such as equalizers, by combining them with a simple output stage using conventional transistors to achieve an acceptably high level. But today, inexpensive op-amps with slew rates plenty fast for pro audio applications are common. One current model called the NE5532 contains two op-amps, each of which have extremely low levels of noise and distortion. It sells for less than 40 cents in production quantities. Meanwhile, the TL074 contains four low-noise, high-speed op-amps, and sells for less than 35 cents.
Digital Audio
Another huge contributor to the democratization of high-quality audio has been the personal computer. Today’s entry-level home computers can handle 100 or more audio tracks, each with two or more plug-ins. All that’s needed to create a complete recording studio is a few microphones, a small-format mixer with mic preamps, a DAW program, and a good quality sound card. All of these are available for prices that would have seemed impossible when I first started recording professionally in 1970. I remember paying $2,000 for a Lexicon Prime Time, the first commercially viable digital delay line. Today you can download freeware plug-ins with better specs.
Because of all this, high-quality audio today is not only insanely affordable – it’s ubiquitous. It seems everyone and her brother is a musician, or DJ, or has a home studio of some sort, which means that the market for high-quality studio gear is vast indeed. But with all the improvements in quality over the years, where can we expect the best results? For that, it’s time to look at the numbers.
Audio Gear by the Numbers
Aside from gear that’s intentionally colored for effect, the design goal for most audio equipment is to be audibly transparent. This is defined as having audio fidelity high enough that people won’t notice any degradation when sending signal through the device.
If a device has a frequency response that’s flat within 0.1 dB from 20 Hz to 20 kHz, and the sum of all noise and distortion is at least 80 dB below the music, that device can be considered audibly transparent. The majority of today’s audio devices meet this criteria, including most budget models. Even when a device doesn’t fully meet these tight specs, the quality can still be acceptable for most applications. A response that’s down 1 or 2 dB at the frequency extremes is still very good, and distortion that’s only 60 dB down is still inaudible on most sources. Distortion at this level is roughly equivalent to 0.1 percent of the total signal.
Audio software is even cleaner, with virtually no noise or distortion unless they are added intentionally for effect. Most modern DAW programs use 32-bit floating point math for all their operations. Although the audio you record is captured using either 16 or 24 bits for each sample, when it is played back in your DAW, the software retrieves it, and converts each sample value to an equivalent floating point number for further processing. Volume and pan changes, routing and plug-in effects such as equalizers and compressors, all happen in this 32-bit environment.
Even though hundreds of calculations are typically needed to create an entire mix, the noise and distortion added by each operation is extremely small.
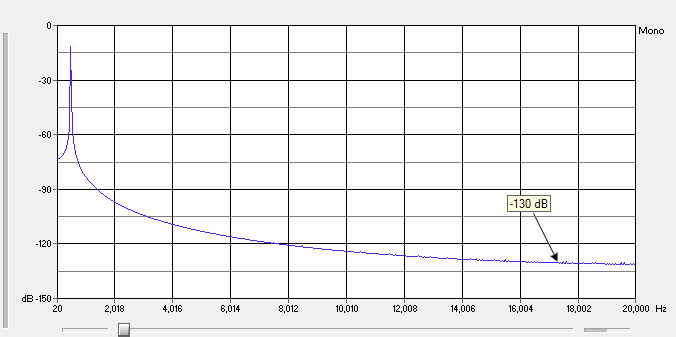
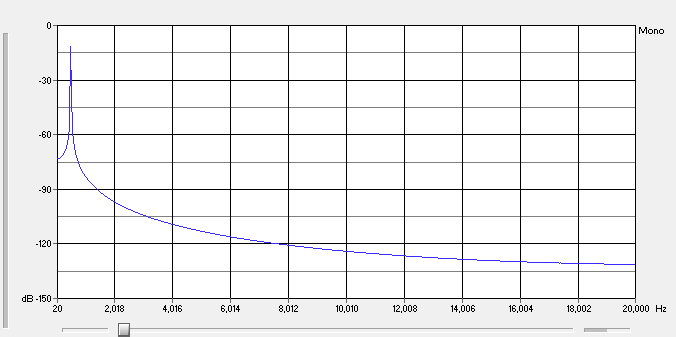
To prove this, I once applied 20 sequential volume changes to a clean 500 Hz sine wave in Sony Sound Forge, and each of the added artifacts was still than 130 dB below the signal. This is one fiftieth the noise floor of a CD, which is itself inaudible.
Figures 1 and 2 show a “Fast Fourier Transform” (FFT) of the 24-bit WAV file before and after changing the volume 20 times. An FFT displays the spectrum of a WAV file, and it’s invaluable for this sort of audio fidelity testing. As you can see, the only difference between the files is a tiny bit of added noise, shown as ripples at the very highest frequencies.

Figure 2: This FFT shows the spectrum of the same 500 Hz sine wave after applying 20 sequential gain changes.
THE WEAKEST LINKS
So getting back to our advice seeker, where is the weakest link in the production chain? And what, in turn, will take that home studio to the next level?
Since today’s electronic circuits do not limit fidelity unless they’re poorly designed or broken, and because the 32-bit floating point math used by modern audio software is even cleaner, the weakest link in today’s systems are in their transducers (microphones and loudspeakers), as well as in the rooms in which we listen and record.
Link #3: Microphones
A transducer is any mechanical device that vibrates in order to capture or create sound waves in the air. Because they are mechanical, transducers are prone to resonances that create a peak in their response, which is often accompanied by “ringing” that sustains the resonant frequency.
Transducers, like microphones and speakers, have physical excursion limits as well; beyond a certain point, their diaphragms can move no further. When a microphone or loudspeaker approaches this limit, its distortion tends to rise. (This is unlike electronic circuits, which are usually very clean right up to the point of hard clipping.)
Thankfully, the same modern manufacturing techniques that brought us high-quality electronics also make high-quality microphones affordable. A few years ago, I did a comparison of small-diaphragm condenser microphones that ranged from dirt cheap to very expensive. Even the $50 Nady CM 100 was flat within a few dB over most of the audio range. This is not to say that a cheap microphone is all one ever needs – but it certainly shows how far we’ve come in the past 30 or 40 years.
Link #2: Speakers
Loudspeakers are even more of a problem area than microphones, mostly because they have more mechanical issues to overcome.
Although the single diaphragm of a small condenser microphone can easily capture very low and high frequencies, woofer cones need to be very large and move very far to produce bass frequencies at acceptably loud volumes, and tweeters need to be exceedingly small and lightweight to move fast enough to reproduce high frequencies.
Speakers often have a crossover circuit that splits the audio into two or three bands, which allows each band to be handled by a different driver. At frequencies around the crossover point, the same sound emits from two drivers at once, which is a common cause of frequency response errors.
Even when these obstacles are handled well, the frequency response of loudspeakers can vary dramatically at different angles. On top of all of this, speakers tend to have even higher distortion than microphones, and 5 percent harmonic distortion is not uncommon at both low frequencies and high output levels. Fortunately, speakers are at least reasonably flat on-axis and within their operating range, and even affordable models typically vary by less than 5 dB in ideal conditions.
Link #1: The Room
This brings us to the weakest link by far: the room you record and listen in.
While even inexpensive audio circuits and transducers are often fairly flat through most of the frequency spectrum, the response of the average room is riddled with numerous peaks and deep nulls.
These major colorations come from acoustic interference, which is caused by sound waves reflected from the walls, floor and ceiling combining in the air with the direct sound of a loudspeaker or a musical instrument. At some distances, the sound waves combine more or less in-phase, creating a peak, or an exaggerated spike at a particular frequency. When the waves combine out-of-phase, the result is a null: the reduction, or even near-disappearance of a significant portion of the original sound.
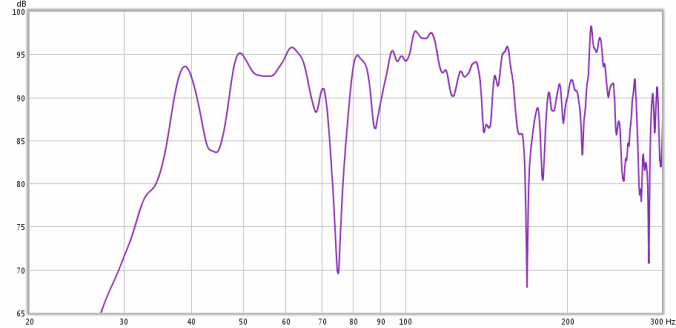
Peaks are typically less than 6 dB, but nulls can be extremely deep. Figure 3 shows the low frequency response I measured in my company’s test room. If a company tried to sell a microphone or loudspeaker with a response this bad they’d be laughed out of business.

Figure 3: This roller coaster low frequency response was measured in a typical bedroom size space. You can see numerous peaks and nulls caused by acoustic interference, with a span that exceeds 30 dB.
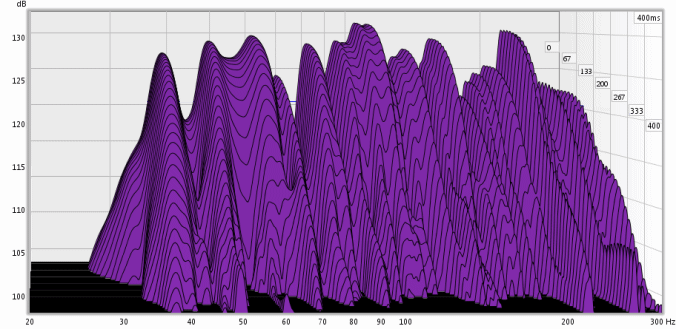
Peaks caused by room resonance also tend to ring for some amount of time. If I play an eighth note on my Fender bass and then stop it suddenly, the sound shouldn’t continue for another 1/4 second due to a room resonance. But that’s exactly what happens, as you can see in Figure 4.
This graph is called a waterfall plot, which shows the individual resonances and their decay times. Each peak in the response takes time to decay, which further reduces the clarity of bass instruments as some notes run into each other.

Figure 4: This waterfall plot was derived from the same data as shown in Figure 3, but it also shows decay times versus frequency.
Poor room acoustics make mixing more difficult and less enjoyable, but at least you can use headphones as an alternate reference, or play your mixes in the car or on a friend’s system to try and compensate for discrepancies in the room. But recordings made in a bad-sounding room sound bad inherently, and it can be very difficult to fix that in the mix.
The same roller-coaster response you see at bass frequencies in Figures 3 and 4 occurs at mid and high frequencies too. Unlike an overall boost or loss that can be countered with shelving EQ, the microphone captures so many peaks and nulls that it’s impossible to restore the original sound of an instrument.
The same is true of the excess ambience that plagues small, untreated rooms. Unless you put the microphone very close to the source, you’re likely to get a small, “boxy” sound that can’t be removed. Worse still, applying the compression so common in pop music only brings out that unattractive ambience further.
BANG FOR THE BUCK
Although the benefits of using good microphones and speakers can be significant (especially compared to the tiny gains promised by purveyors of electronic components), measurements like these clearly show that the rooms we record and mix in are often our weakest link.
Fortunately, making significant improvements in room acoustics is not particularly expensive or difficult. A good acoustic products vendor will tell you exactly what to buy for a given budget, and where to put it for best results.
For an even lower cost you can make your own bass traps and absorbers as shown in the Acoustics FAQ on my personal web site. The Acoustics Basics article on my acoustic company’s site is even simpler and gets right to the point.
Whatever route you take, the key to effective treatment is in using products made from rigid fiberglass that’s thick enough to absorb the frequencies where you need the most control. There are various tweaks that can be applied to improve performance at low frequencies, such as adding a thin membrane, but plain rigid fiberglass does a very good job, and is not expensive at all.
Indeed, investing even a few hundred dollars into treating your room will improve the quality of your productions far more than any electronic “gear” upgrade. And that’s science fact.
Ethan Winer is a former recording engineer and session musician who now designs acoustic treatment solutions for RealTraps. His new book The Audio Expert explains advanced audio principles and theory in plain English and with minimal math.
Please note: When you buy products through links on this page, we may earn an affiliate commission.


Heras Da Lizzard
June 30, 2016 at 7:57 am (8 years ago)Man, the effort you guys put on this website is absolutely astonishing. I’m learning SO MUCH thanks to you guys… Bravo!
Cheers from Madrid! 😀
El Gennaro
July 8, 2016 at 2:00 pm (8 years ago)Awesome article…. it’s the room!