


DIY Studio Design: How To Build Cost-Effective Acoustic Panels
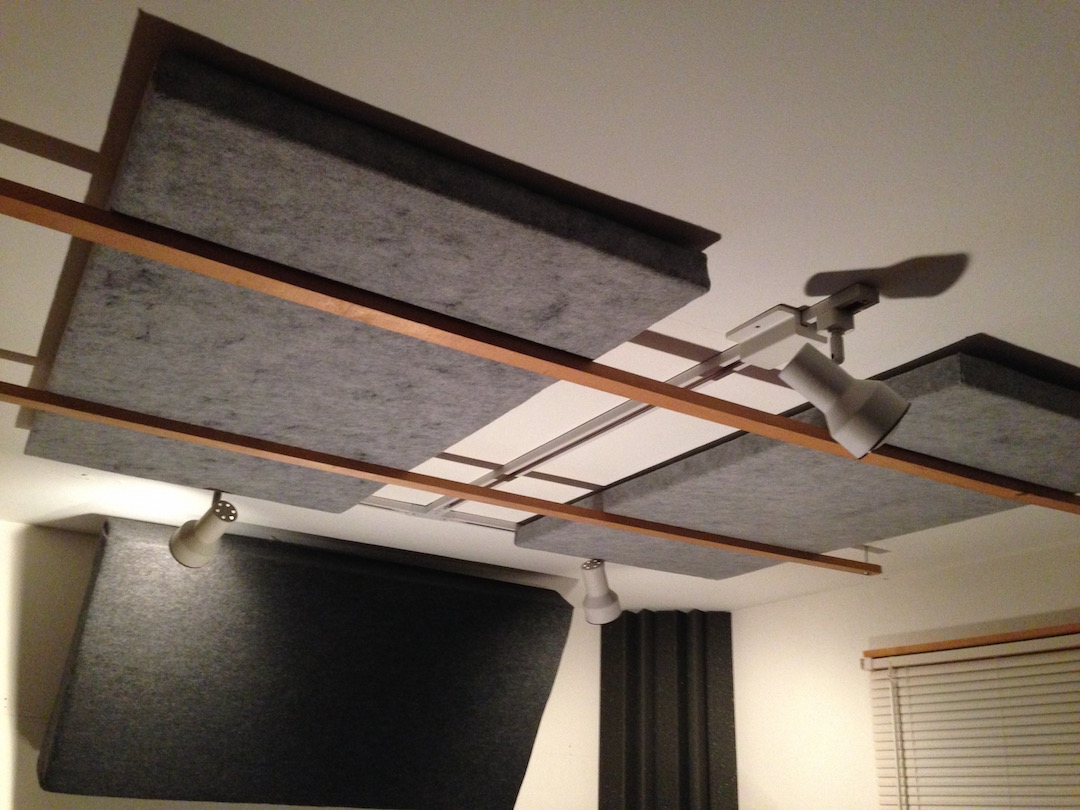
DIY acoustic panels made by the author for his own studio according to the plans presented in this article.
When performing, recording or mixing, trusting what we hear is essential. That trust is built, in part, on our training and experience.
It is the sum total of how much we’ve studied, who we hang with, what we listen to, and what we dig. But that trust is also built out of the environments we work in.
Fortunately, like our experience and training, the ability to shape the acoustics of our listening environment is almost completely under our control. Any non-ideal listening environment can be improved to some degree, and like learning, it can be done without breaking the bank.
Pre-made acoustic treatment is a viable alternative for sweetening your tracking or mixing room when time and skill are at a premium. But if you want to get the most bang-reduction for your bucks, and are reasonably good with your hands, the alternative of building them yourself is a very rewarding one and can save you a bunch of money.
Nice-looking, extremely functional acoustic panels and bass traps are just not that complicated to build. The parts list is surprisingly short in the case of acoustic panels, and is only slightly longer for bass traps.
In addition, relying on factory seconds, surplus, demolitions and remnants can keep the costs especially low. (Though even sourcing premium components is very low in comparison to buying them pre-made.)

Owens-Corning 703 rigid fiberglass insulation is one option, along with even more cost-effective Armstrong acoustic tiles.
To build DIY mid-high frequency acoustic panels, all you need to do is to source some Owens-Corning 703 rigid fiberglass insulation, or make a three-panel sandwich out of low-cost Armstrong acoustic tiles, joining the panels together with spray glue.
Once you cover your panels with fabric, you can have completed panels for as little as $7.00 each using surplus or reclaimed Armstrong acoustic tiles only!
Alternatively, just cover one Owens Corning 703 fiberglass panel (a single 2” sheet) in fabric for around $12.00-$15.00 each.
Both of these fiberglass panels compare favorably in NRC (Noise Reduction Coefficient) which is what we care about when reflected sound is our issue.
Comparing their effectiveness directly is tricky because they don’t come in the same thickness. The plans below are for sandwiching 5/8″ thick Armstrong panels, while the thinnest OC 703 comes in at 1”.
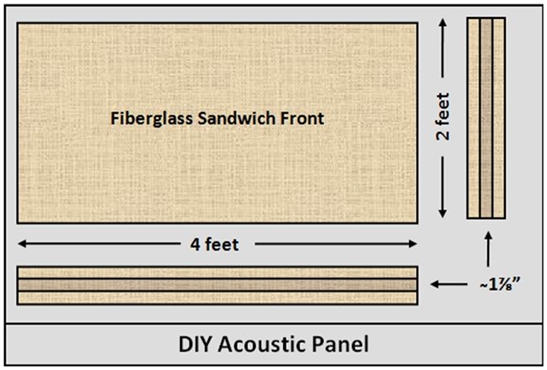
Plans for acoustic panels made from a sandwich of Armstrong acoustic tiles.
A 5/8″ thick Armstrong panel like I used is advertised at 0.55 NRC, but doubling the thickness of panels does not double the absorption, it is geometric. So 1″ worth is probably around 0.65-0.7 NRC.
I have found 1″ thick 703 panels advertised at 0.7 NRC. It should be noted that other varieties of Armstrong panels are available that are 9/16″ thick (very close to 1”) are advertised at 0.9 NRC.
Acoustic panels can be crafted very cheaply using the following materials:<
- Three 2′ x 4′ x 5/8” suspended ceiling fiberglass panels (Armstrong Acoustic tiles), or one sheet of 2′ x 4′ x 2” compressed fiberglass (Owens Corning 703).
- A remnant of a bolt of cloth or felt fabric acquired from a fabric store.
- One can of spray adhesive or spray contact cement.
Be sure to do this outside or in a well ventilated area, and follow the warnings on your spray adhesive can.
To glue together some standard acoustic tile, just lay two pieces face down on the table with the vinyl side down and the fiberglass facing up.
Apply the adhesive spray to the fiberglass side of both pieces. After the recommended waiting time, flip one piece over, carefully laying it on top of the other one, joining the two adhesive sides together in a two-panel sandwich.
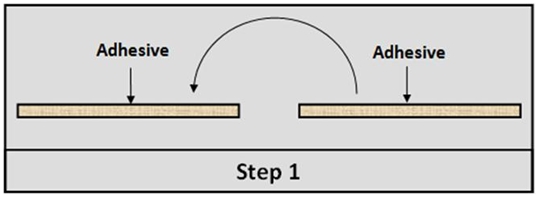
Step 1: Gluing two Armstrong acoustic panels together. Try using reclaimed or surplus panels for even more bang for your buck.
Then, carefully peel the vinyl from the exposed surface now facing up from the table. Lay the third piece of acoustic tile next to your two-panel sandwich with its fiberglass side facing up.
Spray both fiberglass surfaces with adhesive once again to make a three-panel sandwich.
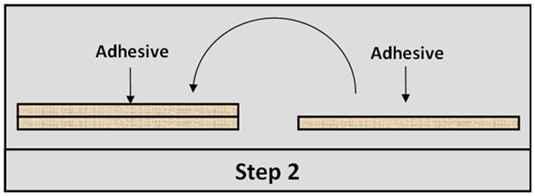
Step 2: Adding layer three to the sandwich.
Carefully peel the vinyl from the surface now facing up. Then, turn the unit over and carefully peel the vinyl from the last covered surface.
At this point you have a functional sound absorbing acoustic panel suitable for soaking up higher frequency sounds. Of course, it is kind of ugly and slightly dangerous until it covered. That’s the next step.
To cover the back of your acoustic panel, cut one piece of fabric slightly larger than 2’ x 4′ and lay it down with the best-looking side facing down, next to your three-panel sandwich.
(If you’re really looking to save money by using leftover materials, note that this can even be a completely different color from the front cloth, as it will not show when you are done).

Step 3: Adding your back cloth.
Apply the adhesive spray to both the sandwich and the piece of fabric. After the recommended waiting time is up, flip the fabric over, laying it on top of the adhesive side of the sandwich, and covering one 2 x 4′ fiberglass side. Them, trim the excess fabric overlapping the edges.
To cover the front, flip your panel over so that this new fabric side faces down and the exposed fiberglass side faces up.
Cut a second piece of fabric so that it is four inches larger all the way around than your 2’ x 4′, and once again place it next to the three-panel fiberglass sandwich with the best-looking side facing down.
Apply the adhesive spray to both the sandwich and fabric. After the recommended waiting time, flip the piece of fabric over, laying it on top of the adhesive side of the sandwich and covering the exposed 2’ x 4′ fiberglass side.
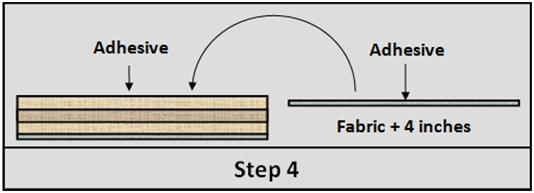
Step 4: Adding the front cloth.
To finish the remaining edges, flip your panel over one last time.
Now, apply some adhesive to each of exposed edges and the adjacent overhanging fabric. Then, fold the fabric up to cover the exposed adhesive edge of the panel.
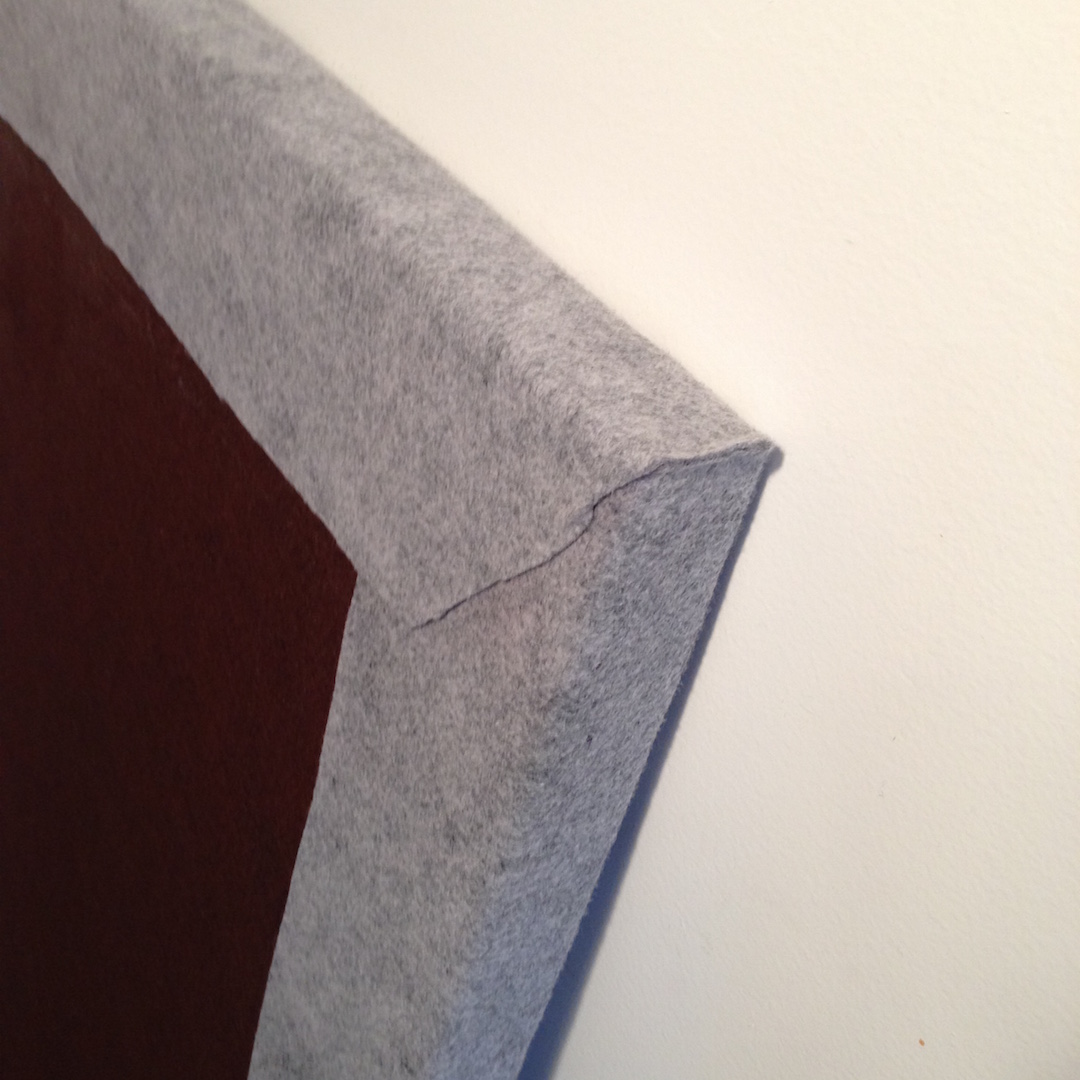
Trim as needed, using 45° cuts in the corners. Repeat until all four edges are covered in fabric. You are done!
-
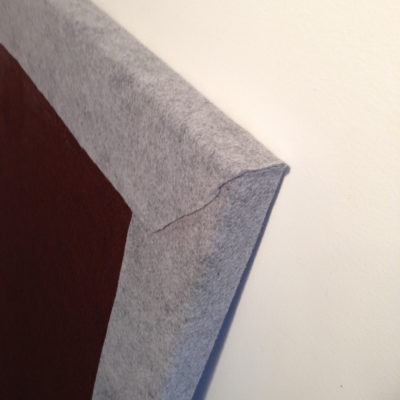
- A view of the finished corners, which will be hidden from view.
-

- A view of the rear side of the panel. An even less expensive piece of cloth was used for the rear of the panel.

One last element to look at is the hangers. I have employed several methods to hang panels from the wall and from the ceiling of a room.
Hanging Panels on a Wall
Option 1: Finishing Nails
The very simplest way to attach these lightweight panels to a wall is by using long finishing nails.
Just drive four of them in, one at each one of the four corners of a panel making sure that you angle them down, driving them just below the outward-facing surface of the panel.
Use a countersink to make sure the screws hold.
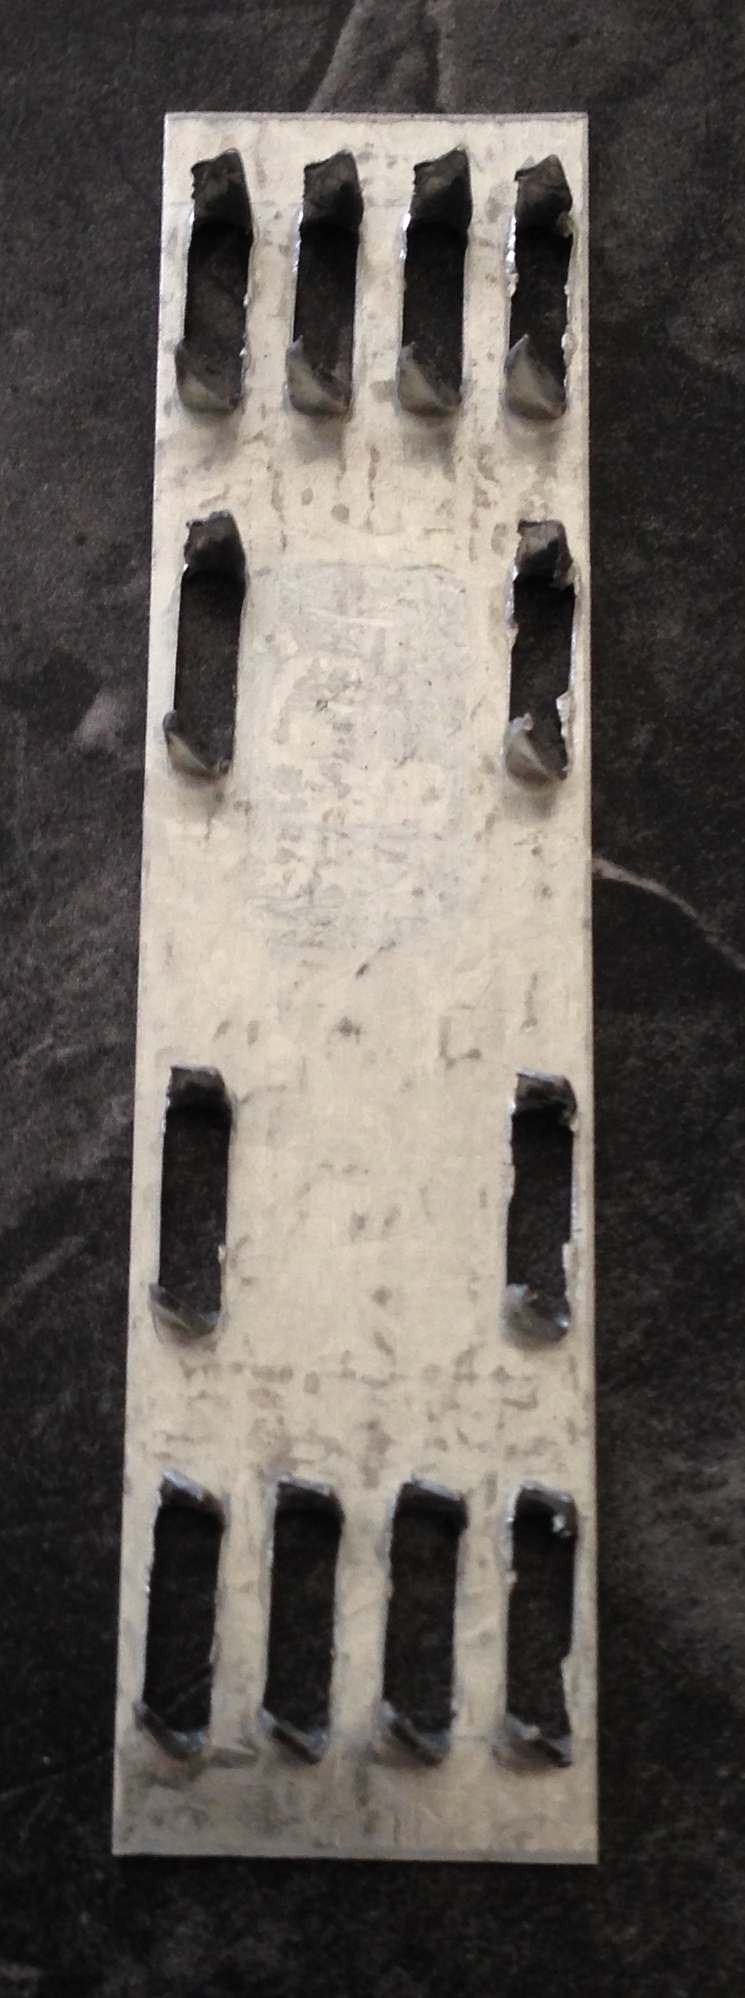
A spiked mending plate can also be used to secure the panels to your walls.
Option 2: Mending Plates
First bend the spikes of the mending plates up at a 45 degree angle.
Then, nail or screw them to the wall through the upper center of each plate with the spikes facing out. (One for each corner of the panel).
Then, push the rear of the panel down and into the four mending plates at a 45 degree angle.
These plates can be purchased at your favorite home or hardware store for about $0.50 each.
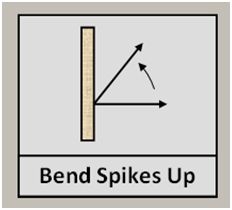
Be sure to bend the spikes up if using the mending plate approach.
Option 3: Velcro
Use a wider Velcro strip—about 3” should do—and put the “spine” side on the wall in each of the four corners.
Then, attach the fabric side to each of the four corners of the panel.
Option 4: Wood Frame
Build a wooden frame out of 1”x2” lumber that fits snugly around the panel. Attach it to the wall with nails or screws and press the panel into the frame.
Alternately, you can attach small 90-degree brackets to the inside of the frame, screwing them into the frame and then into the wall.
Follow up by driving finishing nails in through the sides of the frame so they penetrate the panel by at least a couple inches.
It helps to start out by hammering the nails through the sides of the frame so they penetrate just slightly at first. This way, you can insert the panel without damaging it before you attach it to the wall.
Hanging Panels on the Ceiling
Option 1: Attach Mounting Strips
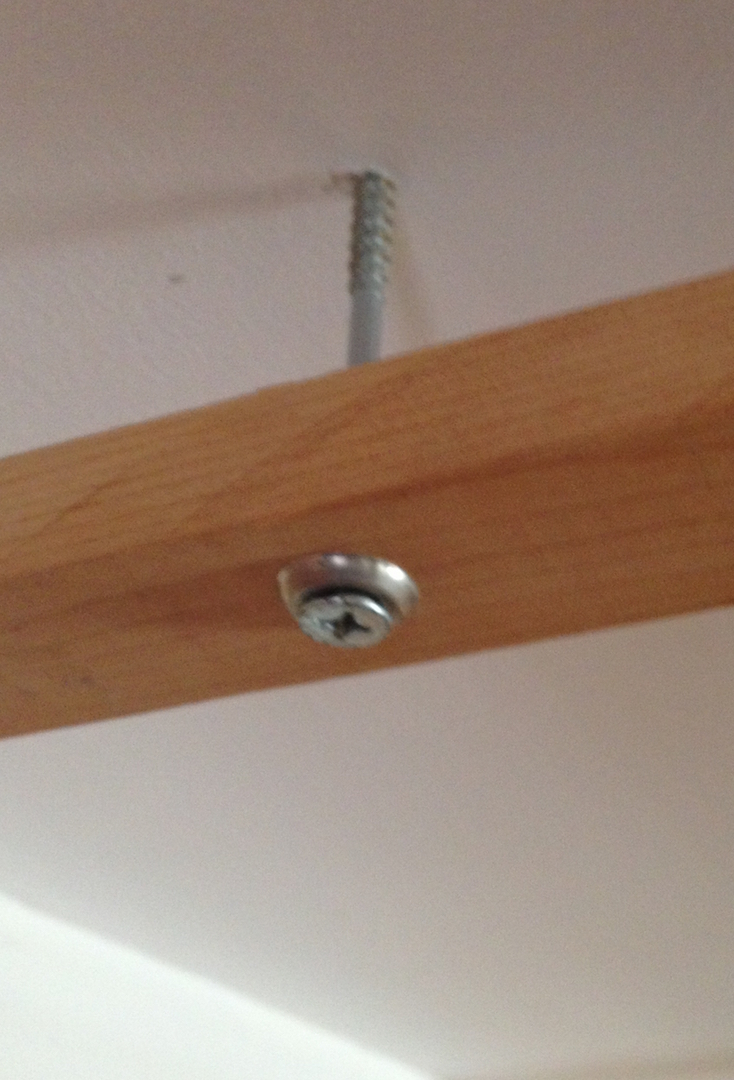
Simple cuts of wood screwed into the ceiling are a simple, inexpensive and potentially, an attractive way to suspend acoustic panels from above.
Use 1”x2” pieces of wood of appropriate length—depending on how many panels you want to hang and how close together you want them and attach them to your ceiling. An example is shown in the opening photo of this article.
A single panel would require two wood strips at least 2’-6” in length. Use screws long enough to penetrate into the joists by about 1” while allowing for the 2”-thick panel and 1” wood hanger. (This calls for a screw approximately 4” long in total).
Hang the wood strips first and then slip the panels in last.
Option 2: Build and Hang a Frame
Construct the frame of 1”x2” pine strips as the wall mounting frame was described. Use two approximately 2’ long and two approximately 4’ long cut to fit around a panel nice and tight and joined at the corners. Drive finishing nails in through the sides of the frame so they penetrate the panel by at least a couple of inches. Then, screw the frames to the ceiling.
Alternately, you can attach small 90-degree brackets, screwing and screw them to the inside of the frame and then to the ceiling. Follow by driving finishing nails in through the sides of the frame so that they penetrate the panel by at least a couple inches.
Once again, remember to start by hammering the nails so that they penetrate through the sides of the frame just slightly at first so you can still insert the panel without damaging it
before you attach it to the ceiling.
Summing it Up
Although I have described methods using my own ideas for building and mounting acoustic panels, I encourage you to experiment and try your own. In part 2, I will be covering DIY building and mounting of bass traps on walls and in corners and getting optimal results with and without adhesive using rigid-fiberglass panels.
Rob Dominiak is a musician, writer and engineer who lives in Upstate New York.
Please note: When you buy products through links on this page, we may earn an affiliate commission.