Mastering Mic Placement: How to Get the Most Out of a Single Microphone
Wessel Oltheten, producer, engineer and author of the book Mixing with Impact offers a roadmap to getting better sounds out of your mics, every time. For even more on this subject, stay tuned for upcoming articles in this new series on recording techniques.
Having access to all the microphones in the world will be for naught if you can’t master placing only one.
It’s impossible to know how a recording will turn out in advance. You have to hear the completed version—preferably in a mixed and mastered state —to be able to tell for sure whether you’ve succeeded.
Unfortunately, if that final listen turns out to be a disappointment, it’s too late to make changes. To prevent this outcome as much as possible, you need a plan.
To succeed in recording means to make the most out of any given situation. Whether you’re recording a fantastic band in an overly reverberant cellar, striving to capture the core of their music and the feeling of energy that fills up that space, or working on capturing every last nuanced detail in a controlled studio environment, from the perspective of the recording engineer, one question matters most of all: Where do I put the microphone?
“The microphone”. Doesn’t that sound a bit old fashioned? Should we instead be talking about the the 32, 48, or perhaps 64 microphones? Maybe. But if you don’t start out by learning to use one microphone at a time, you’ll never know for sure how many mics is ideal for the job at hand.
One thing you can be sure of however is that the more microphones you use, the more complex their combinations become, and the greater the odds that any one microphone will find itself in a bad place and that you will end up with a result that’s weaker—and even has less meaning—than what you could have accomplished with a single microphone in exactly the right position.
We may not like it but the sound image will tend to blur when you try to compose it out of separate parts. You can think of this as being a bit like making one group photo instead of compiling such a photo out of separate portraits of the participants. In the latter case, each of the portraits would need to be cut out, scaled, and adjusted in colour and lighting to be able to fit the composition of the big picture. While this can be interesting, and do the job, it is certainly less natural and less cohesive than a perfectly composed group photo, alive and lifelike and dynamic.
For this reason, it’s a good idea to always strive to first capture the best overview shot, and then fill in the areas that need work with additional microphones.
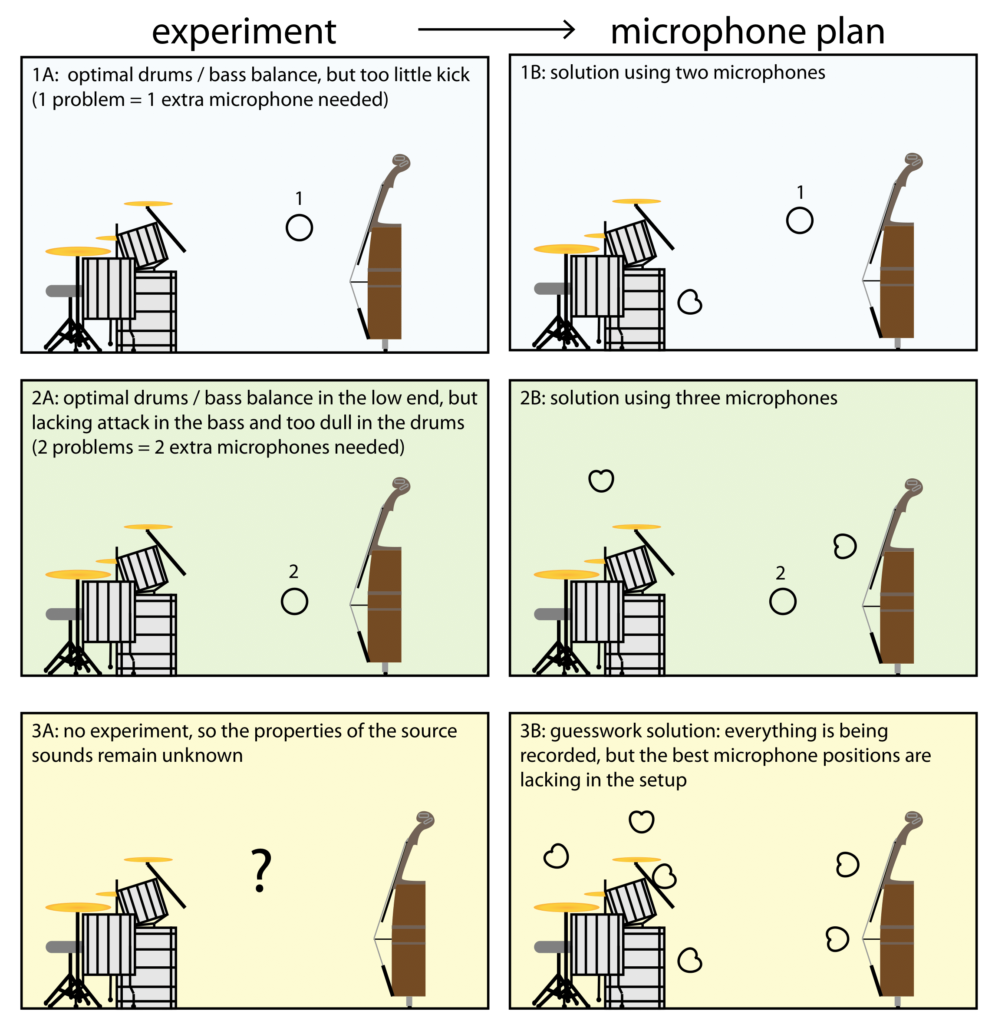
Figure 1: To prevent yourself from creating more problems with your microphone plan than you’re solving, it’s wise to experiment with using a single microphone to capture everything first. This way, you gain insight in the available options in terms of balance and timbre. With that knowledge you can then start to think of solutions that satisfy all of your recording criteria (A, B). That’s a completely different approach than what some people consider to be the “playing it safe approach”: Placing microphones close to all the sound sources without ever really evaluating the whole picture first (C).
Realism
“This is all well and good,” you may say, “but why do I need to capture a natural-sounding overall picture first, when all I want to do is create an artificial world of sound?” Creating and recording music are like telling a convincing story: It works best if you don’t stretch your audience’s imagination too far.
That doesn’t mean you can only tell stories using real life events, or in familiar settings. It just means you have to be conscious of the way the audience is used to perceiving things. A science fiction cameraman once put it like this: “When visiting another galaxy, the audience expects the same laws of perception to be at play. Where you steer their attention depends on the focus point, the composition of the image, the perspective and the light. If you go by these rules, you can convincingly tell the most unconvincing story.”
That’s why this philosophy of first attempting to record an overall picture is relevant even in producing hip hop. Sure, in that genre, you would rarely record everything at the same time, but you can still take this approach with each element you add to your audio collage. If you understand the place that a sound you are adding should occupy in the overall acoustic picture you are creating, you can take that into account when setting up each microphone.
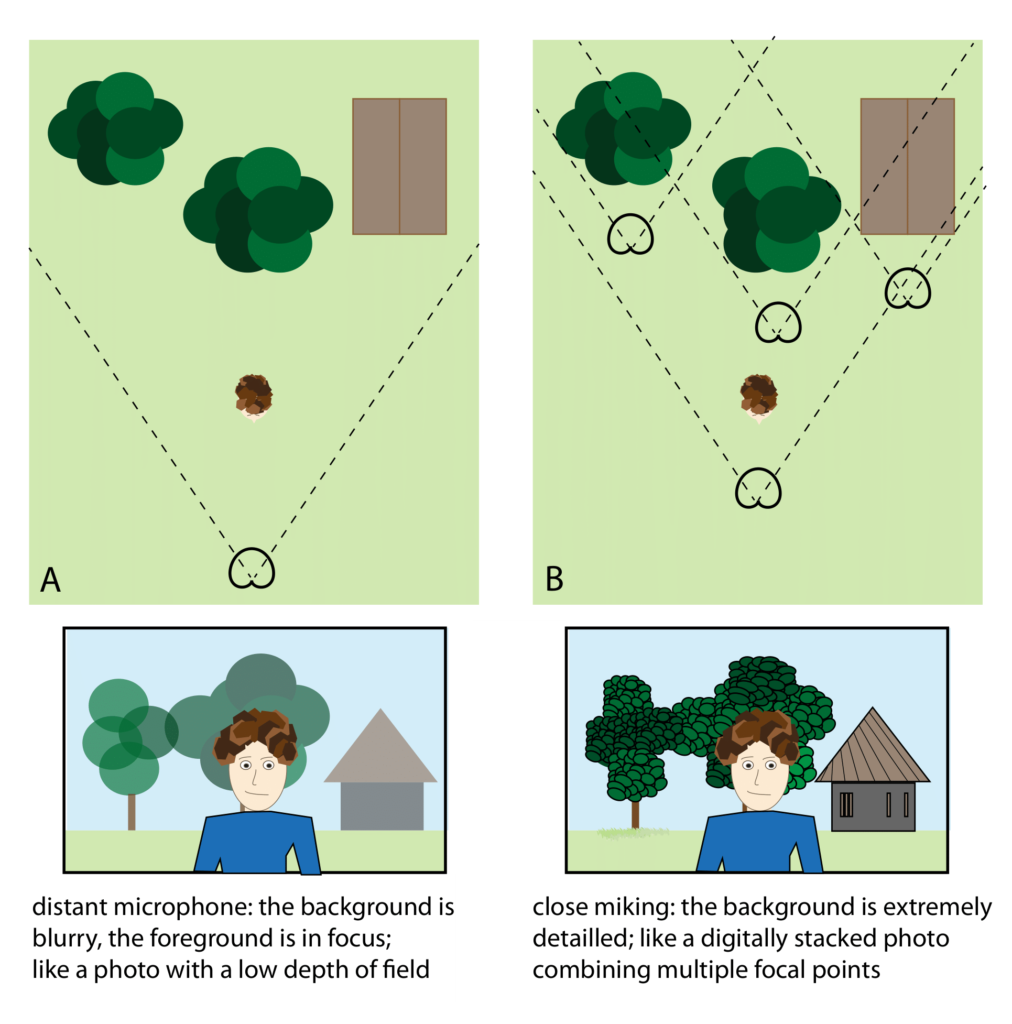
This can lead to very different results than if you record each element in a small room at the same default distance of just a few inches. Don’t get me wrong, there’s nothing wrong with such an approach, as long as you’re aware that it’s particularly well-suited for creating a flat Where’s Waldo like scene—as opposed to creating a more deep and natural perspective (see figure 2).
Figure 2: Recording an overall picture (A) versus compiling an image of separate components (B). The combined image merges multiple focal points in one image, which leads to an unnatural perspective unless great care is taken in manipulating the recording after the fact.
So, back to the question that matters most: Where to put that first (and ideally, only) microphone? If a straight and simple formula could be given for this, we could hardly call it the “art” of recording anymore. The best we can do is understand each of the domains we have control over when placing a mic so we can make better choices when placing any given mic. It’s also good to remember that in recording, there will always be compromise.
These 9 domains are somewhat interrelated, so there is no such thing as “the ideal microphone position”. You always sacrifice something in one or more domains to gain something in another.
The domains we can control with placement are:
1. Size of the scene (How big is the space your sounds occupy?)
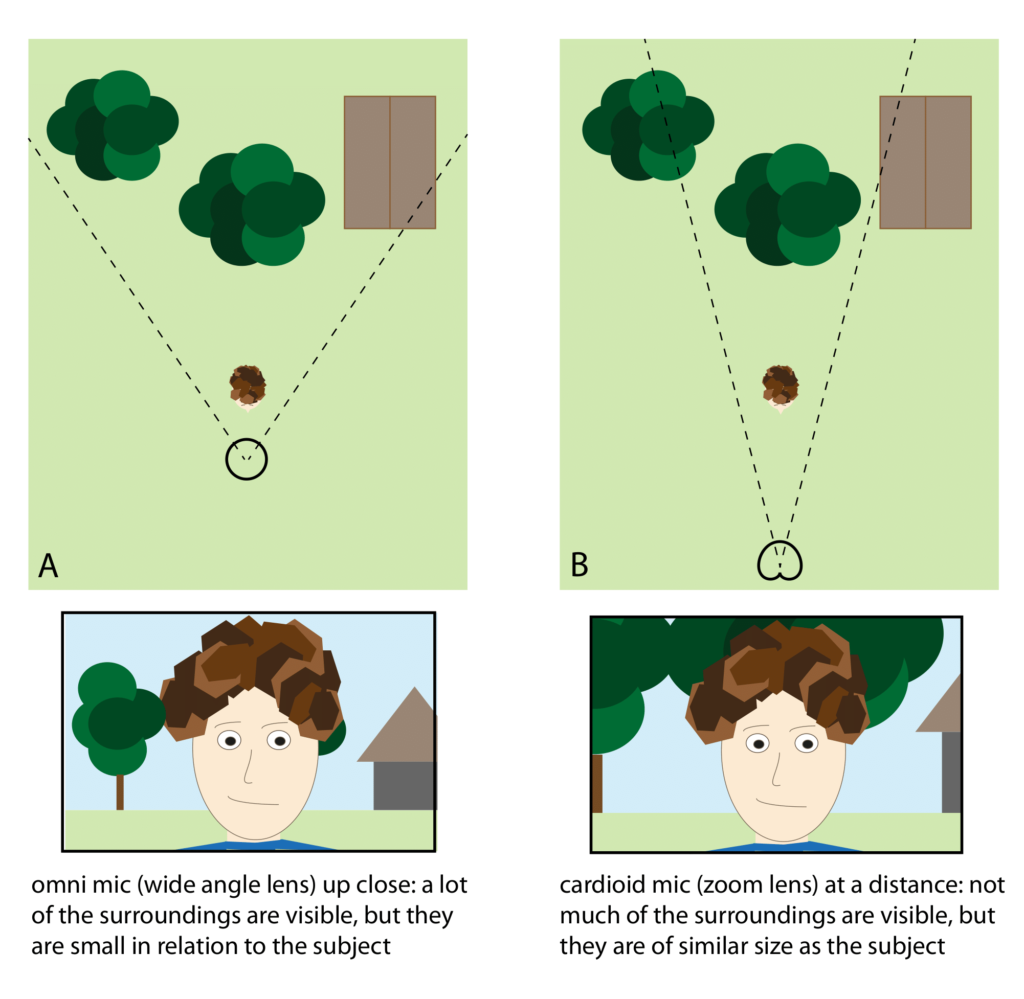
Figure 3: A large space gives room for a lot of separate elements (left), but none of these elements can be as big and detailed as when you place them in a smaller area (right).
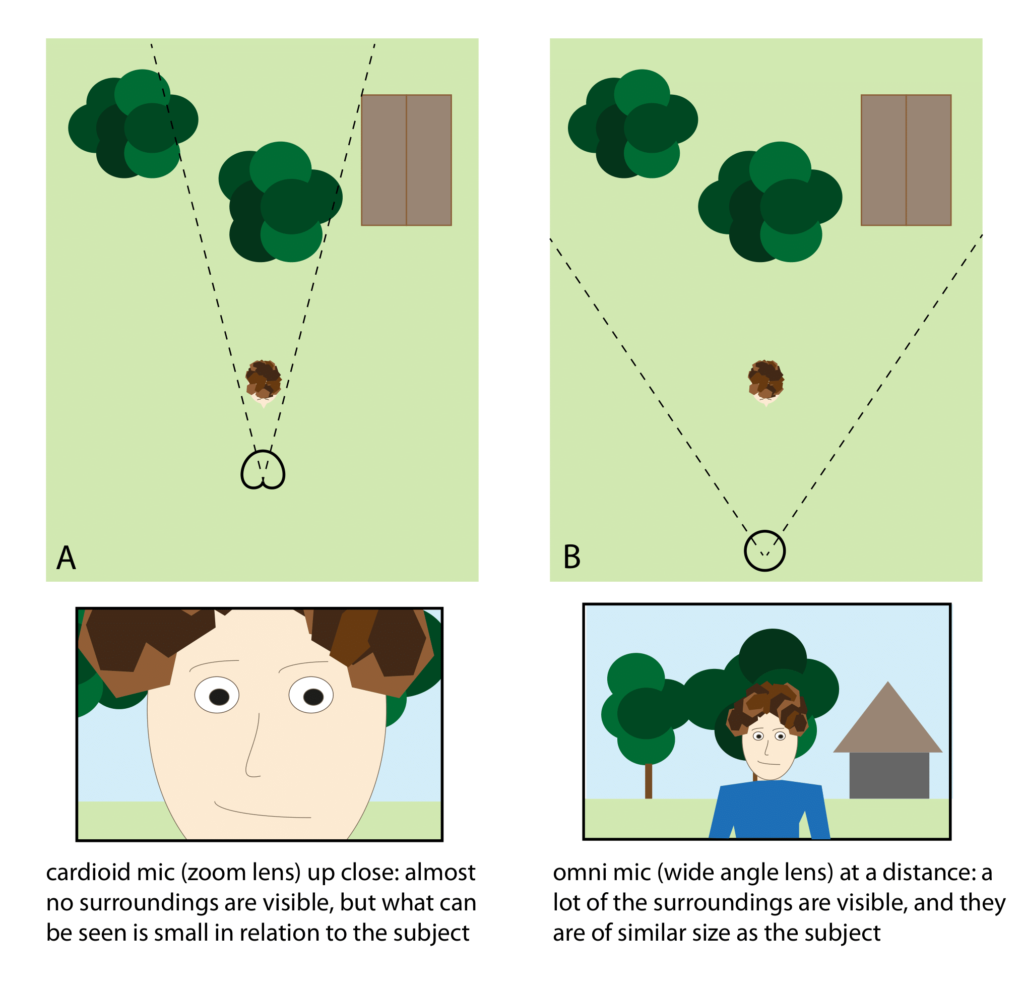
Figure 4: Just like when taking a photograph you can either opt for a wider lens—for instance by choosing an omnidirectional microphone instead of a cardioid microphone—or increase the distance, to enlarge the sense of space around a sound.
2. Size of the source (How much space does the source occupy within the scene?)
Figure 5: The source size is determined by the physical size of the instrument, but also by the size of the space you choose, the microphone’s distance from the source. Though physical size is a given for a particular instrument (a church organ is physically bigger and louder than than a singer at a given distance), but you can manipulate the perceived size by using electronic amplification. Just think of the perceived difference in size between a small guitar amp and a wall of Marshall stacks from an equal distance.
Figure 6: You can also change the perceived size of the source in relation to the background by adjusting the distance and directional properties of the microphone. Changing the perceived source size in this way is not the same as changing the physical source size, but it can create a similar illusion. If your focal point in the foreground seems to be bigger than a physically big-sounding background it appears to be bigger than it really is.This trick resembles how some architects manipulate perspective to make their designs seem larger than they actually are. With careful mic placement we can do the same with our sounds.
3. Balance (How loud is the source compared to other sources?)
Figure 7: The acoustic loudness and the positioning of the different sources determine their balance as heard by a single microphone.
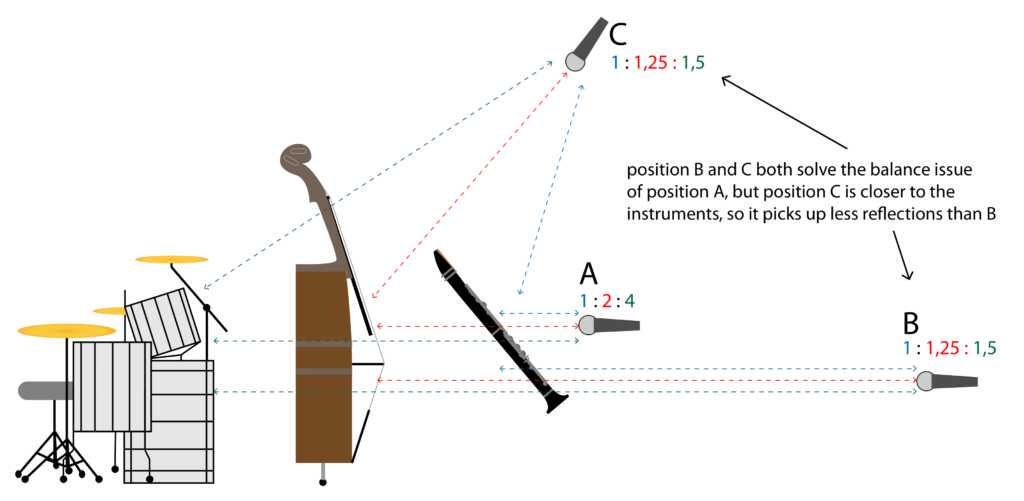
Figure 8: Provided that you have instruments that are all playing equally loud, the distance between each instrument and the microphone determines their relative balance. With the microphone in position A, this leads to large level differences between the clarinet (0dB), the bass (-6dB) and the drums (-12dB). By increasing the microphone’s distance, such as in position B, the ratio becomes less drastic and the balance becomes more even—but more room reflections are picked up. That’s one of the reasons that higher microphone placements are often favoured for ensemble recordings. In position C the distance ratios are equal to those of position B, while allowing the microphone to be placed closer to the instruments.
4. Internal balance (Are particular aspects of the sound source favoured over others?)
Figure 9: The relative distance of the microphone to different parts of each source (as well as the microphone’s directional pattern), determine the source’s internal balance, as depicted by the shrinking and enlarging of different parts of the instruments in the image above.
5. Spacing (How far are individual sources apart, and do they overlap?)
Figure 10: Placing instruments further apart prevents them from overlapping (occupying a similar place) in the recording. If you need a more cohesive sound, placing the instruments closer together can help. Due to the complexity of acoustic reflections, this difference can be heard even in mono recordings.
6. Distance to the foreground (How much detail can you perceive in the foreground? How close is the focal point?)
Figure 11: This one is related to #2. The amount of detail you perceive is directly related to how close the source seems. The amount of detail you can hear is dependent not only on the microphone’s distance and level, but also on its directional pattern and brightness. To further increase detail and perceived closeness, you can also use a narrower pickup pattern, opt for a particularly bright and detailed-sounding microphone, perhaps with a small and light diaphragm, or boost the high frequencies to enhance detail further.
7. Perspective (How big is the distance between the foreground and the background?)
Figure 12: The ratio in distance between the closest sound source and the furthest sound source greatly alters the microphone’s perspective on the scene. This principle can be put to good use to make a division in roles between instruments, even when you are recording only one at a time. If you overdub a part that’s meant to fulfil a supporting role, try placing it further in the back of the room than you would a lead instrument—just as you would if you were recording it together with the main instruments.
8. Direction (How bright does a source sound? Is it aimed straight at you?)
Figure 13: Brightness depends slightly on microphone distance, but even more strongly on how a source the source angled in relation to the microphone. Most instruments radiate with higher directivity at high frequencies, as opposed to low frequencies, which bend around objects more easily. In the example on the right, the bass radiates most of its high frequencies away from the listener, thus sounding duller compared to the acoustic guitar than in the example on the left.
9. Focus (What is the ratio between direct sound and reflected sound?)
Figure 14: The ratio between the direct sound and the reflected sound from the space determines how “in focus” you perceive the sound to be—and also how far away it sounds. If you hear more reflections than direct sound the source appears to be more spread out and diffuse, while if you hear mainly direct sound, you are able to pinpoint its location and details more exactly. In a larger room, the source can actually be further away and still sound in focus, because the reflections arrive later than in a small space, as they have to travel a greater to and from the walls. You can also make the acoustics of a space drier by applying absorption, which weakens reflections and brings sounds more in focus. As always, there is a trade-off. You lose some perspective this way—just like increasing the depth of field on a photo camera. The bigger the area that’s in focus, the less depth you perceive. This is closely related to domain #1.
Because some of these domains interact, they can cooperate or conflict with one another—depending on the effect you’re after. Therefore, the “ideal” microphone position could be defined as the compromise between these domains that best suits your production goals.
For instance, if you want to record softly whispering vocals, you might sacrifice both perspective and the voice’s chest resonance in order to gain an enormous amount of detail. By placing the microphone extremely close you can give the recording a very intimate character. To create a compelling sonic picture, these domains should act in harmony from instrument to instrument. If the focal needs to be on a bright and big sounding foreground, it helps if smaller sound sources are more out of focus and fall deeper into the background.
It is very difficult to achieve opposite goals at once across these domains— having an element in the background sound in focus, for instance, or having a physically big source play very softly sounding small, or placing a sound very close to the listener without emphasizing its details. You need a very good reason (a.k.a. the story you want to tell needs it) to undertake such challenges; otherwise your audience just gets confused about what you are trying to achieve, and you end up chasing your own tail along the way.
Planning Proportions
Houses don’t get built by randomly pouring some concrete, seeing where it lands and then deciding where a wall will fit best. You need a building plan, otherwise you may run into unforeseen problems halfway through the build.
Recording music is no different in this regard. Sure, you don’t need to know the color of the window frames before you start building, but a rough idea of the desired proportions and perspective of each musical component is needed before you start putting microphones everywhere.
You need to establish what it is you’re aiming for in order to judge if a particular approach is working. An instrument that sounds fine on its own can completely miss the mark when you place it inside of a larger musical structure. A good recording plan is comprised of a few physical parameters:
– Instrumentation (From the recording engineer’s perspective, this is usually a given.)
– Recording space (This is also usually a given, though sometimes you’re able to choose one.)
– Positioning of the instruments and microphones in the recording space (This is where a good recording engineer’s input is most valuable)
Positioning means placing the instruments and the microphone(s) in the recording space so that suitable proportions are formed. It doesn’t really matter if you are recording everything at the same time or are doing overdubs. Either way, the plan for the proportions of each element remains the same. The proportions define how the different musical components relate to one other in the mix.
A vocal that is proportioned so that it easily surpasses a heavy band tells a completely different story than a vocal that has to fight a band to maintain its sonic space. The role big-sounding drums play in your story is automatically more of a leading one, while small-sounding drums fulfill a more supportive role.
You, as the recording engineer, can help modify and determine these roles to better tell the story of the song. Of course you’re free to modify reality a bit, when the story calls for it. You can simulate a bigger space than the one you’re recording in, or go for an unnatural perspective (such as in figure 15). The results of your manipulations of instruments and microphones within a space can be quite convincing, especially when you know what you’re aiming for when positioning each microphone.
If the goal is to simulate a bigger space, then it’s no use recording much of the reflections of a small recording room, as they will tend to make the end result sound like a small room with reverb added on top. And if you want to enhance a particular detail in a given sound, then you’ll need to position a microphone to pick up plenty of that detail relative to the rest of that sound.
Figure 15: The same piece of music can tell a completely different story if you position and proportion the instrumentation differently.
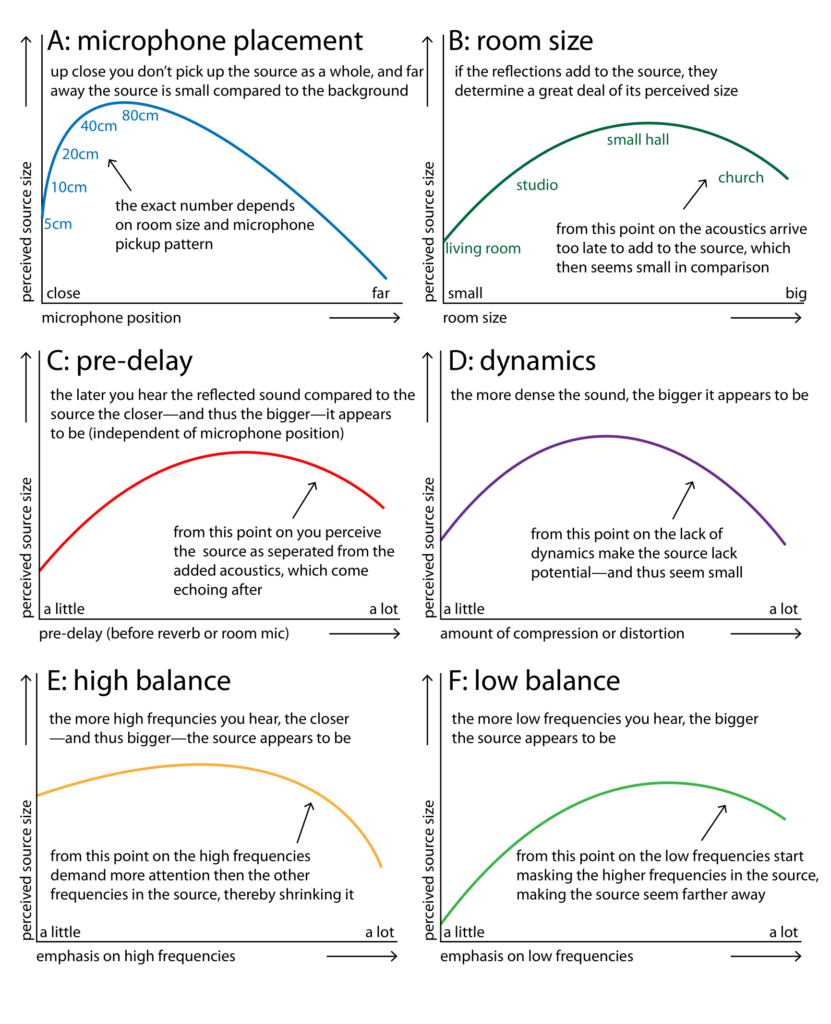
Your recording plan should aim to define how big each of the various instruments should be in the overall picture, and how detailed, close up or far away they should be. Be aware that in addition to microphone positioning, the frequency response and dynamic range of a sound can influence its perceived size, distance and detail. For instance, if a sound is harmonically more dense and it “eats up” more space from other sounds, I will seem bigger. If a sound has a lot of low frequencies it will also seem bigger, and if it has a lot of high frequencies it seems closer—and therefore also bigger.
Dynamics can also affect the perceived size of an element. If a sound is very dynamic it is will sometimes be drowned out by other sounds—and thus seem small. On the other end of the spectrum, if it has no dynamics at all, it can seem “impotent”—which is just another word for “small”. Figure 16 lists a number of properties you can use to influence the apparent size of a sound source. Note that almost every property features a turning point beyond which the sound starts to shrink again.
Figure 16: Different properties that influence how big a sound is perceived in the context of a mix.
Wessel Oltheten is a producer and engineer who lives and works in the Netherlands. He is the author of the new book Mixing with Impact.
Please note: When you buy products through links on this page, we may earn an affiliate commission.







[…] microphones everywhere so you always have “something to work with”. Read part 1 and part 2 at […]