New Software Review: DeEss by SSL
Sibilance is the bane of many mixers’ existence. We’ve all toed the line between curing a problem and killing the vibe of a track. Unfortunately, setting a threshold to address all offending issues is oftentimes akin to taking a machete to the track. However, SSL’s DeEss plugin helps solve one of the biggest problems I’ve had with de-essing. Within this new plugin is a Relative Threshold Algorithm that allows the user to “…change the input level of the signal without a destructive effect on the response of the de-esser.” In other words, it’s possible to de-ess quiet sibilant events just as effectively as loud ones. Although they’re not the first to implement something like this, it’s a game-changing concept. Let’s see how SSL pulls it off below.
Features
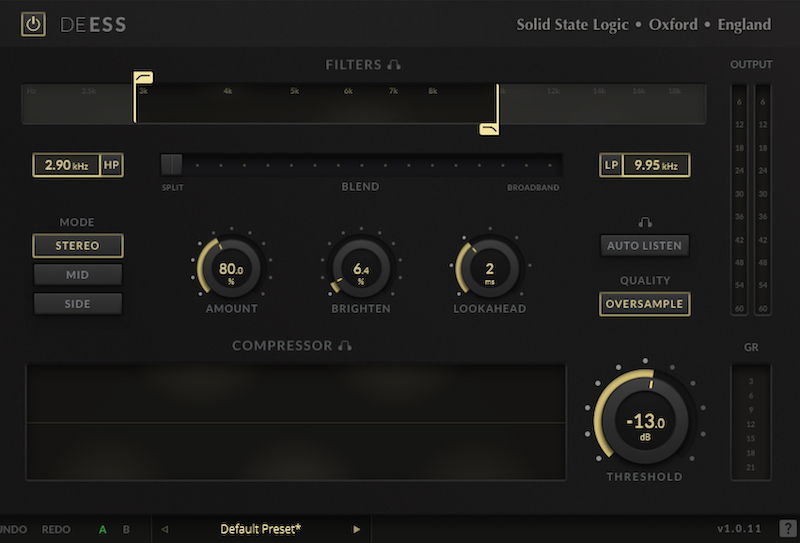
The top of the plugin features an FFT graph with a set of HP/LP filters. Windows below show the frequency assigned to a particular filter. Between the two is the blend control, which allows any mix of the filtered area to broadband in effect. There are three available modes: Stereo, Mid, and Side. There are also three rotary knobs used to control the amount, to brighten, and to look ahead. The ability to look ahead combined with the option of oversampling provides higher quality audio output. Additional meters for output as well as for gain reduction are available. And there’s a Multi-Shade Waveform Visualizer showing how much of the waveform is being affected (in three separate degrees) as you adjust the threshold knob located to its right.
Another great feature within DeEss is the Auto Listen button, which when engaged, turns on audition mode for both the filter and compressor while you’re adjusting relevant parameters. As is standard, SSL provides undo/redo and A/B buttons too. Furthermore, there are a group of presets for tenor, alto, and soprano voices as well as stringed instruments, cymbals, and mixbuss, all of which provide a great starting point. Lastly, the “?” allows you to toggle on descriptions of controls as you hover over them.
In Use
Starting with the filter section, I found the easiest way to set parameters was to press the filters label, which has a headphone icon beside it. This allowed me to audition the detector circuit and quickly set the filter range that was required. No guesswork; just listen and adjust the filter tabs overlying the FFT graphic. The boxes below indicate the frequency chosen but can also be used as the control mechanism opposed to the filter tabs. Personally, I found that tabs were easier. The filters can be easily toggled on/off by the filter name tag in the box.
From there, I set my threshold and could see in the Compression History Graph a three-shaded representation of the audio being compressed. The gray waveforms are unaffected where light yellow represents less than 6 dB of compression and the brighter shade above 6 dB. You can audition the compression to gain a deeper understanding of how well you are addressing sibilance by clicking on the compressor label with the headphone icon. Now you can tweak even further using the Amount knob and the Blend slider. I found that setting the amount to 80% felt more natural and present while still adequately addressing any sibilance. The Blend slider allows for a balance between broadband de-essing and “Split”, which strictly filters the sidechain as per the control settings. In the end, I found I preferred the sound and feel of pure Split mode and an amount of 80% for the vocal I was de-essing.
Once I set the filters and compression, I used a little of the “Brighten” knob, and I do mean a little–only around 6.4%. This can be like salt spoiling the food, so go easy. The frequencies boosted are those above the filter cutoff point, which means it will change settings internally based on the filter settings. The overall quality of the sound is also greatly affected by using the “Lookahead” and “Oversampling” modes. A 2 ms lookahead added along with oversample made the track really shine. (Too much lookahead, not so much.)
I also tried DeEss on cymbals using the DeHarsh preset provided. When I was done, it sort of felt as if the overheads had been tracked on tape, as they had a smoother sound with the “Oversample” mode enabled. Get a taste of what I mean by checking out the audio example below.
Summing it Up
I found that just diving in and working the knobs was quite easy with this plugin, but you owe it to yourself to get a full understanding of what is truly possible with DeEss. Uncle Ben told Peter Parker that “with great power comes great responsibility” and this is a very powerful plugin capable of delivering a high-end sound which can feel extremely natural or not if you overdo it. Sonically, SSL has once again delivered a tool that I think many of us will find essential in our workflow.
Rick Slater is a NYC area mixer/engineer, producer, writer, and educator.
Please note: When you buy products through links on this page, we may earn an affiliate commission.


