Game Audio, Level 2: Get in the Game—Implementing Audio In Unity
In our last sojourn into game audio we covered some of the basics to bring you up to speed on how sound in games works in general, as well as taking you through how an audio asset gets designed and ready to be put into a game.
Now, we’ll actually walk you through putting your own sounds into a game built using the powerful and popular Unity3D game engine, in one of our most popular game audio lessons, “The Mysterious Warehouse”.
The Mysterious Warehouse is a training game that we use all the time in our classes. It’s a fully-playable puzzle escape game that has been specifically configured to teach specific game sound concepts, such as creating layered musical soundtracks that increase in intensity over time, ambient room design, footsteps and much more.
In this article, we’ll begin to show you how the Unity game engine thinks about sound.
Simply reading this article will give you a great handle on how the fundamentals of game audio really work in practice. But if you want to implement these steps right away in a real game environment, you can click here to purchase the student version of the Mysterious Warehouse lesson and go through these steps yourself. (Teachers can click here for an educator’s version.) To provide an added incentive for you to dig in and give it a try first hand, we are offering a coupon discount of 50% on the Student or Teacher version price. Simply apply the code ‘gai-ss50-2019’ at checkout.
If you do decide to follow along, just download the ZIP file from the GAI site, uncompress the top level ZIP file, as well as the Zip file inside of it. (Make sure you can see the folder labeled ‘MysteriousWarehouse2.0-UA-Student’ inside the uncompressed main unzipped folder before moving on. PC users may want to use the free 7-Zip utility to more accurately unzip these files.) You’ll also want to download the free Unity game engine, and select the 2017.4 version, as shown below.
For this lesson, we’re using the 2017.4 version, as shown down below. Just choose your desired platform and then download and install Unity.
If you’re completely new to the Unity game engine, click here for a free guide we’ve created on the basics of Unity. There are also lots of great tutorials available directly from the Unity website.
Finally, if you’re playing along at home, you’ll need to find or create a looping piece of music or room ambience that is around 30 seconds in length, as well and a short beep-like sound effect, around 1 or 2 seconds. These files should be saved as 16-bit WAV files at 44.1k.
Getting Started With Game Audio
OK, let’s say you’ve created your sounds, installed Unity, have the Mysterious Warehouse Game Lesson loaded up, and are ready to dive into implementing it into the game. Let’s get started!
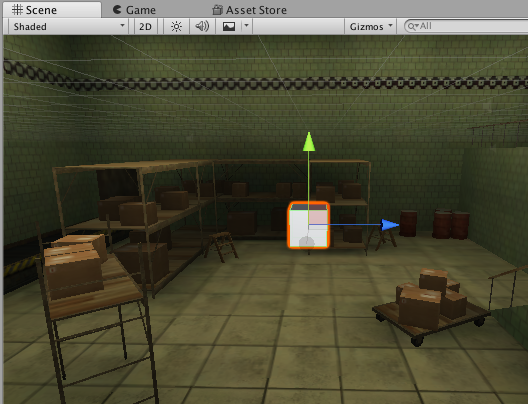
Our first step is to open up the Mysterious Warehouse game in Unity and navigate over to the loading area in the tiled room. (If you don’t see anything, be sure you’ve opened up the Scene labeled ‘warehouse-student’.) From here, we’re going to create a simple test object to play our sound. Go to the GameObject menu, select 3D Object and then Cube.
When you do this, a Cube object will be created in the area you are in, as shown below. (You may have to move it with the cursor tools to view it fully.)
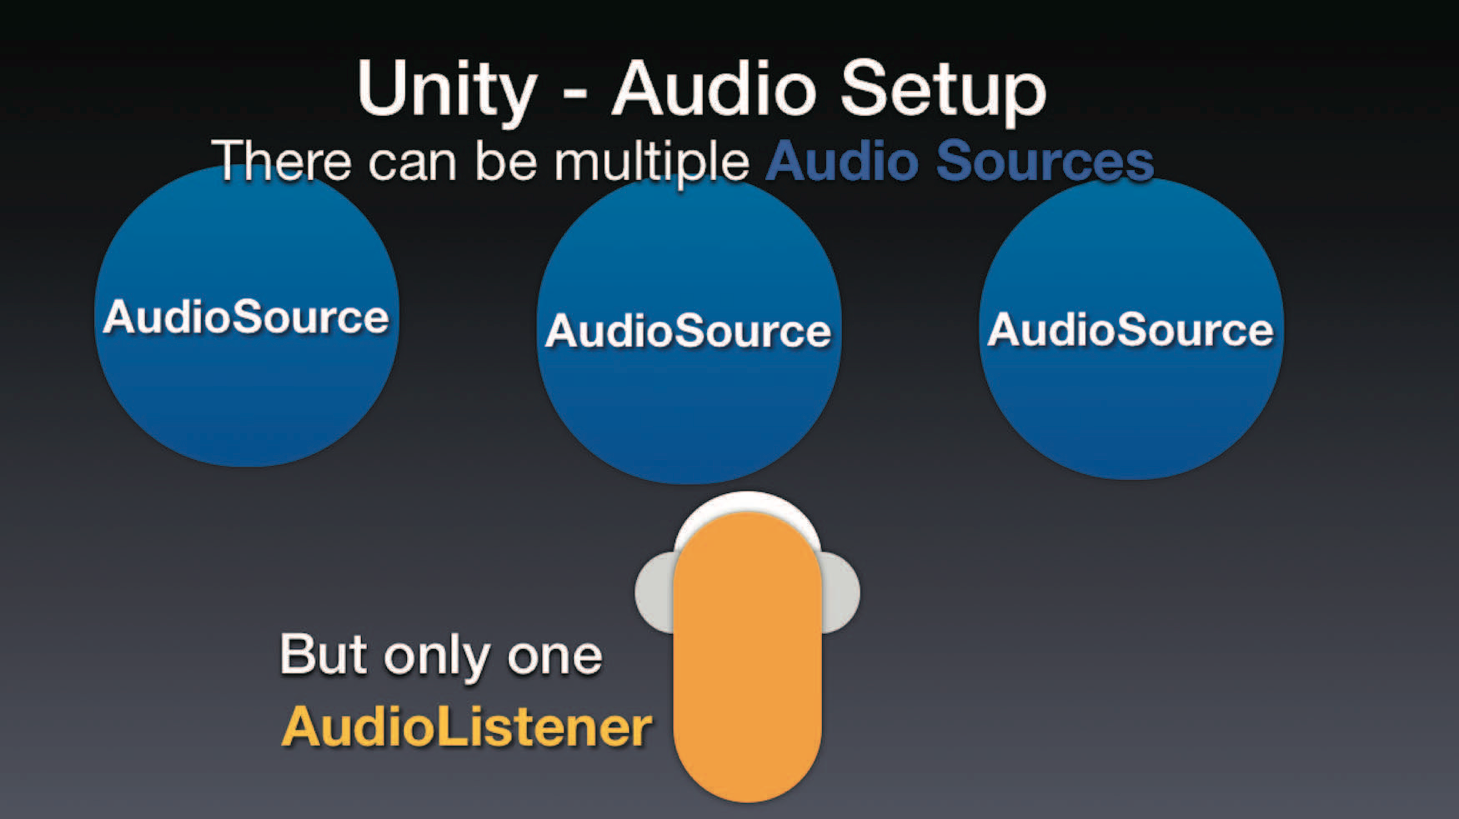
Now for the sound! Unity uses what it calls “Components” to add characteristics or behaviors to any of the Game Objects. To play a sound you normally need two Components: The Audio Source and the Audio Listener.
Introducing the Audio Listener
You can think of the Audio Listener as something like an avatar for your ears inside the game space. Every time you move around inside the game’s 3D space, your position is updated, and any audio data is passed to the Listener. It acts as a microphone of sorts within the game world, and its main role is to mix the sounds coming at it via Audio Sources from different distances and directions.
Although you can easily create a Listener Component, you should first always check to make absolutely sure there isn’t already a Listener Component already implemented. This is very important because Unity only supports one Listener Component in the scene at a time. So make sure there isn’t one already working, or you can definitely get into issues with multiple Audio Listeners in a single scene!
One of the most common GameObjects where you will find an Audio Listener attached is the Main Camera.
You can look for this in the Hierarchy on the left side of the window. In the Search field in the upper right, type: “Main Camera”. This will show the Main Camera object and its Components and grey out anything that doesn’t match. Click on the Main Camera object and you will see an Audio Listener Component. It’s not anything fancy, and you can’t configure it much, but it’s vitally important that it’s there.
Because there already is an Audio Listener present in this Scene, we don’t need another one. Let’s move on to the next Component, The Audio Source.
Audio Source
This is the most important audio-related Component you need for hearing audio playback in Unity. As the name implies, it is a source of audio. It plays back audio along two signal paths at the same time – a 2D path, which has no attenuation based on distance or direction (aka “azimuth”), and a 3D path where both distance and direction are factored into the audio signal, based on the position of the Audio Listener. It can also freely mix between these two paths in-game. Unity can support as many Audio Sources in a game as the hardware can handle, but usually defaults to 32.
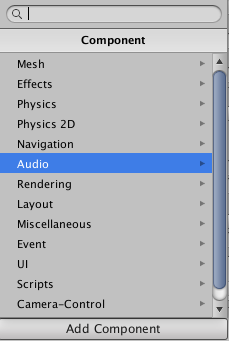
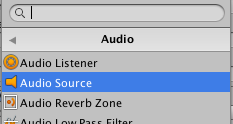
To add an AudioSource Component in this example, we can click on the Cube object we created in either the Scene itself, or the Hierarchy menu to select it. On the right side of the screen is the “Inspector” window, where you can scroll down until you see an Add Component button. Clicking it yields a popup menu like this:
Simply double-clicking “Audio Source” from this in popup menu will add it to the object you’ve selected.
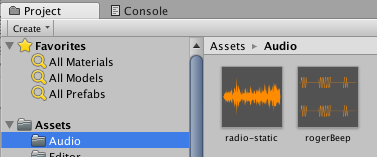
Let’s get a sound in here to play shall we? First, let’s keep things organized by creating a new folder to put our sounds in. In the Project section lower down on the screen, you’ll find an Assets folder. You can right click on it, select Create from the menu and then New Folder. Name it something super-interesting like “Audio” and press Return or Enter.
Now go find the sounds you created or appropriated and simply drag them into it. Here’s my example:
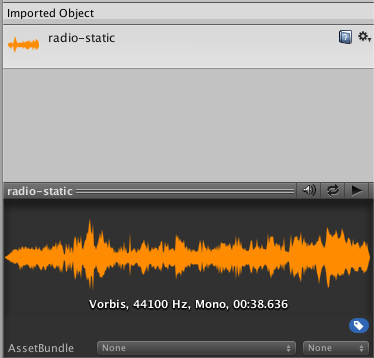
Once you’ve done this, your audio files are considered by Unity to be “AudioClip assets”. You can play these back inside Unity using the Inspector toward the bottom right in the Preview section.
Note that Unity has automatically converted this file into a compressed Ogg Vorbis file to save space. Now we have something we can use in our AudioSource Component. Click again on the Cube object you created and look at the AudioSource Component at the top:
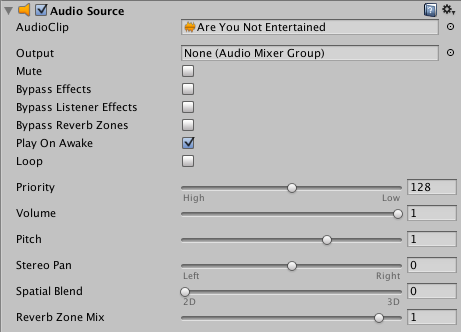
We’ll need to drag the AudioClip you just imported over the AudioClip field where it says None (AudioClip). You should see something like this when complete:
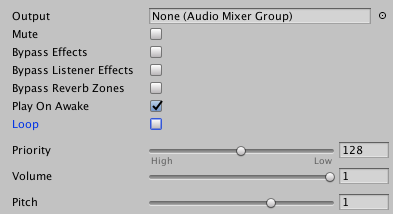
Let’s go over a few more of the basic settings in the Audio Source, so you know what is available.
Output
The Output area is for adding a “Mixer” asset to add further flexibility for mix routing in Unity. The Mixer is one of the newer and most exciting features in Unity, but for now we’ll leave this alone for a moment and just use the Listener as our master mixer output.
Mute
Mute temporarily mutes the sound. Mute can be useful when you need to isolate a particular sound from others. We’ll leave this setting alone as well.
Bypass Effects / Bypass Listener Effects / Bypass Reverb Zones
We’re going to skip these for this basic tutorial.
Play On Awake
The “Play On Awake” setting immediately plays the sound as soon as the scene is loaded. This setting is useful for ambience sounds or music loops. Turn (or leave) this option on.
Loop
The Loop setting, intuitively enough, causes the Audio Source to loop continuously, so it is useful for background sounds like ambiences or music. Turn this option on.
Priority
Priority allows you to rank sounds according to their importance. We’ll skip this one for now as well.
Volume
Volume is the maximum volume the Audio Source will have: 1 is the highest volume possible, and 0 mutes the sound.
Pitch
The Pitch control is like a record speed control. Effectively, it adjusts the playback speed of a sound. Because speed and pitch are linked, a faster speed (above 1.0) creates a higher pitch with a shorter length, while a lower number (below 1.0) creates a lower pitch with a longer length.
Testing the Sound
As long as you have Play On Awake enabled, we’re ready to play our sound in the scene. One last thing to check: In the Hierarchy menu, we’ll open up the WarehouseLevel object and click to select the WarehouseManager object.
Next, check the Warehouse Manager script in the Inspector for this object, and make sure that Showtime is disabled on it as shown. With Showtime disabled the scene will play back in a way that will help us test the sound more easily.
Manipulating Sound in Unity
Alright, to play the scene—and your sound—find the Playback arrow at the top center of the main window in the center and click on it. This will play your Scene, and since we have “Play on Awake” selected, your sound should play almost immediately.
Congratulations! You have successfully managed to play a sound inside of a game. Now let’s keep going and look at the 3D side of things.
We’ll select Cube object once again and talk a little bit about how 3D audio works in Unity by looking a bit further at the Audio Source controls.
The most important control to look at here is the Spatial Blend. What this does is maintain a constant balance between a 2D signal path, at the far left, and a 3D signal path at the far right. Anywhere in between is a mix between these two paths.
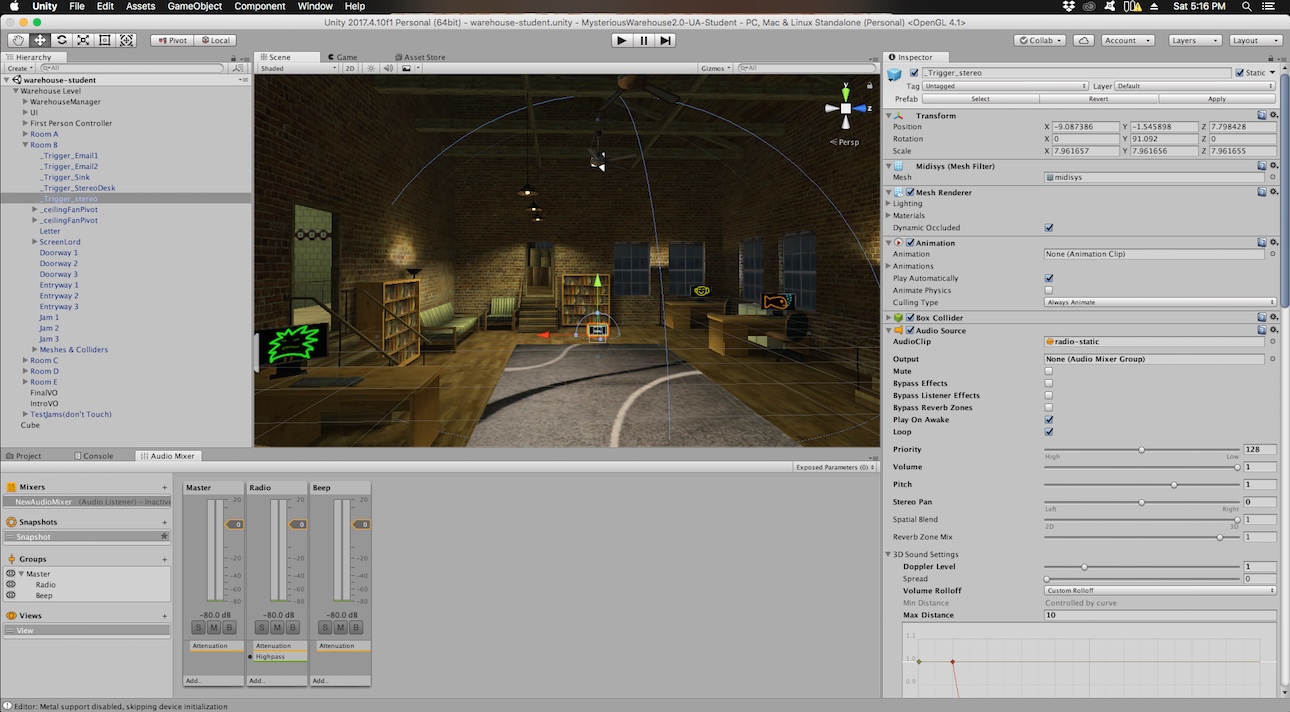
Let’s set up an Audio Source on an existing game object to test out what we can do with a sound in 3D mode. Under the WarehouseLevel ->Room B object in the Hierarchy, there’s an object called a _Trigger_stereo we can use.
We can add an Audio Source to this object in exactly the same as before (Add Component Button->Audio->Audio Source). We’re going to make two changes however. First on the Spatial Blend, we’ll move the control to full 3D, and second, we’ll make sure that the “Loop” option is turned on. For the AudioClip, find a music loop or perhaps an old radio show. Drag it to the Audio Clip field as we did before. Now let’s take a look at Unity’s 3D options under Sound Settings:
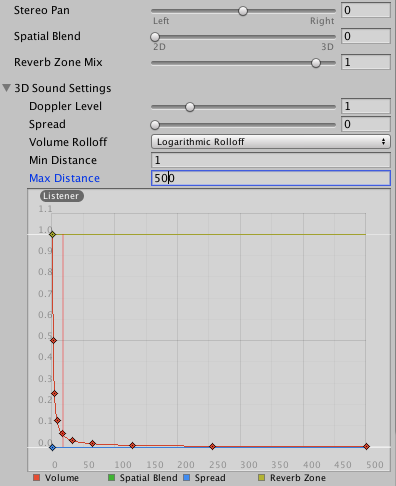
The two controls that are most important to keep track of are the Max and Min Distances. Doppler and Spread are nice features to have, but are not needed at the moment.
Min and Max Distance
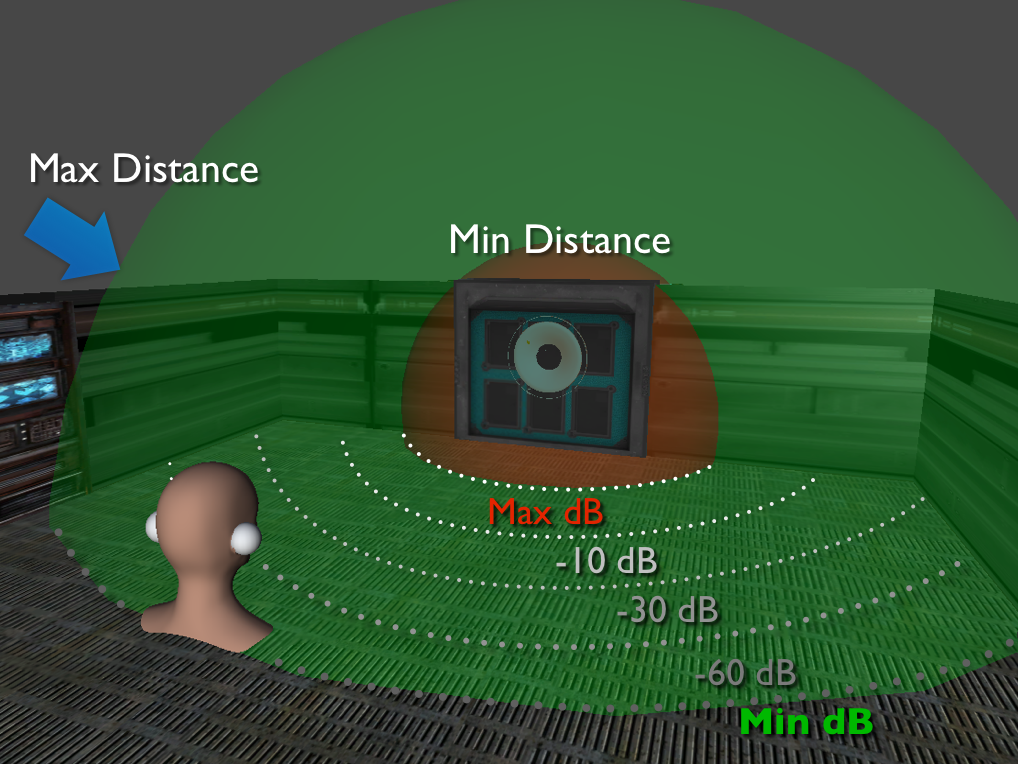
An Audio Source in Unity, just like a real-life source, emanates audio in a spherical shape. As the shape grows in size, it loses its intensity (or amplitude) by a formula called the “Inverse Square Law”. At some point, the sound is effectively so quiet that it isn’t heard anymore.
That point is similar—though not necessarily identical—to a setting called the Max Distance. Going further outwards past this point, the sound stops reducing in volume or attenuating. However, it doesn’t automatically mean the sound will cut out, as we’ll see.
Similarly, the sound increases in volume as you get closer to the source, and at some point, you cannot effectively get any closer to the Audio Source. This is called the Min Distance, and it is the loudest the sound can possibly get. Think of it as a gate in front of the speakers at the front of the stage at a large rock concert.
Both Min and Max Distance can be manually set in the Inspector, or by adjusting the size of two concentric spheres. The inside sphere is the Min Distance and the Max Distance is the outside sphere.
How quickly or slowly the sound changes between the Min Distance to Max Distance is determined by the Rolloff curve in the graphic settings window.
Volume Rolloff
The rolloff mode for your object’s audio is indicated by a graph with a line. The line can be set to a preset mode, or it can be adjusted manually to create a custom curve. This graph can be used to control many other settings both on the Audio Source itself, as well as any extra added Filter Components.
For Volume Rolloff there are three preset modes:
Logarithmic Rolloff (left), is the default setting and can adjust the sound’s intensity most naturally in terms of distance from the Audio Source, though sounds can fall off quickly in volume using this type of curve. Interestingly, due to calculations, the curve does not actually reach zero. We’ll see later on that this can create problems.
Linear Rolloff (center) draws a diagonal line. This setting may be useful if a sound is important in the game and needs to be heard from a further distance away.
Custom Rolloff (right) allows you to customize the slope to your own taste.
Upon examination of the settings in your default Audio Source settings, you’ll see that the Min Distance is 1 and Max Distance is 500.
How Is Distance Measured in Unity?
That brings up an interesting point—how is distance measured in Unity? Here’s a quick answer: Each number is one Game Unit. The actual distance of a Game Unit can be determined in the Project Settings. By default, this is set at 1 meter, which means that the Cube object you created is 1 meter on each side. So this means that your Min Distance is 1 meter and your Max Distance is 500 meters! (That’s around 1,600 feet for us in the United States.) For this purpose, let’s set it to something more useful like 10 meters, or a bit more than 30 feet.
Unity’s Audio Mixer
Before we end this article, we should talk about the best way to mix sounds and music inside Unity, and that’s with the aid of Unity’s Audio Mixer Asset. This has made the act of mixing in Unity tremendously easier to manage than it was in the past. Let’s take a look at a basic overview of the system.
In effect, the Mixer stands between the Audio Source and the Audio Listener. Remember that the Listener has a 3D output bus and 2D output bus, and that the Spatial Blend control on each Audio Source regulates how much of each is in its final balance. This split signal cannot be further rebalanced from the mixer, and when a signal leaves the Mixer, the 2D and 3D sources are mixed together at Unity’s main output according to the proportion set on each Audio Source.
Creating a Mixer
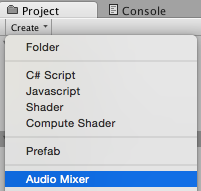
To create a Mixer asset, we’ll click the “Create” button under the Project menu and select “Audio Mixer”.
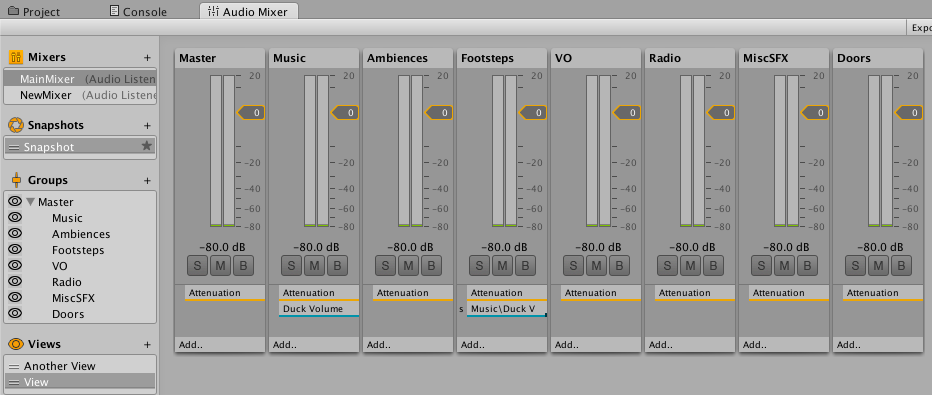
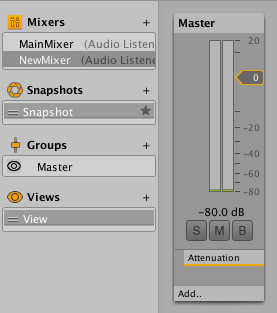
By default Unity will name the created Mixer object NewAudioMixer. We’re renaming this one NewMixer. To see the new Audio Mixer’s contents, you can go to the Window menu and choose Audio Mixer. By default, the window will open as an extra tab near the Project tab. (You can of course, position this tab wherever you like.) Here’s what you’ll see:
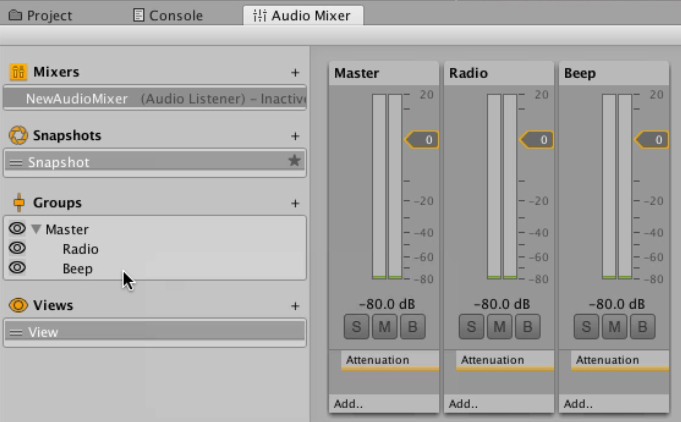
Now, we need to create channels for the Audio Mixer. Unity calls these channels Audio Mixer Groups. You can create these by clicking the plus sign on the upper-right corner of the Groups area on the far left. Here’s what you get when you do this:
Let’s rename this group “Radio”. Now look at the area just to the left of the names in this area. These eye icon to the left of each group sets the visibility of that item in the mixer window. Click on these to toggle the visibility of that item on or off in the mixer.
Now, we’ll click on the Master object and click the plus sign again to create another Audio Mixer Group at the same level. Name this one “Beep”.
(Note: If you were to click the plus sign while the Radio Group was selected instead, you will make a new sub-group below that, and we don’t want that.)
The Mixer should look like this when finished:
Now we have to configure our Audio Source components to actually make use of these new Audio Mixer groups!
First, we’ll tackle the “Beep” sound. You can select the Cube object and look at the Audio Source’s Output setting once again, found just below the AudioClip’s name:
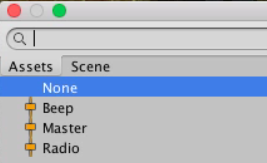
Clicking on the dot on the far right of the Output field select the appropriate Audio Mixer Group. A separate window will pop up, allowing us to select the audio mixer group we want to route it through:
We’ll select the Beep Group from the list of Mixer Groups, and then go t through the same processfor the ‘_Trigger_stereo’ object.
At this point, both of your object’s Audio Sources will be configured to use their assigned Audio Mixer Groups rather than just going directly to the Audio Listener.
Let take a quick look at the Radio Group to see what a typical Audio Mixer Group looks like:
Since you’ve likely had some experience with DAWs already, you probably recognize the controls—there’s a fader (called “Attenuation” here, as it can only be used to reduce the level) a meter to view levels, and the familiar Solo and Mute buttons. The “B” button actually bypasses the effect on that Group.
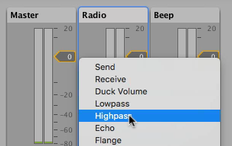
Yes, you read that right: Unity’s Mixer can load effects—though it can’t load standard audio plugin types like you can in a typical DAW. To add effects, click and hold the Add button and scroll through the popup menu to add an effect:
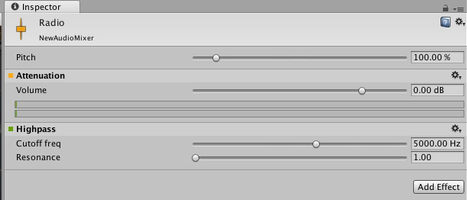
For this example, we’ll choose the Highpass option. Once you’ve added an effect, you’ll see that the controls for it appear just under the Attenuation label in the audio mixer. In other words, this effect is Post Fader. Adjust this to the desired level.
Now we can play our scene again, and this time, we’ll hear that our radio will sound a bit more tinny and thin. During the Scene playback, you should also notice the button on the Mixer tab labelled Edit In Play Mode. Clicking this will allow you to edit any of the Mixer’s settings live inside the game—a very useful option so you can really dial in your sounds.
Summing it Up
OK, that’s an overview of the process of implementing sound in a Unity game. Keep in mind that the methods described above are just a couple of common approaches, and they do not apply precisely to every game development situation or engine.
For a video covering all of the tasks we just ran through, within the game environment itself, see below:
In our next article we’ll take a closer look at some popular middleware programs like FMOD and Wwise. Meanwhile…
Find out more about GAI below and register for the hands-on summer intensive workshop at San Francisco State University June 25-28th, 2019. We get much deeper into all this stuff, but hurry as seats are limited and fill up fast!
We started the Game Audio Institute based on our experience in the industry and the classroom, where we have been developing curriculum and teaching both graduate and undergraduate courses. To really get involved with the game audio industry these days, it is essential that you understand what’s under the hood of a game engine, and be able to speak the language of game design and implementation. You don’t have to be programmer (although that can’t hurt) but a general understanding of how games work is a must.
Unfortunately, all too often these days, people are missing out on developing a solid foundation in their understanding of interactive sound and music design. The GAI approach is fundamentally different. We want composers, sound designers, producers and audio professionals of all kinds to be familiar and comfortable with the very unique workflow associated with sound for games and interactive environments. We have many resources available for budding game audio adventurers to learn the craft, some of which we’ll be using in this series. To find out more about our Summer Hands-On Game Audio Intensive Workshop, Online Course, Unity Game Lessons or our book, just click over to our website gameaudioinstitute.com.
Steve Horowitz is a creator of odd but highly accessible sounds and a diverse and prolific musician. Perhaps best known as a composer and producer for his original soundtrack to the Academy Award-nominated film “Super Size Me”, Steve is also a noted expert in the field of sound for games. Since 1991, he has literally worked on hundreds of titles during his eighteen year tenure as audio director for Nickelodeon Digital, where he has had the privilege of working on projects that garnered both Webby and Broadcast Design awards. Horowitz also has a Grammy Award in recognition of his engineering work on the multi-artist release, True Life Blues: The Songs of Bill Monroe [Sugar Hill] ‘Best Bluegrass Album’ (1996) and teaches at San Francisco State University.
Scott Looney is a passionate artist, soundsmith, educator, and curriculum developer who has been helping students understand the basic concepts and practices behind the creation of content for interactive media and games for over ten years. He pioneered interactive online audio courses for the Academy Of Art University, and has also taught at Ex’pression College, Cogswell College, Pyramind Training, San Francisco City College, and San Francisco State University. He has created compelling sounds for audiences, game developers and ad agencies alike across a broad spectrum of genres and styles, from contemporary music to experimental noise. In addition to his work in game audio and education, he is currently researching procedural and generative sound applications in games, and mastering the art of code.
Please note: When you buy products through links on this page, we may earn an affiliate commission.


