13 Common Vocal Mixing Mistakes and How To Avoid Them

Avoid these 13 common mistakes to ensure your vocal mixes always sound at least as good as the singer does. (And maybe even better.)
Vocals are the most important part of your mix. The vocals sell the music. Whether they’re a seasoned pro or your tone deaf aunt, everyone listens to the vocals.
When you focus your mixing energy on the vocals, you are focusing on the one part of the mix that every listener is guaranteed to hear.
Of course, good vocal production starts well before the mixing phase. It even starts before the recording phase, with good preparation and pre-production.
It would be fair to say that at least 80% of good vocal production comes down to the quality of the performance and the recording. But it’s your job as a mixer is to take that already great-sounding vocal and mold it to perfection.
Unfortunately, everything can all-too-easily go wrong in that final 20%. And I see new mixers make the same mistakes over and over again.
Today, we’ll look at 13 of the biggest vocal mixing mistakes that I regularly see my students make (and how to avoid them) so that you can produce vocals that sound professional, expensive and impressive.
Mistake 1: Not Sufficiently Controlling Dynamics
By nature, vocals have a large dynamic range. A vocalist can go from a whisper to a shout in a matter of seconds within a single song.
Because of this, vocals need a lot of dynamic processing. This is often done in several stages, and with a variety of tools. It’s not uncommon to see three or more stages of compression, volume automation by the word or syllable, and even a touch of brickwall limiting.
If you fail to sufficiently control the dynamics of the vocals, they will never quite sit right in the mix. If you find that the vocals suddenly go from sounding too low in the mix to too loud, then you need to apply more dynamic processing. Vocals with wildly uncontrolled dynamics are a hallmark sign of an amateur mix engineer.
Lighter genres that make a point of maintaining dynamics, like jazz and acoustic styles, are an exception to this rule. But even there, a gentle touch of dynamic range control is often warranted.
Mistake 2: Using Too-Fast Attack Times
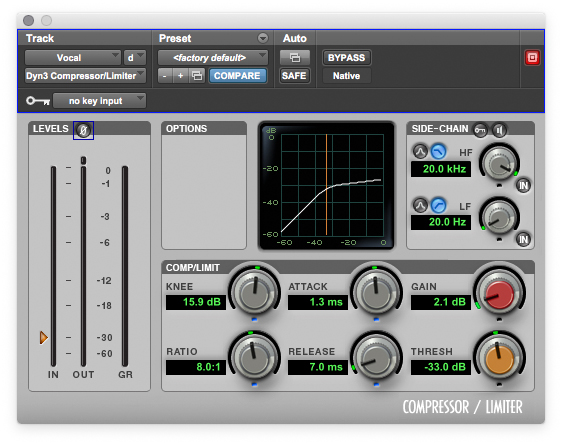
By using too fast of an attack time when compressing vocals, you are cutting off the transients and losing the attack and articulation of the words. This has the effect of placing the vocal further back in the mix.
With lead vocals, this is bad. Generally, you want the lead vocal to be right in the listener’s face.
On the other hand, using a fast attack time on backing vocals is a great way to set them further back in the mix and stop them from stealing attention from the lead vocals.
I rarely use an attack time below 5ms for most of my gain reduction when working with lead vocals, and some would argue that even that is too fast for many performances.
The exception to this rule is if you are working with a particularly aggressive vocalist, and you want to make them sound smoother or if you have a particularly dynamic vocalist.
In the latter case, fast attack times can help tame loud transients, and shouldn’t cause too much trouble as long as you aren’t overly aggressive aim for around 2dB of gain reduction or so at the most.
In this context, I recommend using a fast compressor to tame the transients followed by a slower compressor to add more control.
Mistake 3: Using Too Much Reverb for the Genre
The current trend in modern mainstream music has been for vocals that are fairly dry, and it has been this way since the 90’s.
Adding reverb to a sound source makes it sound further away from the listener. But in many styles of music, we want the vocals to be up at the forefront of the mix, right in the listener’s face.
Use delays to create a space around the vocals without putting them further back in the mix. Try a stereo slapback with a different delay time on the left and right, between 30 and 200ms delay on either side. Or, try adding a mono delay with a bit more feedback (around 15-20%) timed to the beat of the music.
For modern mainstream styles, you might use an extremely short stereo reverb on the vocals, as long as there is no noticeable reverb tail. This helps to add width and shimmer to the vocal without drawing attention to itself or having it take up too much space. Make sure it’s barely audible—you should only miss it when it’s gone.
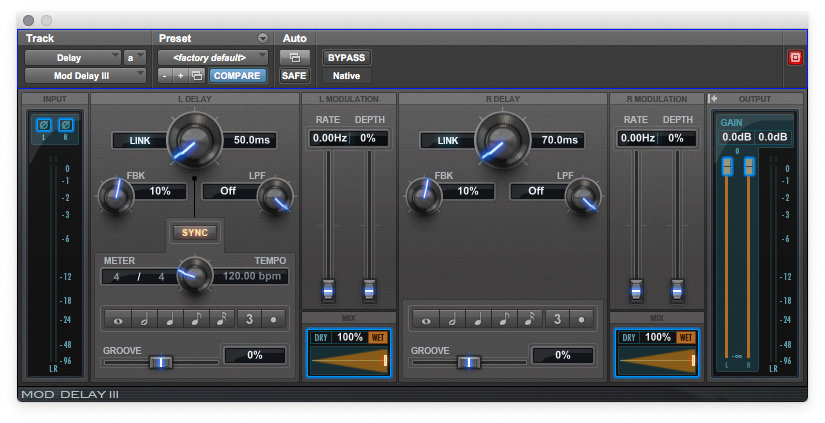
In lieu of reverb, try using a stereo slapback delay with different times on the left and right sides.
You can also try adding a gate sidechained to the vocal to cut off the reverb as soon as the vocals stop. Lastly, if you want a taste of reverb but don’t want it to sound too apparent, try adding a subtle reverb to the delay aux to make it sound a bit smoother.
Mistake 4: Applying Overly Aggressive EQ
You hear people talking every day. You know what a voice should sound like. As soon as you start applying drastic EQ curves to a vocal, it starts to sound odd and unnatural.
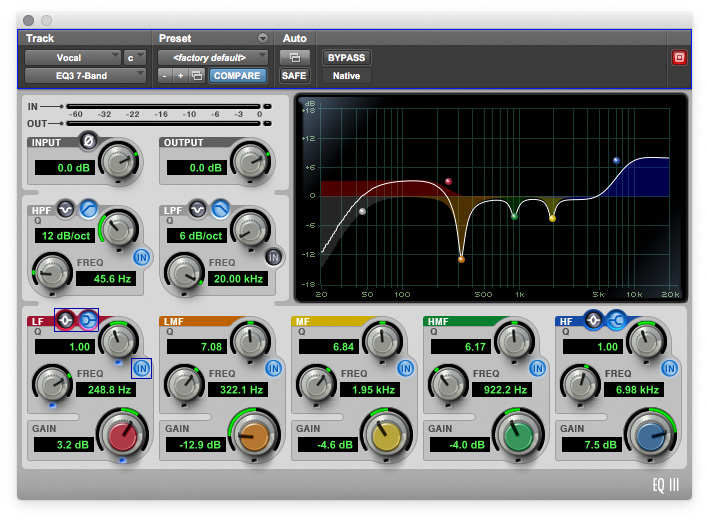
Unless you’re going for a special effect, keep your EQ moves subtle. A good guideline is to avoid boosting or cutting by more than 5dB. Instead, use microphone choice and placement to alter the tone of the vocal.
Exceptions to this rule are high pass filters, which can be set to make steep cuts to remove low end noise, and high shelf boosts, it’s common for many mix engineers to boost the top end quite aggressively.
Some engineers will make deeper, narrow cuts to remove room resonances, but if you’re EQ settings are starting to remind you of swiss cheese, it may be a sign that you’re pushing things further than they need to go if it’s a natural sounding vocal you’re after.
Mistake 5: Making One Compressor Do All the Work
Compressing in series is an easy way to control dynamics without making your vocals sound overcompressed. In the words of Dave Pensado, “Don’t try and make one thing do too much of the work”.
For most genres, I try to add 2-3dB of gain reduction each at three different points in the signal chain: During tracking (with an outboard compressor), before my main, tone-shaping EQ and after the EQ. (I’ll also use parallel compression on most mixes)
Everyone has their own method, but the outcome is agreed upon: Applying compression in several small chunks often sounds much more musical.
Mistake 6: Reducing Sibilance With EQ
Sibilance is a common issue when mixing vocals. Ideally, it would be addressed and reduced in the recording phase when possible. But oftentimes, we’ll need to help control it in the mix.
Attempting to reduce sibilance with EQ however, is a mistake, and one that many novices make.
Any tonal issues that aren’t static in nature should be addressed with multiband compression, not with static EQ. By cutting 5-7kHz to reduce sibilance, you are affecting the tone of the whole vocal. Why do that when you can just gently tap down on that area only when it becomes a problem?
Use multiband compression, dynamic EQ or a de-esser instead of a static EQ to tame those frequencies only when they become problematic and you’ll thank yourself for it.
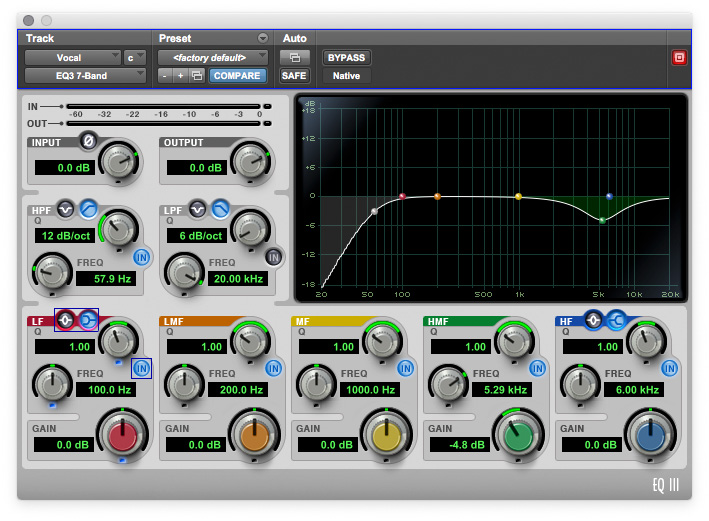
Don’t use EQ to reduce sibilance. A multiband compressor, de-esser or dynamic EQ can smooth out issues without sucking the life and sparkle from your track.
Mistake 7: Adding Effects Without Good Reason
For most mainstream styles, delay throws and spot effects can be great. They add interest and variation to the lead vocal, helping to keep the listener engaged.
But if you want to keep your, effects from sounding out-of-place, don’t add effects just for the sake of it.
Your job as a mix engineer isn’t to impress people with your mixing chops and bag of ticks. In fact, it’s the opposite: your mixing should be transparent, and work organically to support the music, rather than overshadow it.
Subtle effects, such as subtle chorusing or timed delays, work great across all styles—as long as they aren’t noticeable. You should always consider the style of music when applying effects. Which leads me to…
Mistake 8: Not Mixing to the Genre
Although there is a lot of crossover, most genres have a particular style of vocal mixing. Use reference mixes to help make sure you understand the genre of the music that you are mixing and also understand how that genre is generally mixed.
Here are some basic guidelines to get you started.
- Pop, R’n’B, Electronic: These styles share similar traits. In general, heavy processing is acceptable and often required. Lots of top-end shimmer, noticeable effects and highly consistent dynamics are the norm.
- Hip Hop: Similar to Pop, but with less effects and less top-end. More presence and aggression in the upper mids. (Though the most mainstream of Hip Hop often has top-end shimmer more akin to Pop).
- Rock: Less top-end, more body and high mids. Vocals can sit a bit further back in the mix.
- Jazz: Approach with subtlety and taste. Avoid obvious processing and leave the dynamics mostly intact.
- Hardcore/Metal: Heavy compression (several rounds of 6-10dB gain reduction can be warranted) to make the vocals sound aggressive. Less low end, more body and high mids.
Mistake 9: Not Using References
Some people can mix without a reference, but I’m not one of those people. Unless you have been mixing in the same room and with the same monitors for a long time, it’s essential to reference your mix at some point in the mixing process, even if it’s right at the end.
You can use different reference tracks for different parts of your mix. For instance, you might use one track to reference low end, and another to reference the vocal style. And, when talking with clients about tones, preferences and ideas, remember that references can often speak more clearly than words.
Mistake 10: Not Using Automation
Detailed automation can take some time, but it’s time well spent. Though you don’t need to go as far as him, Mutt Lange [AC/DC, Def Leppard, Lady Gaga, Muse, Shania Twain] has been known to spend a whole day just riding one vocal part.
Using a physical fader on a control surface or a single-fader device like the PreSonus Faderport can speed up the process significantly.
It’s usually not possible to control dynamics to perfection with compression and limiting alone.
To make vocals sound modern and professional, you need to make them as dynamically consistent as possible. Modern standards of professional production require crazy levels of perfection and consistency in the vocal.
Chris Lord-Alge says “With the vocals you’re chasing the faders to get them really in your face. It’s all about automation”.
If you’re chasing a modern “pop” aesthetic , then not using automation is a crucial error that I see most novices make.
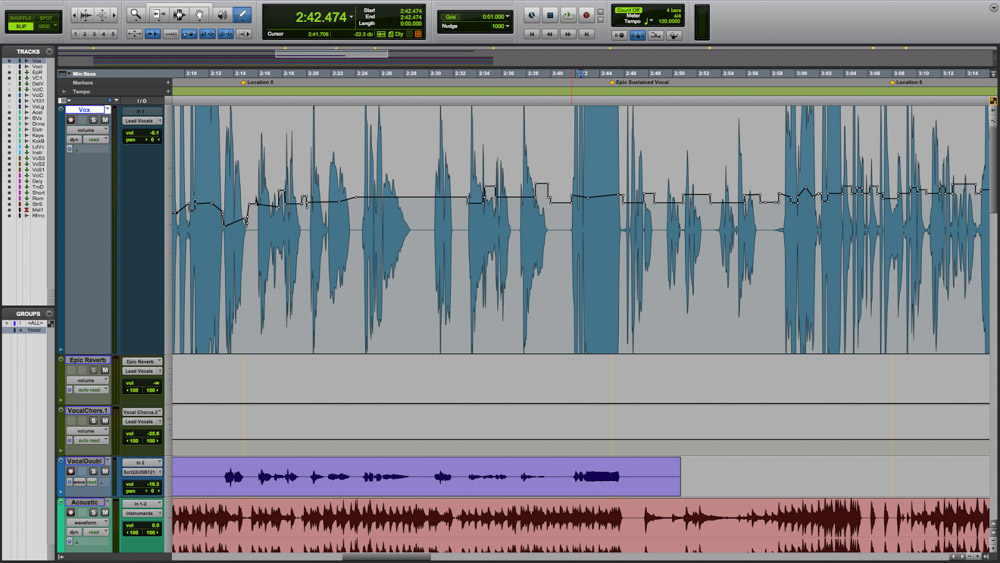
Don’t assume that you can get consistently great vocal balances on compression and limiting alone. Volume automation is key.
It doesn’t end with volume automation. You can also automate EQ (I do this regularly), automate compression (to keep the verse more dynamic than the chorus for instance), automate panning (especially when mixing double-tracked vocals) and automate any other parameter that could require automation.
You can also apply ”front end automation” to automate the volume of the vocal before it hits your plugins, which leads us to…
Mistake 11: Not Automating Gain
By automating the gain of the vocal BEFORE it hit’s your plugins, you are giving your compressors and your limiter a much easier job. If the vocal sits around -18dB RMS for the whole track, you can be more precise with the threshold of your dynamic processors.
By automating the vocal early on, you also make it a lot easier to mix. You can be more subtle with compression. Big wins early on will increase your confidence too, which means better mixes.
One way to automate gain would be to add a gain plugin at the beginning of our chain and automate that. Of course now, there’s a much easier way for Pro Tools users: clip gain.
Clip gain automation involves adjusting the gain of each phrase in the Edit window by adding edit points either side and manually raising or lowering the gain of that individual clip.
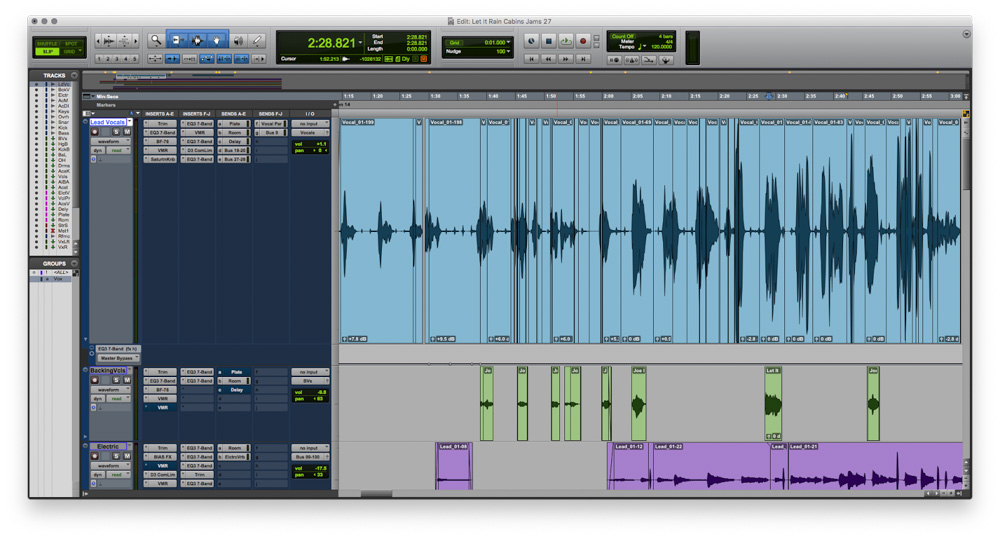
Clip gain can help reduce the burden placed on your compressors and limiters, allowing you to get a smoother and more consistent vocal sound.
This can be a time-consuming process, so try adjusting the gain of whole sections to make them more consistent, rather than adjusting the gain of individual words or phrases.
Mistake 12: Over-Compressing
Some people rely on compression alone to control the dynamics of a vocal, and this can quickly lead to over-compression.
If a vocal sounds dull and lifeless from over compression, back off on your compressors if you can. If the compression has already been printed onto the vocal, use another compressor with a slow attack or a transient designer to bring back some of the transients.
To avoid over-compression, refer back to numbers 5, 10 and 11 above and make sure you are using other techniques to control the dynamics of the vocal.
Mistake 13: Making the Vocals Too Quiet
This is a big one. It sounds like it should be simple, but this is where so many people go wrong.
Don’t forget to spend plenty of time balancing the level of your vocal. It’s all too easy to focus on plugins and other processes, and forget about the power of the volume fader.
One way to do this is to send your finished vocal track, automation and all, and route it to a new stereo aux labelled “Lead Vocal”. Turn off the screen or close your eyes, and focus on adjusting that volume fader until the vocal sits right throughout the whole mix. If you find yourself constantly adjusting the volume, you need to add more dynamic control to the vocal.
If you aren’t sure how loud to make the vocals, always err on the side of ”too loud”. When you turn down your monitors, you should hear the vocal more than anything else. For mainstream and pop styles, the vocals usually need to be louder than you think. This is another area where #9, checking your references, can be incredibly enlightening.
Summing it Up
These are the mistakes that I hear in new mixers’ vocal tracks time and time again. Once you are aware of these problems, they should avoidable.
Internalizing these ideas and coming up with the solutions and habits that work for you takes time, so practice is key. But if you take these 13 lessons to heart, you can ensure that every one of your vocal mixes is at least as good as the singer is.
Rob Mayzes is an audio professional and educator who has taught thousands of people about recording and mixing through his website Home Studio Center.
To further improve your mixes you can enroll in Mayzes’ free vocal mixing class to learn his complete 12 step system for mixing vocals that sound professional, expensive and impressive.
Please note: When you buy products through links on this page, we may earn an affiliate commission.


Lady Audio
June 23, 2016 at 6:04 pm (9 years ago)Mistake #11 – that’s a great one. Sometimes I think I’ll be saving time with my podcast by putting the EQ and compression on right away. But I actually spend more time than when I do some automation to the level first. A loud vowel sound here, a quiet word there… working with the level first is a great lesson.
Tom Conklin
June 23, 2016 at 9:54 pm (9 years ago)Lot’s of good stuff here… as far as mixing to genre and using appropriate reverb for the genre… I don’t like rules. Good article though. 🙂
Rob Mayzes
July 6, 2016 at 9:53 am (9 years ago)Thanks Tom, glad you enjoyed the article.
That’s very true, if reverb is used creatively and it works, then it works!
Rob Mayzes
July 6, 2016 at 9:54 am (9 years ago)Glad you think so, I don’t see many people doing this. But for me, it’s essential!
Pranali Wa
September 16, 2016 at 8:01 am (9 years ago)Thanks for the post… Lot of information gather here in single post.
Anoopsrinivassan
November 29, 2016 at 2:20 am (8 years ago)You are giving awesome information, to avoiding the vocal mistakes. its very helpful to all.