Shortcut Bible: How to Use the 50 Most Essential Pro Tools Key Commands
Whether you’re an experienced user coming to Pro Tools from another DAW, or a beginner eager to get your first Pro Tools Ninja badge, we have something perfect for you: A collection of the most essential Pro Tools shortcuts to get you up and running, fast.
For simplicity’s sake, we’ve included the Mac version of each shortcut in the main text, and a summary table at the bottom with both the Windows and Mac keystrokes spelled out in full. (For quick reference, if you’re on a Windows machine, simply replace Cmd with Ctrl and Ctrl with Start and all these time-saving quick keys are the same.)
All of these shortcuts are valid for both HD and non-HD flavors of Pro Tools version 8 and up.
Getting Started Fast
Once you’ve launched Pro Tools, you can always create a new session quickly with Cmd+N, open an existing one with Cmd+O, or open the last session you worked on with Shift+Cmd+O.
Once you’re inside your session, your can really start flying:
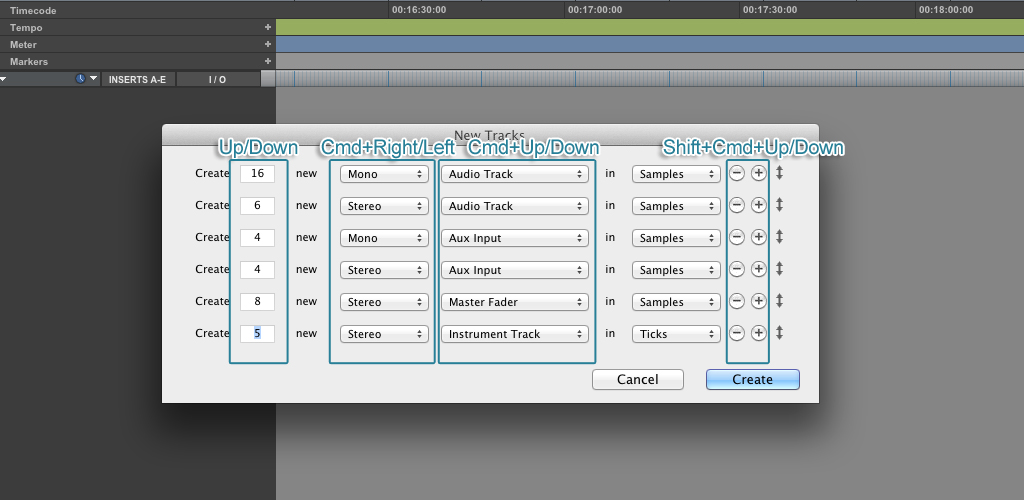
Type Shift+Cmd+N to open the new track dialogue.
In this window, the Up and Down keys can be used to change the number of tracks you’d like to add, Cmd+Right or Left will toggle between mono and stereo options, and Cmd+Up or Down will change the track type between audio, aux input, master, etc.
Finally, Shift+Cmd+Down or Up will let you insert (or delete) additional track types, allowing you to set up a full session’s worth of routing all in one go, without ever touching your mouse.
Once you have all of your tracks loaded up, there are even quick keys to rename them from the default “Audio 1, 2, 3…” as well.
To start, double-click on the first track name you’d like to change. Once the renaming window is open, you can skip to the next or previous track by hitting either Cmd+Down or Up or Cmd+Right or Left, without ever needing to close the dialogue box.
Renaming each track before doing any recording is always a good practice to be in, as Pro Tools will name each new audio file based on the name of the track where it is being recorded.
There are few tasks in the studio more tedious than searching through a folder or clip bin for that missing lead guitar track in vain because it’s named something ridiculous like “Audio 5_06.01”. Thankfully, these quick keys let you save time right now, as well as later on.
Routing and Recording
The Alt/Option key can be especially helpful in setting up the routing for your new session. Simply holding this key and clicking the input or output of a track allows you to change these settings for all of your visible tracks at once.
You can narrow things down from here too, by changing your input and output settings for a batch of selected tracks only:
First, select the tracks you want to adjust by using Shift+Click (for consecutive tracks) or Cmd+Click (for non-consecutive tracks).
Then, to change the input or output settings for only the batch of tracks you have selected, just hold down Shift+Alt/Option. (This is great for routing a whole group of tracks to a common bus with a single click.)
In many cases, it will be even more useful to change the inputs or outputs of consecutive tracks to consecutive numbers. To do this across a whole session, simply hold down Cmd+Alt/Option. To do it for selected tracks only, try Shift+Cmd+Alt/Option
Applied to inputs, this is a super fast way to set up a multi-track recording session, allowing you to instantly set track 1 to input 1, track to to input 2 and so on. Applied to outputs, this allows you to break out your entire session across a mixing board or external summing box in a heartbeat.
The modifers “Alt/Option to change All” and “Shift+Alt/Option to change the selected” are a common option within Pro Tools. Both can be used in a lot of scenarios, like adding plugins, creating sends, creating new playlists, changing track height, arming, soloing, muting and so on.
For instance, if you want to insert a new plugin across all visible tracks, simply press the Alt/Option key before doing so. If you want to insert the plugin on certain tracks only, press Shift+Alt/Option before clicking on the slot to insert the plugin on just your selected tracks.
Finally, the actual recording can be started by either hitting the number 3 on the numeric keypad, or Cmd+Space, or F12.
These last two options may enter into conflicts with some Mac OS system shortcuts, but that’s easy to fix:
If you want to free F12 and other function keys so they can be used with Pro Tools on a Mac, simply go to Mac > System Preferences > Keyboard and select “Use all F1, F2, etc. keys as standard function keys”.
By default, new Macs use Cmd+Space to bring up “Spotlight”. To disable this (or change the quick key for Spotlight) just go to Mac > System Preferences > Spotlight > Keyboard Shortcuts.
Keyboard Commands Focus and Zooming
Another great way to save even more time with your shortcuts is by activating Pro Tool’s “Keyboard Commands Focus” mode. You can do this by clicking on the small “AZ” button at the top right of the edit window.
When this mode is on (yellow means it’s activated) some of the common shortcuts that normally require you to press Cmd or Ctrl can be engage without them.
For example, the horizontal zoom on a track can normally be adjusted by by pressing Cmd+R or Cmd+T, for zoom out and in, respectively. With Keyboard Commands Focus enabled, simply typing R or T alone will get you the same result.
The same idea applies to fades and other types of edits. Normally, fade ins and fade outs can be created by placing the cursor inside a clip, near the beginning or the end, and typing Cmd+F. With Keyboard Commands Focus, you can achieve the same result by simply typing F. If you select the entire clip, typing F will create both a fade in and a fade out, and by selecting several clips and pressing Cmd+F the Batch Fades window will open up.
The Zoom presets are also quickly accessed with the Keyboard Commands Focus active. The numbers 1, 2, 3, 4, and 5 located above the qwerty keyboard (not the numeric keys to the side) allow access to the corresponding zoom memory settings. If you’d like to save the current zoom level in one of those memories, just Ctrl+Click on it and select the zoom memory location you’d like to use. (You’ll see the zoom memory numbers flickers briefly in blue).
Here are a few more handy zooming shortcuts:
To increase or decrease the vertical zoom on selected tracks, you can use Ctrl+Up or Down.
To fit all your tracks to the vertical space available in the edit window, use Ctrl+Cmd+Alt/Option+Up or Down.
To adjust the horizontal zoom so that all your clips are visible, try Alt/Option+A
Typing both of these commands in rapid succession is a great and quick way to get a bird’s eye view of the session. It is often faster (and much more badass-looking) than double-clicking the magnifying glass toward the top left of the edit window.
Bypassing and Deactivating
Any plugin can be bypassed by Cmd+Clicking on it, or deactivated with Ctrl+Cmd+Click.
The main difference between those two actions is that a bypassed plug-in still consumes computer resources—even if it is not being used—while a deactivated plugin consumes no processing power at all.
A slight drawback is that deactivated plugins may take a moment or two to restore, especially if they are processor-intensive, while a bypassed plugin can be restored instantly.
You’ll know the difference at a glance, as bypassed plugins have a blue background while deactivated plugins will be greyed out:

Bypassed plugins (left) can be quickly restored, allowing for direct A/B comparisons, while inactive plugins (right) free up precious processing power for other uses.
As a rule of thumb, if you want to A/B the effect of the plugin, or you plan to use it later, you can just bypass it. If you think you are definitely done with it, but would like to keep it around, just in case, it is better to deactivate.
The same thing goes with whole tracks. An entire track, and all of its inserted plugins and sends, can be deactivated by Ctrl+Cmd+Clicking on its “Track Type” icon. (This icon is the small image of a waveform, keyboard, etc. that appears at the bottom right corner of the fader in the mix window).
Once again, Alt/Option is your friend here and will allow you to to bypass (Cmd+Alt/Option+Click) or deactivate (Ctrl+Cmd+Alt/Option+Click) all visible plugins on a specific slot.
Adding in the Shift key will allow you to apply this to only the track you have selected selected tracks (Shift+Cmd+Alt/Option+Click for bypassing and Shift+Ctrl+Cmd+Alt/Option+
Basic Editing
As you might expect, the usual cut, copy, and paste are Cmd+X, Cmd+C and Cmd+V, respectively. If you want to make a cut inside an audio clip, you need to use the Separate Clip command by typing Cmd+E.
To nudge a selected clip by increments, try the +/– signs on the numeric keypad or </> on the regular keyboard. The increments can be adjusted to the right of the main counter in the Edit window.
To toggle back and for the between your Mix and Edit window, try Cmd+= (Or Shift+Cmd+= on Latin-style keyboards.)
Edit Modes and Tools
Other frequently used shortcuts are assigned to the function keys, F1 through F12.
Remember: If you want to free these function keys so they can be used with Pro Tools on a Mac, simply go to Mac > System Preferences > Keyboard and check the box marked “Use all F1, F2, etc. keys as standard function keys”.
Starting at the top left of the Edit window, the first 4 function keys control the edit modes: F1: Shuffle, F2: Slip, F3: Spot, and F4: Grid),
The next four are assigned to the zoom and edit tools: F5: Zoom, F6: Trim, F7: Selector, and F8: Grabber. F9 and F10 are, respectively, the Scrubber and the Pencil tools.
The Smart Tool, which is a combination of the Trimmer, Selector and Grabber tools, can be activated by pressing F6+F7 or F7+F8.
If you have to mouse around in Pro Tools, using the Smart Tool is one of the best ways to do so. Hover over the top half of a clip and it will act as a Selector tool. Hover over the bottom half of a clip and it will turn into the Grabber tool. Go to the start or end of a clip and it will change to the Trim Tool. Mouse over the bottom of a clip start or end point and it will turn into the fade in, fade out or crossfade tool, as appropriate.
For tools that have different modes (like Grid vs. Relative-Grid or Trim vs. Time Compression/Expansion), repeatedly pressing the corresponding function key will cycle between those modes.
Memory Locations
Another cool feature available in Pro Tools is the Memory Locations. These can store a lot of information, allowing you to mark specific points in time, zoom settings, selections, groups, window configurations and so on.
The shortcut to create a new memory location is the Enter key on the numeric keyboard. When using a laptop without numeric keyboard, you can use Fn+Return.
The Memory Locations window contains a list with all the markers that have been created in your session. You can quickly access this by typing Cmd+5 on the numeric keyboard.
The fun begins with the fact that each marker has e a unique numeric ID automatically assigned to it, so each one can be accessed at any time by pressing Comma in the numeric keyboard, then entering the corresponding number, and then pressing Comma again.
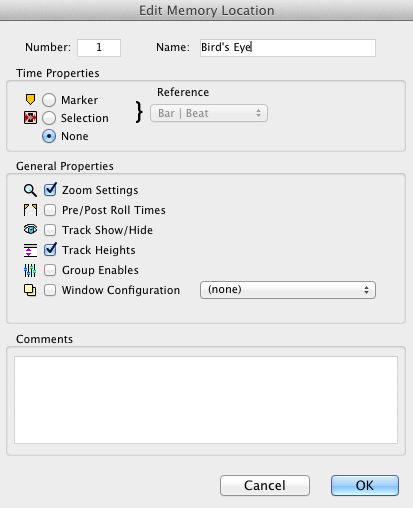
This opens up many possibilities. For example, another way to get a ”bird’s eye view” of the session is to press Ctrl+Cmd+Alt/Option+Up or Down and then Alt/Option+A as discussed earlier, and then hit Enter. From the Marker’s “General Options”simply select “Zoom Settings” and “Track Heights”.
From that point on, and following the example image, you can recall the memory location simply by typing ,1, (Pretty cool!)
Windows and Mac correspondences
If you use Pro Tools regularly on both Mac and Windows machines, you probably already know that Mac keys Cmd, Alt/Option and Ctrl, correspond to, respectively, Ctrl, Alt, and Windows/Start on Windows machines.
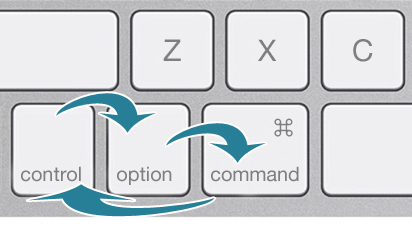
There’s a great mnemonic way to remember this correspondence (and thus all the shortcuts):
If you look at those three keys on a Mac, their position on a Windows keyboard would be as if all three keys were moved one position over to the right, with the Cmd sliding to the leftmost position. (And vice-versa if you are moving to Windows from a Mac.)
Roger Montejano is a producer, mixer and engineer based in Madrid, Spain. He works out of a variety of studios, and offers an online mixing service at rogermontejano.com.
Summary Table
|
Mac |
Windows |
Shortcut |
| Cmd+N | Ctrl+N |
New session |
| Cmd+O | Ctrl+O |
Open session |
| Cmd+Shift+O | Ctrl+Shift+O |
Open last session |
| Cmd+Shift+N | Ctrl+Shift+N |
New tracks dialogue |
| Up/Down (In New Tracks Dialogue) |
Up/Down (In New Tracks Dialogue) |
Increase/decrease the number of new tracks |
| Cmd+Right/Left (In New Tracks Dialogue) |
Ctrl+Right/Left (In New Tracks Dialogue) |
Mono or stereo |
| Cmd+Up/Down (In New Tracks Dialogue) |
Ctrl+Up/Down (In New Tracks Dialogue) |
Track type |
| Cmd+Shift+Down/Up (In New Tracks Dialogue) |
Ctrl+Shift+Down/Up (In New Tracks Dialogue) |
New track type |
| Cmd+Up/Down | Ctrl+Up/Down |
With the renaming window open, previous/next track |
| 3, Cmd+Space, F12 | 3, Ctrl+Space, F12 |
Record |
| Alt/Option modifier |
Alt modifier |
Apply to all visible |
| Shift+Click | Shift+Click |
Select consecutive tracks |
| Cmd+Click | Ctrl+Click |
Select non-consecutive tracks |
| Shift+Alt/Option modifier | Shift+Alt modifier |
Apply to selection |
| Cmd+Alt/Option modifier | Ctrl+Alt modifier |
Assign consecutive In/Out/Bus to all |
| Cmd+Shift+Alt/Option modifier | Ctrl+Shift+Alt modifier |
Assign consecutive In/Out/Bus to selection |
| R (In Keyboard Commands Focus Mode) |
R (In Keyboard Commands Focus Mode) |
Horizontal zoom out |
| T (In Keyboard Commands Focus Mode) |
T (In Keyboard Commands Focus Mode) |
Horizontal zoom in |
| F (In Keyboard Commands Focus Mode) |
F (In Keyboard Commands Focus Mode) |
Create fade in/out |
| Cmd+F (In Keyboard Commands Focus Mode) |
Ctrl+F (In Keyboard Commands Focus Mode) |
Batch fades |
|
1, 2, 3, 4, 5 |
1, 2, 3, 4, 5 |
Zoom memories |
| Ctrl+Click on numbers 1, 2, 3, 4, 5 | Start+Click on numbers 1, 2, 3, 4, 5 |
Assign current zoom level to a zoom memory |
| Ctrl+Up/Down | Start+Up/Down |
Vertical zoom on selected tracks |
| Ctrl+Cmd+Alt/Option+-Up/Down | Start+Ctrl+Alt+Up/Down |
Vertical fit of all tracks |
| Alt+A | Alt+A |
Horizontal fit of all visible tracks |
| Alt+F | Alt+F |
Horizontal fit of clip selection |
| Cmd+Click on plugin | Ctrl+Click on plugin | Bypass plugin |
| Ctrl+Cmd+Click on plugin or track icon | Start+Ctrl+Click on plugin or track icon | Deactivate plugin or track |
|
Alt-Cmd-Click on plugin |
Alt-Ctrl-Click on plugin |
Bypass all plugins on the same slot |
| Ctrl+Cmd+Alt/Option+Click on plugin or track icon | Start+Ctrl+Alt+Click on plugin or track icon |
Deactivate all plugins on the same slot, or all visible tracks |
| Cmd+Shift+Alt/Option+Click | Ctrl+Shift+Alt+Click |
Bypass plugins on selected tracks |
| Shift+Ctrl+Cmd+Alt/Option- |
Shift+Start+Ctrl+AltClick |
Deactivate plugins on selected tracks, or selected tracks |
|
F1 |
F1 |
Shuffle |
|
F2 |
F2 |
Slip |
|
F3 |
F3 |
Spot |
|
F4 |
F4 |
Grid |
|
F5 |
F5 |
Zoomer |
|
F6 |
F6 |
Trimmer |
|
F7 |
F7 |
Selector |
|
F8 |
F8 |
Grabber |
|
F9 |
F9 |
Scrubber |
|
F10 |
F10 |
Pencil |
| F6+F7 or F7+F8 | F6+F7 or F7+F8 |
Smart Tool |
| Enter (numeric pad) | Enter (numeric pad) |
New memory location |
|
,-number-, |
,-number-, |
Recall memory location |
| Cmd+5 (on numeric pad) | Ctrl+5 (on numeric pad) |
Memory locations window |
| Cmd+X | Ctrl+X |
Cut |
| Cmd+C | Ctrl+C |
Copy |
| Cmd+V | Ctrl+V |
Paste |
| Cmd+E | Ctrl+E |
Separate |
Please note: When you buy products through links on this page, we may earn an affiliate commission.


