The #1 Speaker Placement Tip That Speaker Manuals Get Completely Wrong
The tips in your speaker manual may do far more harm than good. Here’s the advice you can ignore, and what to do instead.
I remember the very first set of professional studio monitors I ever bought. It was a pair of Wharfedale Diamond 8.2 Pros that I got on sale at the local music store.
All excited, I carried them home from the shop and ripped open the boxes:
“This is it, I’m starting my path as a music professional!! No more working on HiFi speakers, this is the sh*t right here. Finally I’m going to sound like Deadmau5 and Noisia!“
So I opened up the manual (cause RTFM right?) to make sure I get the most out of my new speakers. Sure enough, I soon came across the following line:
“Make sure to set up your speakers far away from the front wall to avoid unwanted reflections that will negatively affect the low end.”
“Aah, OK… I don’t actually have space to do that in my 18-square-meter university dorm room. So I’m screwed from the start? Fantastic!”
Even now, over 10 years (and many sets of speakers) later, it’s still advice that haunts me. Although now, it mostly comes in the form of posts in Facebook groups and on forums.
It haunts me because of what I’ve learned since. I’ve now spent the better part of a decade trying to figure out why this advice was (and keeps on being!) included in speaker manuals. It turned out to be bad advice that only served to confuse me, and made me feel like I was doing something wrong.
So what am I saying? That you should ignore the guidelines in the manuals completely?
Well, let’s just say there are far more important aspects of speaker placement. Aspects that you can actually use, no matter what room you’re working in, and that WILL improve the sound you are hearing.
The Typical Speaker Placement Advice in Your Speaker’s Manual
Granted, some speaker manufacturers get it right. Sort of. But others just make a complete mess of it. Different companies can even give opposite advice for placing the same types of speakers! Here are just a few examples:
OK, got ya: At least 40cm or 16” away from any wall. Further away = Fewer reflections. Easy enough. And completely wrong, as you’ll soon see.
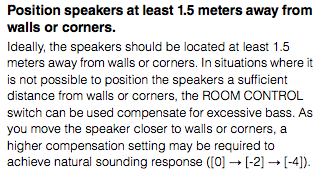
Wow, OK. 1.5 meters? What is that, almost 5 feet? THAT I cannot do. At least they tell me I can somehow magically fix whatever mistakes I’m making with their “Room Control” system if I set up closer to a wall.
Other speaker manuals and guides say the opposite:
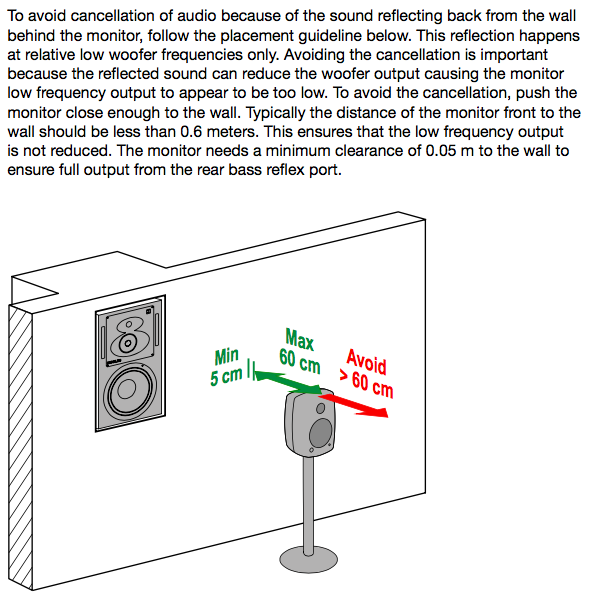
Genelec’s “Monitor Setup Guide” does a bit better, but still leaves a lot to be desired. Genelec’s “Monitor Setup Guide” does a little bit better, but still leaves a lot to be desired. Retrieved October, 2017.
Wait, what? I thought the advice was to stay away from any walls! So now I need to be close to the wall to avoid reflections and make sure I get enough low end?
What if I’m working in a larger room and I don’t want to set up that close to the wall? And the Genelec is a back-ported speaker, so what about the whole “shooting too much energy into the back wall” thing I’ve heard about?
Here’s one more example:
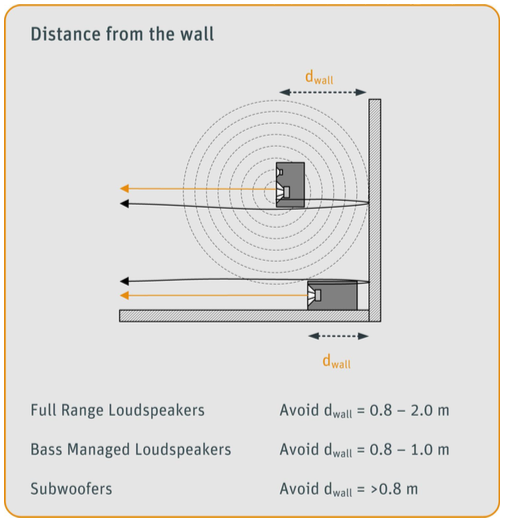
From Neumann’s “Setting Up Studio Monitors” guide. Somewhat more detailed but not exactly easy to make sense of.
*Throws up hands in resignation*… OK, now I’m just lost. Which is it!?! Can’t you just tell me if I should set up close or far away??
The Real Solution: Divide and Conquer
Some people might argue that different types of speakers “behave” differently and so need a different approach to placement. And, as you’ll see, that’s true to some small extent.
But they definitely don’t behave differently enough so that one type has to be placed right up against a wall, and another several meters away.
(And what does “behave” even mean? It’s not like we are talking about children here.)
Back when I did my masters degree in aerospace engineering there was one point they hammered home the entire time: Divide and conquer.
Basically, whenever you encounter a problem that seems too difficult to solve, break it down into smaller sub-problems. Then, solve each individually.
This is a problem that is in serious need of some dividing and conquering. Hold on to your butts.
It All Starts With the Speaker
Generally speaking, any standard modern studio monitor tends to focus higher frequencies in a forward direction. At lower frequencies, they become less and less focused.
At some frequency in the mid-range (usually at a wavelength that roughly matches the diameter of the woofer) the speaker will output its energy fairly evenly at angles of around 90°.
By the time you look at bass frequencies, pretty much any speaker on the market today puts out energy in all directions. You can imagine it like a balloon of low frequency energy expanding around the speaker.
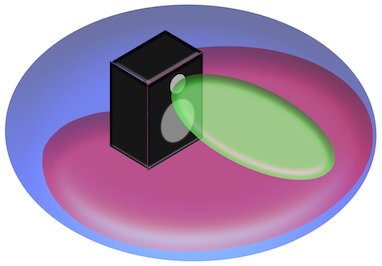
Typical dispersion character of a loudspeaker. High frequencies (green), mids (red) and bass (blue). Thanks to Ove Schei for the drawing.
Depending on the design, some speakers are better than others at controlling the dispersion as they go down in frequency. But this is actually very hard to do. A lot of them are simply all over the place.
In practice, this means your speaker shoots full spectrum energy forwards, and as you move around the speaker to the back, the sound gets darker and darker. Right behind the speaker, all it puts out is bass.
This becomes important when you look at the energy that actually hits the wall behind the speaker and gets reflected back toward you, as you will see in a moment.
Front Ported vs. Rear Ported
This general dispersion pattern holds true for front ported, back ported, passive radiator and sealed box designs. For all intents and purposes, they all do basically the same thing.
As long as there is enough space around the port for air to move unobstructed, the port can do its job, and the speaker will perform as designed.
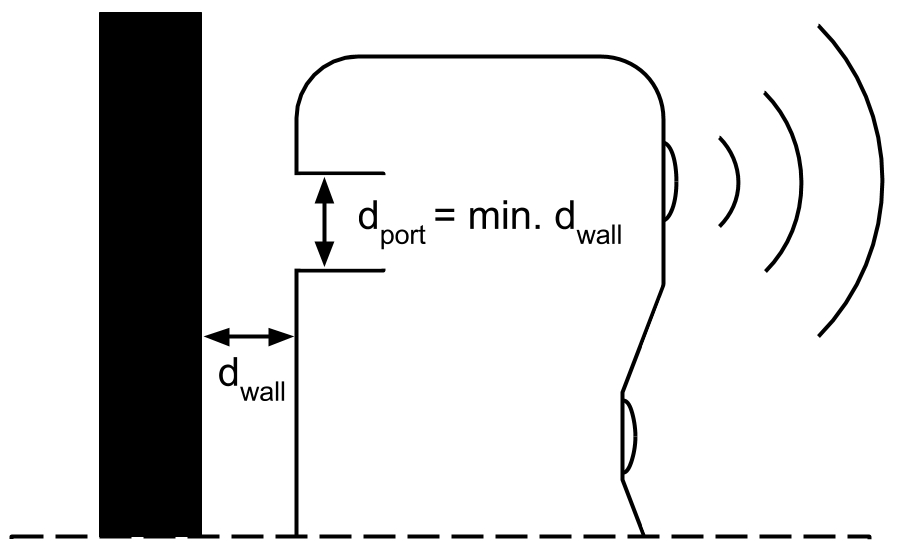
As a rule of thumb, you can use the diameter of the port as a minimum distance required to the nearest surface for air to move freely.
Any back-ported speaker with a port diameter of 2″ for example, will work just fine placed up to a wall, as long as there is 2″ of space behind the port.
And oh look, that just happens to be the minimum distance to the wall recommended by Genelec for their back-ported speakers… What a coincidence!
Even if the port is blocked, all that happens is that the tuning of the low end changes. Basically, the speaker will sound a little bit different, particularly in the low end. That might change the dispersion pattern of the speaker a by tiny amount. But since there is hardly any dispersion control in the low end anyway, it still follows the same basic pattern we saw earlier.
So obviously, the position of the port isn’t really a reason to keep your speaker a certain distance to the wall. Then what is?
The Magic of “Room Control” (aka “Space Loading”)
One thing that does occur as you move a speaker closer to the wall is “space loading”.
As you may already know, the energy sent backwards by a speaker hits the wall behind it and gets reflected. If the wavelength is long enough, this will add in-phase to the energy that the speaker sends forwards.
You can imagine it as if half of the balloon that expands outward from the speaker folds back on top of the other half.
These two halves add together, doubling the amount of energy. What you end up with can look like a low shelf boost at up to +6dB SPL. And, just like with an EQ in your DAW, you can bring it back down with a similar low shelf cut!
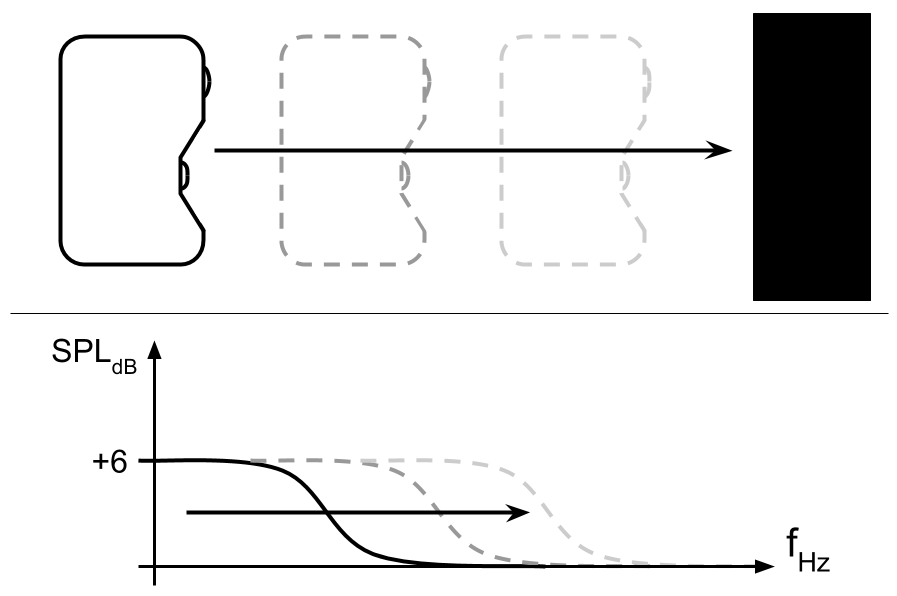
Space Loading: As you move your speaker closer to a wall, it’s as if someone is boosting your bottom end with a low shelf EQ.
The same thing happens again when you place your speaker in a corner. Now there are two surfaces that reflect energy, and half the balloon is folded over again. All that energy is now concentrated in ¼ of the volume. Another potential +6dB SPL low shelf boost[1].
So what does that mean in practice when placing your speaker? In simple words:
As you move your speaker closer to a wall or corner, it’s going to sound like somebody is boosting your low end with a low shelf EQ.
If you don’t like it, simply bring it back down with the low shelf EQ on your speaker. Done.
But this doesn’t mean you HAVE to place your speaker at any particular distance from the wall. In fact, you might like a little bit of extra energy in the low end! And if you don’t, it’s easy enough to take care of.
Those Dreaded Reflections
But what about energy that gets reflected back from the front wall and ends up combining out of phase with the sound sent forward?
What you end up with here is a classic comb filter.
You know those mono-to-stereo mixing tricks that you’re not “supposed” to do because of mono compatibility, but you end up doing all the time anyway? You know, like the one where you double the track, pan the two versions out and delay one side? Yeah. Sounds great. Just don’t hit that “mono” button.
That’s what happens when the reflected energy off the front wall combines out of phase with the energy sent directly forward.
Except, the reflected energy is effectively low-passed because of the dispersion pattern of the speaker. It only sends bass backwards, remember?
As a result, that comb filtering only substantially affects the low frequencies.
And, like with any comb filter, the frequency of the first and lowest cancellation is determined by the time difference between the direct sound and the reflection.
The important thing to understand is that this first cancellation happens at the membrane of the speaker itself!
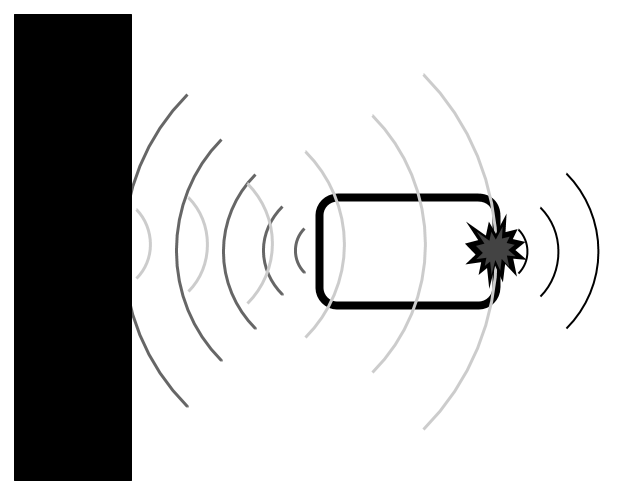
Speaker Boundary Interference: Low frequency sound sent backwards gets reflected and combines with the direct sound at the speaker membrane.
You see, two sound waves interact by the laws of superposition. That means they interfere at every point in space while continuously passing through each other. But for us listeners, the effect is only “cemented” into existence at the very moment and point in space where the energy is transferred to a membrane[2].
And depending on what that membrane is (the speaker membrane in this case), the interference effects can be quite different.
In this case, the cancellation literally affects the power output of the speaker[1]. It changes the actual frequency response played into the room. Basically, it colors the speaker! And so that coloration stays the same no matter where you are in the room, as long as the speaker stays in the same place.
You may have heard of it. It’s sometimes called Speaker Boundary Interference Response or SBIR.
Note that this is not the same as your classic “mirror point” reflection, who’s effect does vary throughout the room as you change position.
Boundary Effects in Combination
So what does it actually look like as you move your speaker closer to the wall? You’d expect the cancellation to start low, because of the long time difference, and move up in frequency as you move the speaker closer.

So as long as your speaker is more that 4m (12 feet) away from the front wall, the fundamental cancellation notch lies beneath the audible spectrum. It’s probably outside of your speaker’s frequency range and doesn’t get created in the first place. So that’s good.
Unfortunately, the first harmonic above it still sits smack bang inside the audible bass region, wreaking havoc.
In between 3 meters (10 feet) and 1 meter (3 feet) in distance, the first cancelled overtone is now above 100Hz. And, the main notch moves right through the subs and bass. Not cool.
Once the speaker is less than 1 meter from the wall though, the main notch has moved above 100Hz as well. At those frequencies, simple insulation material absorbers on the wall are very effective.
Finally imagine what happens when you move the speaker all the way into the wall. Now the reflection doesn’t even happen in the first place, and you can simply ignore the entire issue. That’s the whole idea behind soffit mounted speakers.
So, to keep your front wall reflections from messing up your bass, place your speakers at least 4 meters away from your wall, or less than 1 meter away. Anywhere in between 1 meter and 4 meters and you are asking for extra trouble.
You can reduce the effect by placing an absorber right behind the speaker, but it will have to work at least down to 100Hz, or lower.
Optimizing For The Front Wall = A Game of Futility
This advice is all nice and dandy. The problem of course is that there are usually five more surfaces in your room apart from the front wall. And all of them cause the same effect.
In most typical home studios, like converted spare bedrooms, attics, garages or basements, you will neither have the space nor the ergonomic luxury to place your speakers to optimize for all 6 reflecting surfaces. (And often, not even for one.)
Even if you could do this, which surfaces and reflections would you prioritize? Which are the worst offenders?
As you optimize for the front wall, you may be missing the mark on the back wall reflection. And to actually get the oft-recommended “equilateral triangle” going, you end up completely ignore getting the right distance to the side walls. Finally, there’s the floor, and whatever you do, I’m sure you won’t be successful in setting up your speaker within 1m of the floor.
I think you can see what I’m getting at.
Ever wanted to have a great way to chase your tail for weeks in the studio? This is it. It’s a lesson in futility.
Sure, you might be able to squeeze a little bit of an improvement out of your setup with lots of patience and trial and error. But looking at the bigger picture, all of your efforts are going to be swamped by the effect of room modes anyway.
Any trouble you do run into because of boundary interference is better handled with careful absorption and the simple low shelf EQ on your speaker.
In my opinion, for all practical purposes, you can completely ignore any advice about setting up your speakers that you may find in your speaker’s manual.
So What DOES Matter?
The thing that doesn’t satisfy me about all of this is that I still don’t have a way of determining exactly where I should place my speakers.
If it doesn’t matter much where you place your speakers in relation to the the walls, then what does matter?
The simple answer is: It matters where you place the speakers in relation to your ear.
You see, there’s another surface, apart from the speaker membranes where reflections combine with the direct sound to cancel out or sum together. And that surface is your eardrum!
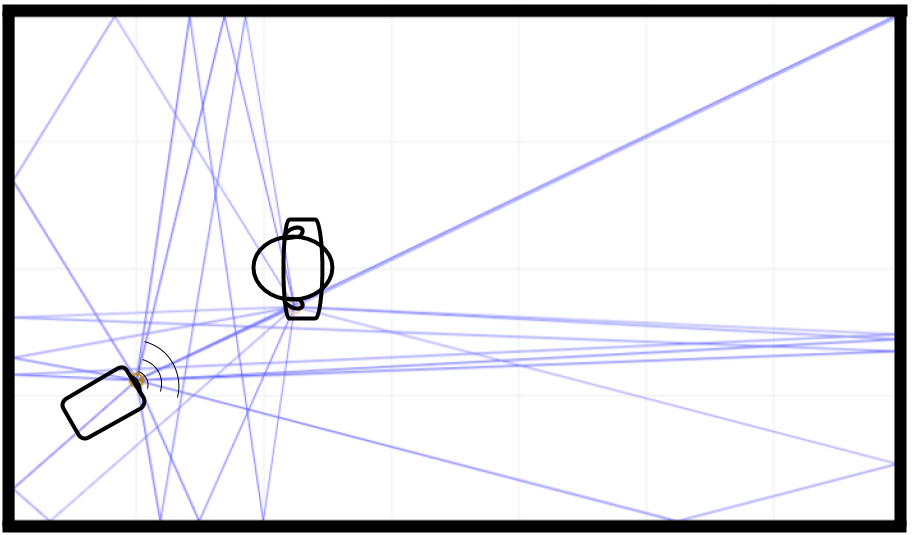
Speaker to ear first and second order reflections on the listening plane for one speaker and one ear.
The timing of sound waves arriving here doesn’t just cause comb filters in the low end. It can mess with how you hear the entire frequency response and sound stage from your speaker.
In fact, the timing of sound waves here can have a huge impact on the stability, focus, width and depth of the stereo image. Our brains are incredibly sensitive to small differences in timing, direction, volume and timbre of those reflections.
But it’s not enough to simply set up your speakers in an equilateral triangle and be done with it.
It would be, if the speakers only shot sound waves directly at your ears. But they don’t.
In fact, your speakers send a pretty chaotic mishmash of frequencies in all directions, dependent on their dispersion character.
This energy then gets reflected, delayed, and potentially further filtered. It arrives back at your ear as an utterly destroyed version of its former self. And your poor, confused brain, incapable of telling any of it apart, jumbles it all together and tries to somehow makes sense of it.
Optimize Your Speaker Positions for Stereo Sound and “Body”
This kind of confusion can lead to a vague and ambiguous sound stage, lacking body and overemphasizing certain frequencies. That is exactly the opposite of what you want.
Of course, there is some combination of speaker position and reflection paths that minimizes both the effect of comb filters and this brain confusion.
If you’ve ever heard a room where this positioning has been optimized, you know just how exciting and pleasurable the experience is. I’ve often heard people say that it’s like working on good open-backed headphones. Everything snaps into focus. It feels like all the instruments are floating in space in front of you. You could just reach out and touch them.
But the problem is that your room has its own, very unique reflection pattern. So it’s literally impossible for any rule of thumb or general guideline to tell you where that exact, perfect speaker position is.
Short of hiring a professional acoustician to measure every last angle, nook and cranny of your room, the only way to do it is… Drum roll please…
By using your ears.
The speaker position that sounds the best to you IS the best in terms of distance and reflections.
To get the most of this method, you do need to know what you are listening for, and it helps to have a structured approach for listening to speaker placements to optimize your final speaker position.
Using your ears can tell you exactly at what distance you should place your speakers to minimize the effect of comb filters. It can help you optimize the combination of direct sound and reflections. It lets you find the spot for your speakers where your stereo image and sound stage end up being the best they possibly can be in your particular room.
Providing the exact details for how to do this with a minimum of time and second guessing deserves a post in and of it self. I call my method the “Phantom Speaker Test”, and if you’re ready to try this approach for yourself, I have a free step-by-step guide for you that walks you through the process.
Just follow this link and I’ll send it right over.
When you have tried it, let me know in the comments below: Did you find the phantom center? How does it sound? And how close were you with your original speaker setup?
[1] Toole, F.E., 2008. Sound Reproduction: Loudspeakers and Rooms. Focal Press.
[2]Alton Everest, F. and Pohlmann, K.C., 2009. Master Handbook of Acoustics. Mc Graw Hill.
For more great insights into both mixing and mastering, try our full-length courses with SonicScoop editor Justin Colletti, Mixing Breakthroughs and Mastering Demystified.


Please note: When you buy products through links on this page, we may earn an affiliate commission.




Carl T
December 14, 2017 at 6:32 pm (7 years ago)Many small rooms don’t have the luxury of being able to move the monitors away from the front wall so a boundary compensation switch on most active monitors can be helpful. However, the larger issue is not only space restraints, but also the need to avoid placing the listening position in an axial mode null which can very effectively suck out the low end in a nasty unfixable selective way.
All of our TEC Award-winning PhantomFocus MixRooms™ with https://uploads.disquscdn.com/images/4ad600d7b10e3934eeb5a55d69f1a1c18b394278cc243f99aa00bab12d3a705d.jpg PhantomFocus™ Monitor Systems rely on our Null Positioning Ensemble http://carltatzdesign.com/acoustic-tools.html. No simple procedure in your studio will render greater results than spending a little time to follow this easy to understand diagram to a T. This is not something we invented per se but rather utilizes the laws of physics as the fathers of stereo intended.
Mr Bones
December 14, 2017 at 9:14 pm (7 years ago)Yeah, but a lot of us want accurate bass – not boomy, bloated Deadmau5 concert type bass that sounds like a16 yr old’s car.
Dwayne Hunt
December 14, 2017 at 10:04 pm (7 years ago)I’ve always thought that to solve this positioning dilemma, simply put the speakers very close to your ears…..as in a pair of good studio grade headphones. Seriously, why are we beating this deadhorse? I suspect that the new guys coming up that don’t have a room to accommodate the proper positioning simply put them just anywhere. I just hope they are careful to place them so that they don’t fall and hit them on the head. If their room will accommodate the proper specifications, they probably have read a hundred times where to place the speakers.
By the way, Mr Bones, sometimes I enjoy my pickup truck that can sound like a 16 year old’s. I’m in my seventies.
Rumi
December 14, 2017 at 10:39 pm (7 years ago)in my experience, even the “equilateral triangle” advice is a myth. I almost always end up widening the speaker angle. My ATC SCM100A are almost parallel to the back wall, for example.
Justin C.
December 15, 2017 at 3:23 am (7 years ago)If you follow the full guidelines here you should be able to get that too!
With that said, if you did want mixes that have tons of bass, it’s probably not best to be monitoring on a system that puts out exaggerated bass anyway.
Unless you learn to really fight what you’re hearing, your mixes will tend to sound like the inverse of your speakers:
Bright monitoring tends to lead to dark mixes, boomy monitoring tends to lead to bass-light mixes, and so on.
Scott
December 15, 2017 at 9:55 am (7 years ago)Your comment made me fall asleep.
Jason Kohnke
December 19, 2017 at 6:18 pm (7 years ago)Unlike the comment from the cro-magnon, this is great information. The spreadsheet was interesting. Thanks Carl for taking the time to comment.
Carl T
December 19, 2017 at 7:50 pm (7 years ago)Thank you Jason. Please let me know your results if you decide to follow the NPE. The secret is to follow it exactly as prescribed.
Jason Kohnke
December 19, 2017 at 9:16 pm (7 years ago)I have looked at the sample version and am curious how you came up with the suggestions. Based on the graph, I do not see how the suggestion of “ear height” equates? Is it the intersection of certain axials or? https://uploads.disquscdn.com/images/66d3a60c2dc661b6e62013bf916ec9847057dbe7b139e16377fc66ccbeb6a428.png
Carl T
December 19, 2017 at 10:27 pm (7 years ago)Call me on my cell (615) 400-5479 and I’ll walk you through it.
Jesco Lohan
December 21, 2017 at 12:33 pm (7 years ago)Hi Carl,
thanks for chiming in and the amazing work you do! I wouldn’t be here without it.
I’ve studied your approach in great detail, and after much experimentation came up with these adaptions to them, to apply the same theory in small and asymmetrical home studio rooms and only using music and your ears.
On boundary compensation: you’ll find that I covered that under “The Magic of “Room Control” (aka “Space Loading”)”.
To place your sweet spot in the best position in terms of room modes (including avoiding the axial null), I’ve developed the Bass Hunter technique, which you can find here:
http://www.acousticsinsider.com/fixing-low-end-without-knowing-acoustics/
All the best,
Jesco
Jacob W-Petersen
December 24, 2017 at 3:24 am (7 years ago)A useful tips for small spaces is to start with a listening height at about 87 dB and then adjust down into small step. Here it is possible to hear most details without bass frequencies blurs the mix. Another tips is to listen to the whole mixed in mono and make adjustments, and then switching back to stereo.