Music Sync Skills: 7 Tips for Creating “Timing Edits” for TV, Film and Video
To take advantage of another possible revenue stream for their work, more and more music creators are turning to licensing their music for TV, ads, film and video.
It’s a common occurrence for licensing companies to ask the artists and composers they work with to provide 15, 30 and 60 second edits of their tracks for easy insertion into advertisements, web videos, and brief features in TV shows.
Providing these shorter clips is just about a requirement in the production music world, but any artist looking to license their music would gain from doing so as well.
These shorter “timing edits” can often outsell their full track counterparts! Recording engineers can also gain from having the skills to create timing edits, giving them the ability to offer an additional service to their clients.
While it at first, cutting down a track might seem like a simple task, once you get into it, the editing process can prove challenging. Here are seven tips along with an example to help ease the way.
1) Use a two-track editor.
While some multitrack DAWs are up to the task of allowing for fast and intuitive 2-track editing, using a dedicated two track editor like Sound Forge, Audacity, Adobe Audition or the like for your final stereo edits can be easier—depending on what DAW you use.
Where a DAW is designed for recording and mixing or looping and production, editing is the sole specialty of this type of audio software, and the layouts are often ideal for the task.
Audio editing programs have many useful tools, and being familiar with all the features offered by your software will help greatly in creating timing edits. One feature you might find, depending on the program, is the ability to use playlists and cut-lists to rearrange sections of a final mix into a new edit. This is a non-destructive way to test your edits without always relying on the undo button! (Though needless to say, you’ll always want to be working on a copy of the master file.)
Other useful tools are separate windows for a time display, inserting time, zooming, markers, fading, muting—all kinds of choices to get creative with.
2) Have an instrumental, drum and bass only or bed mix to cut to.
You are bound to run into instances where some aspect of the mix makes it difficult to cut where you would like to. It could be a cymbal crash, a melody note or sustaining instrument—something you’d be better off without. Many times this can be solved by having an instrumental version, bed version or other alternate mix available to copy and paste from.
If you’re an audio engineer editing for a client, be sure to have them make these alternate mixes available to you before getting started! They will give you much more flexibility in choosing your edit points.
3) Enable “Snap to Zero Crossing”.
Snapping to, and cutting at, a zero crossing eliminates the annoying pops and clicks that can occur when editing an audio file. A zero crossing is a point where the amplitude of the audio is zero, and can best be understood graphically.
This image has a marker placed at a zero crossing for channel 1. Notice how it avoided the amplitude spike just to the right of the marker:
If you look really closely, you might notice that technically, only channel 1 is at a perfect zero crossing, while channel 2 is just slightly above zero. This is common with stereo audio files, and isn’t a deal breaker. If any “click” remains on your edited track, a very brief crossfade, of even just a couple of samples is likely to fix the issue.
This next image has a marker at a non-zero crossing. It is placed right at an amplitude peak and is sure to pop or click if cut here:
When making a very exact edit you may need to turn this off, but ninety percent of the time leaving snap to zero crossing enabled will work out best for you.
4) The final hit.
Endings that ring out are ideal. Keep this in mind if you’re the one creating and recording the song!
By “ringing out” I mean a cymbal or instrument hit that is held long rather than short. (Short endings are called “button endings”). And I don’t mean a fadeout either! Fadeout endings make creating timing edits just about impossible.
A sustained ending gives you much flexibility in creating your timing edit. If your 0:30 edit is coming in at 0:31 and your sustained ending is long enough you can simply fade the hit to fit your time.
One caveat here: you don’t want a final hit to come in too early. For example, in a 60 second edit you wouldn’t want your final hit happening at 0:50 and then ringing out for ten seconds. It’s just not useful. Keep it closer to hitting at 0:58 or 0:59.
If you’re an engineer editing for a client, keep a collection of cymbal crashes handy. You can paste one in on an ending hit as necessary to extend it. Or, consider adding reverb to extend a final hit that is too short—whichever is the most musical solution.
5) Do and don’t time stretch.
You may ask, “why not just get the whole track pretty close to the final timing then use the software’s time stretching feature to make it exact?” This is generally not a good idea. Time stretching an entire file and keeping the original tempo and pitch can induce audio artifacts that will affect the quality of the recording.
There is one instance where I’ll time stretch: on a final hit of a song which rings out too long, but sounds unnatural when faded out to get to the time I need. In these cases, I’ll highlight the hit, make some calculations, and tell the software exactly how much to shrink the hit to fit in the allotted time. Sometimes it works, sometimes not, depending on the length and on the source material. The reverse can be done to stretch a final hit to be longer, if adding a touch of reverb or a cymbal crash isn’t working.
6) Find creative musical solutions
Cutting and pasting is your friend when it comes to getting an exact timing, and a lot of artistry comes in to play when doing it. Having a good ear and some musical training is essential. You have to be able to dream up possible solutions as you’re listening. Such as: “Oh, I could copy this bar and paste in front of that one to get the three seconds extra I need—it’ll sound perfect”.
Some solutions might include copying and pasting in two extra beats to make a measure of 6/4, grabbing a drum fill to use as an intro when you’re a second or two short, or maybe simply repeating a phrase. Whatever it is it has to sound musical and natural of course. The more you do these timing edits the more these kinds of creative solutions will come to you.
7) Don’t be afraid to “give up”.
By “give up”, I don’t mean giving up on completing the edit! There’s always a solution. It may just take a different approach than what you’ve been trying.
Sometimes you work and work at it and you just can’t make a musical edit. That’s OK. Delete all your work, call up the original file and start from scratch with a fresh approach. More than once I’ve struggled for some time only to start fresh and complete the edit in ten minutes! Somehow I’m able to find what I was missing before just by starting from a different place or coming back to it at a later time.
Below is an example where I create a 60 second “timing edit” from a full stereo mix.
Knowing I want to get to the meat of the track right away and that leaving long intros is generally not a good sales strategy for these shortened versions, I give the track a listen while thinking about what moment would make a great starting point.
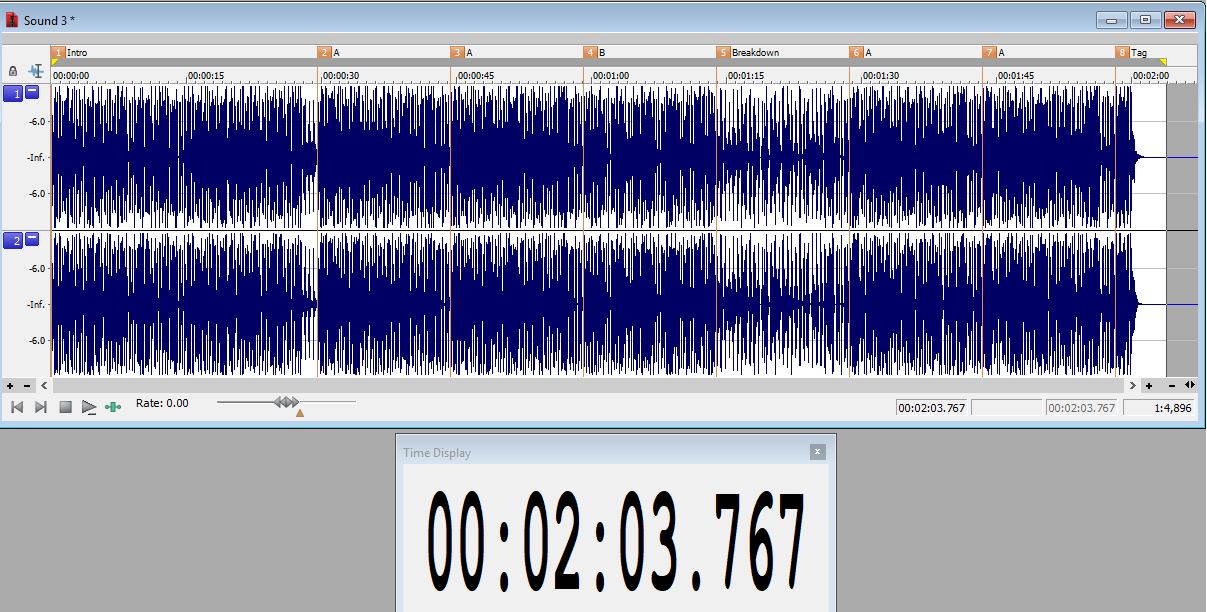
In this example, the form of the song is Intro, A, A, B, Breakdown, A, A. After the final “A” section is a tag ending (a “tag” is simply a repeated phrase) with a cymbal crash on the final hit. The total length is 2:03.767.
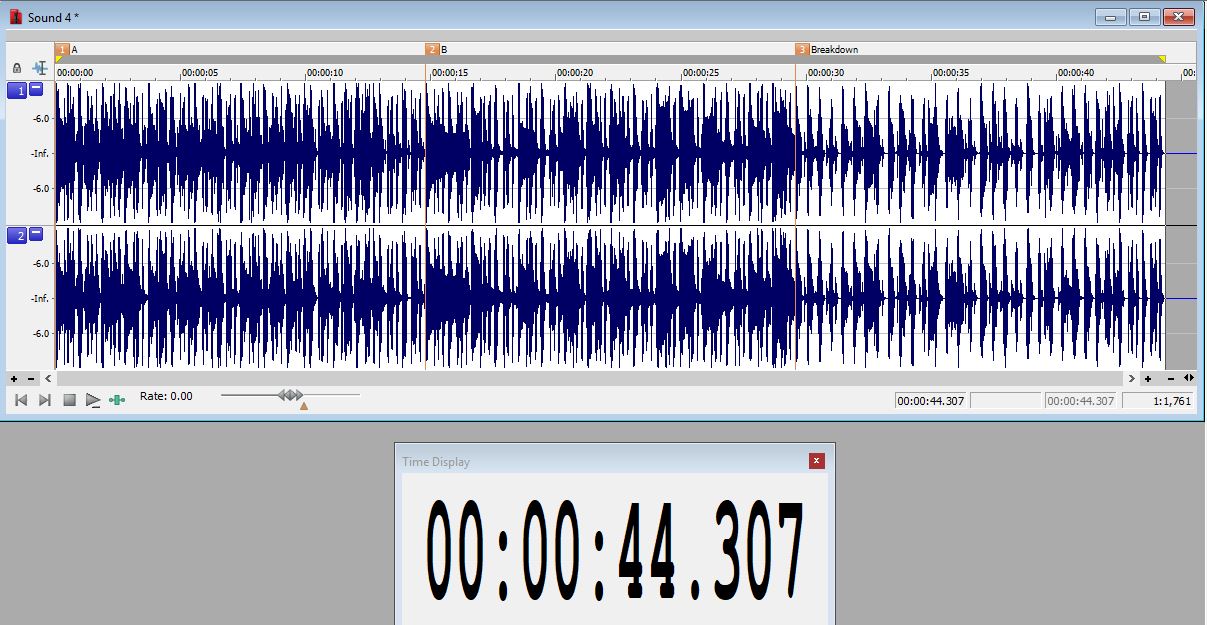
I’d like to include an A section, a B section and the breakdown in the 60 second version, so I start by copying these sections to a new file. This new file with an A, B and breakdown is now 44.307 seconds in length, meaning 15.693 more time is needed.

A simple cut didn’t get us to 60 seconds on the nose, as is often the case. We’ll have to get creative.
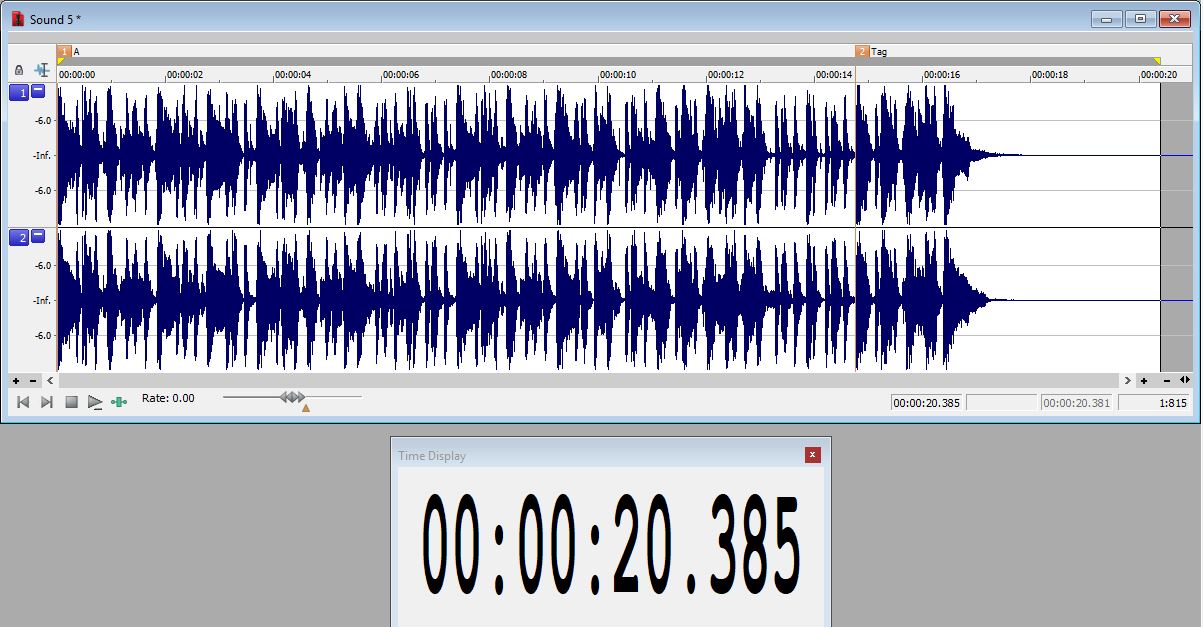
Adding the last A section through final hit would make musical sense, but the total of those is 20.385. Pasting them into my new file would make it 5 seconds too long. However, there is the last bar of the last A section which includes the tag phrase at the end. That tag phrase can be cut out while still sounding musical.

This 20 second snippet can be adjusted just slightly and added on to give us the 60 second runtime we need.
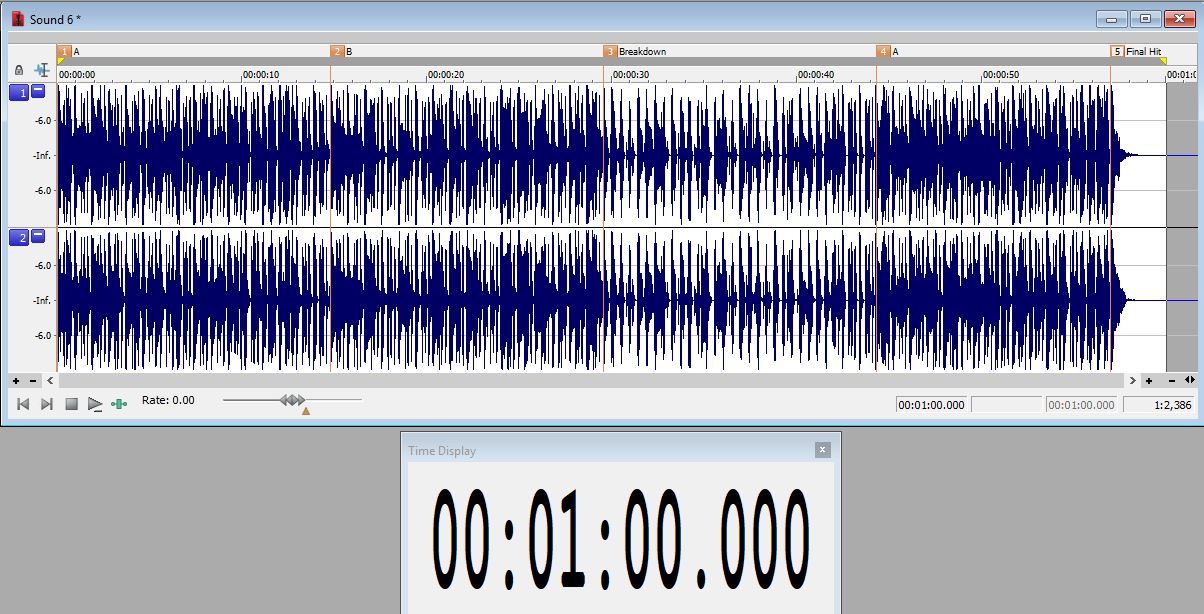
Cutting that extra phrase results in an extra A section with a time of 16.667—just one second more than needed. Much better. The fade time on the final cymbal crash leaves plenty of time to cut out the extra second and still keep things sounding musical, so I paste this new doctored section into my new file and re-fade the final hit to end at exactly 1:00.
Done! Admittedly, that one was pretty simple but if you create a lot of music, you’ll have a lot of opportunities to practice and come up with your own creative solutions to challenging tracks.
Making timing edits over and over again can turn into a bit of a chore, but sometimes the challenges are what keep it interesting and give you a sense of accomplishment when you come up with a sly way to make a problem edit really work.
Like anything, the more you do it the more proficient you’ll become. So go get editing and good luck!
Michael Nickolas is a music creator, musician and author working in Massachusetts. Recent TV placements include “American Pickers”, “Real Housewives” and “Wyatt Cenac’s Problem Areas”.
Please note: When you buy products through links on this page, we may earn an affiliate commission.


