5 Points of Wisdom from the Akai MPC That You Can Bring to Your DAW

Akai recently announced the triumphant return of its standalone MPC line with the X and Live models. Even if you can’t justify the $1200-$2200 they command, you can still apply some of their best features to your DAW-based productions.
It’s safe to say the barriers to entry for producing music—especially electronic music—have never been lower.
Faster and cheaper computers, a slew of no- and low-cost apps available for your tablet, a burst of DIY hardware, and more online video tutorials each day means that anyone with even an inkling of making the next fire club track has more places to start than most of us can fathom.
This was not always the case. EDM’s forebearers, producing house and techno music in the 1980s and 90s, tended to start out on a small setup consisting of some Roland hardware synthesizers and drum machines, and little else. And while those vintage-style XOX drum machines certainly deserve all the acclaim bestowed upon them, ask any veteran producer about the biggest innovations to arise between now and then, and invariably you will hear three letters: MPC.
Originally dubbed the “MIDI Production Center” and later changed to “Music Production Center” as technology evolved, the MPC is probably still the most commonly-used hardware sampler in the world.
It helps that there are many models that have held up remarkably well over the years, each with their own intricacies and quirks. While early models such as the 60 and the 3000 have now obtained “vintage” status (and accordingly, vintage prices) many of the later models are easily found on Craigslist, eBay, and Reverb, and offer a gateway into the world of hardware-based, rhythm-centric production.
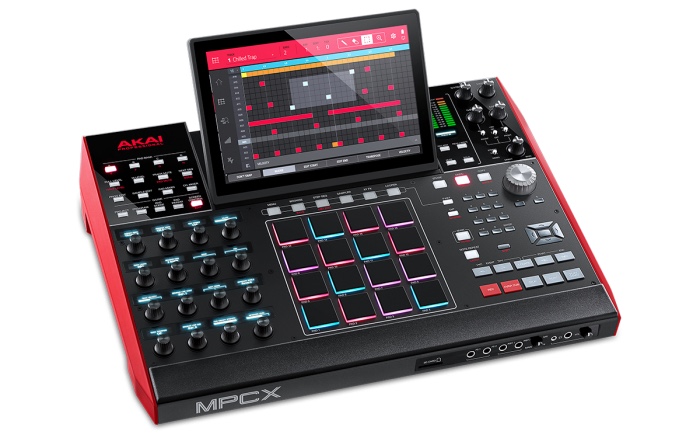
There was a swell of renewed interest in the MPC line last month, when the Japanese-based manufacturer surprised the beatmaking world with the announcement of the new (12th and 13th) versions of the famed workhorse: the MPC X and the MPC Live. One of the key benefits of both of these is their ability to allow you to work remotely, without being tethered to a laptop.
While both of the new MPC models seem exciting and capable, very few budding beatmakers are going to be able to justify beginning their production careers on either, simply because they are quite expensive compared to the alternatives at $1199 USD for the MPC Live and and $2199 USD for the MPC X.
But even if you aren’t ready to drop that kind of money, there are techniques to learn from the MPC that you can integrate into your own software-based production workflow right now. Here are five of the most powerful:
1. Economize Your Library for Greater Creativity
Regardless of which MPC model you are using, there is a finite amount of space available for your samples. In theory, this doesn’t sound like it would have a hugely positive impact on your workflow, but in practice, having some sort of cap on the number of audio snippets at your disposal can be extremely helpful, because it forces you to make decisions right away.

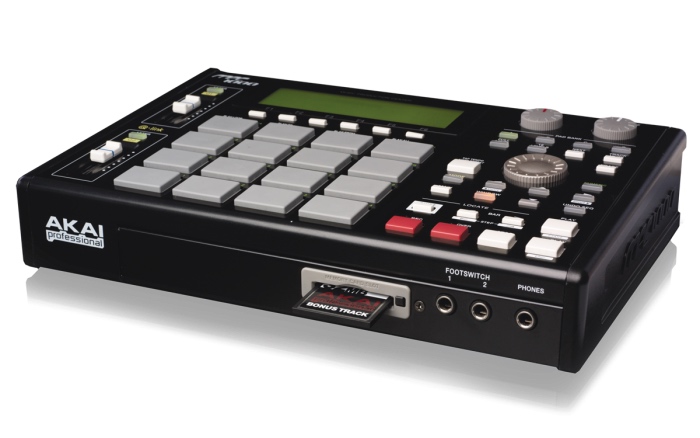
Often, limitations can aid creativity, as evidenced by the now-classic MPC 1000 and its “whopping” max storage capacity of 128 MB.
Granted, I do have a huge folder of samples of all kinds on my desktop, but more often than not, finding the right sample from within that haystack is a daunting and nearly impossible task.
On my MPC-1000 however, which is maxed out with just 128MB of available memory at once, I have a folder of drums with a few kicks and a few snares and I’ve been able to make do.
Similarly, I have folders for percussive hits, vocal samples, one note bass samples, and a folder for various noise sounds. I’ve produced countless tracks without having to import a single additional sample.
You can take advantage of the kind of curation and economy of space that the MPC forces you into by doing one simple thing: Choosing a random size—whether a 128MB limit, or a strict number of sounds—and creating a folder that stays within that boundary.
It often seems counter-intuitive to new producers, but by simply limiting your starting material, your possible paths will multiply. There is a time to curate your library, and a time to create. Trying to do both at once almost inevitably leads to “analysis paralysis”.
2. Edit the Velocity Curves of Your Pads

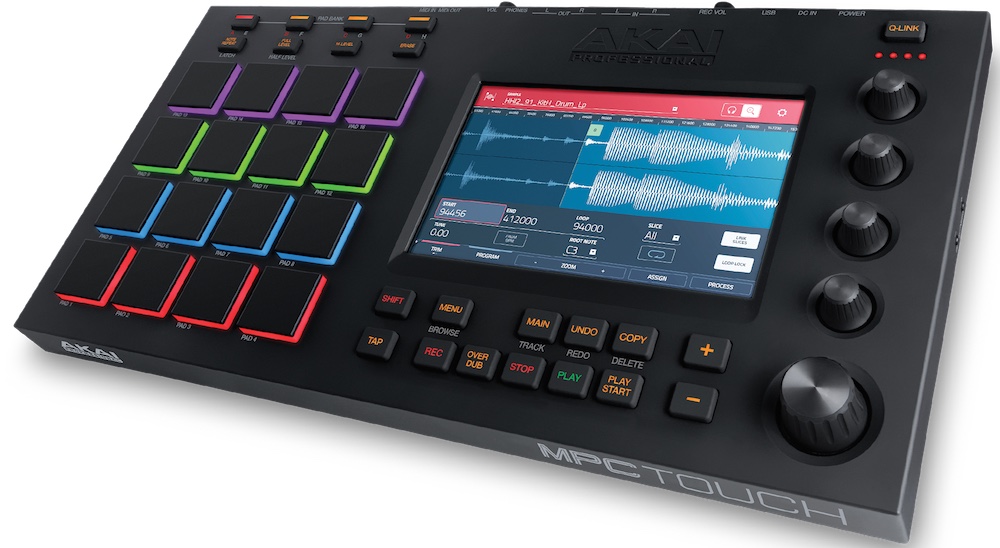
The MPC touch, priced around $600, is one way to bring classic control to your computer. But alternate (and less expensive) brands can also be adapted to provide a similar feel.
One of the most essential appeals of the MPC—or any good piece of hardware—is how it truly feels like an instrument, and how its layout and physicality help create level of expressivity that is hard to achieve right off the bat with a DAW-based setup.
There are two reasons for this: a static user interface (we will return to this idea later), and the pads. Yes, THOSE pads. The Roger Linn-designed, 4 x 4 grid that is now iconic around the world.
The MPC series shines because the pads have always been a central part of the design, from the very first MPC, these were not just an afterthought thrown onto a plastic chassis. The quality, sensitivity, material, durability, playability, and “give” are all essential parts in the process of inputting information through those pads.
You are probably saying to yourself right now, “Yeah, but I have some pads on my MIDI controller right here.” Well, not all pads are created equal.
Yes, there was a time when the red/blue series of MPC-1000s was plagued with pad problems, and MPC-heads love to argue about this, but in general, I have found the quality and responsiveness of the pads on the MPC-1000 to be incredibly dynamic and expressive, for one reason in particular: The the ability to edit the velocity and pressure curve for each individual pad so that they respond in a way that feels natural and musical to you.
Fortunately, almost all pad-based MIDI controllers allow you to edit their velocity curves as well, and once you do this, and spend a bit of time playing around and paying close attention to how responsive your controller is, you’ll quickly be able to put that newfound attentiveness and preciseness to work in your productions.
3. Make Your Samples Cut Each Other Off

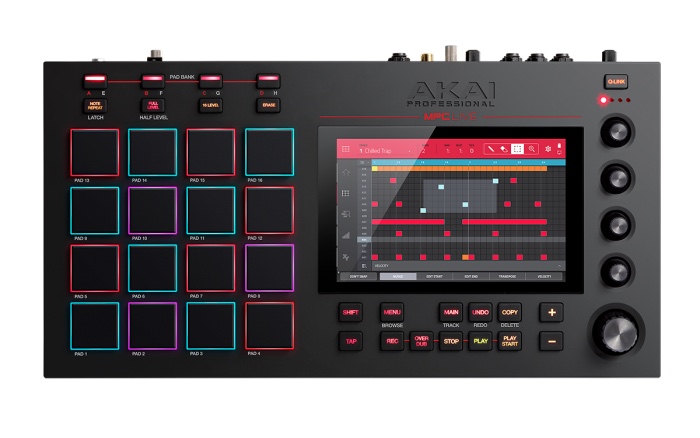
The recently-announced MPC Live provides a standalone EDM production experience at a reasonably accessible price point, and is ready for use on stage.
One of the simplest techniques to import from the design of the MPC series can also have the greatest impact on your workflow, and the tightness of your productions, especially if you are working with BPMs of 125 and up.
In the MPC world, this technique is easily accomplished, especially after installing the coveted third-party JJOS2XL operating system, which allows you to assign mono or poly playback modes for your sample programs with the simple scroll of a knob.
In Ableton, by default, a drum rack will not be set up to have its samples automatically cut one another off, and the sustain can sound messy and un-idiomatic, especially at faster tempos.
Fortunately, you can easily fix this within Ableton by assigning samples to a “choke group”: At the far left of a drum rack, you’ll see the I/O tab. Click it to expand the “chain list”, where you can assign one or more choke groups, making these samples playback “monophonically”.
By simply setting up a mute group and then jamming in your chosen sample program, you’ll immediately find yourself drawn to rhythms and choices that you wouldn’t normally make, as well as choices that will instantly be more reminiscent of the types of productions usually pumped out by users of the MPC line.
There are many other ways to ensure that the programmed rhythms of your sample patterns—whether drum sounds or otherwise—will be punchy and easily understood by the listener. For example, you can simply assigning release and decay settings to just barely-audible minimal values. However there is something familiar and inspiring about this classic type of sample cutoff.
4. Give Yourself an Extra Hand: Use a Footswitch.
Right on the front of the MPC-1000 are two jacks for footswitches. You can’t miss them, and I can’t help but imagine that this conspicuous placement was by design: Putting the two jacks in front just screams to the producer to put them to use.
Being able to assign overdub, punch in and out, or play/stop functionality (as well as many more options to use footswitches) allows you the keep your hands involved in playing, tweaking, and staying active and in the moment.
Ask any drummer: Putting all your limbs to work at once will also increase your potential for rhythmic variation immediately.
In Ableton, this same functionality can be accomplished by an often-overlooked option: Plug a footswitch into the now-easily-sourced Push v1, freeing up both hands.
5. Adopt a Static User Interface
Part of the reason the design of the MPC has stood the test of the time is that it has astatic user interface, meaning that once you’ve mastered it, the creative process becomes as intuitive and right-brained as possible.
“Static” is just a fancy way of saying nothing on the machine really changes position. Your hands always go to the same spot for the track mute button, they always go to the same spot for the main volume control, the two Q-link faders are always in the same spot and so on.
By using their MPC more and more, producers build muscle memory, literally lowering the physical barrier between them and they want to express musically.
Fortunately, the same thing can be accomplished with your own MIDI controller of choice—it just takes a bit of foresight. Choose a layout that fits what you need, whether it’s keys, faders, buttons, knobs, or some combination of the above. Then, make a MIDI map for that controller and stick with it. Don’t change it until you have it memorized and can play it blindfolded in a dark room. It will almost be like you are playing an MPC. Or at least, the next best thing.
Leo Maymind is a producer, DJ, and writer living in Los Angeles, CA. He is obsessed with sound and can be reached at lmaymind@gmail.com.
Please note: When you buy products through links on this page, we may earn an affiliate commission.


