The 7 Steps of Ideal Mic Placement
Wessel Oltheten, producer, engineer and author of the book Mixing with Impact offers a roadmap to getting better sounds out of your mics, every time. For even more on this subject, look for his new in-depth series on placing mics, starting next month on SonicScoop.

Getting the ideal mic placement means making important decisions before you even move the mic. Here are 7 steps to getting better results in any context.
1. Guess—but don’t just guess.
I start by placing every microphone at the spot where I think the odds are best for it to work well.
Starting with this kind of “informed guesswork”, based on past experience, may seem obvious. So I can’t stress enough the importance of making your first guesses as reliable as you can. Practice makes perfect, so to start making better guesses in the future, begin making them more often right now.
You don’t always get the opportunity to do a thorough sound check before recording, and in those cases, a good guess can make the difference between a bad recording and a usable one.
Recording large ensembles such as symphonic orchestras often means spending 90% of your time on preparation—without hearing anything of much use—and 10% on adjusting things on the spot. That’s simply all the time you get when there’s 70 musicians and a conductor waiting.
But even when you are in the position of being able to make endless adjustments to your setup, you don’t want to start off a new day wasting your attention and fresh ears on auditioning a mic setup that’s probably not going to make the cut anyway. So before you do anything else, make your best guess. There’s plenty of room for creativity and experimentation in fine-tuning your initial placement. And that’s what we’l focus on next.
2. Actually listen. (Preferably in headphones.)
Going into the recording space and listening to the acoustic sound there can help you determine the best starting position, but this approach presents a couple of difficulties.
First, you have to have experience in estimating what a microphone will ”hear” as opposed to what you are hearing as a flesh and blood, two-eared human being in the room with the instrument.
In a three-dimensional sound field, it’s relatively easy for a person to distinguish between direct and reflected sound. This is because the reflected sound arrives from different directions, while the direct sound arrives from only one direction. The direct sound is not only the loudest, but also the first sound to arrive at your closest ear, which further helps your brain to make the distinction. Reflections are deemed less important, and so the brain automatically ”zooms in” on the direct sound and filters out much of the rest.
This all changes when you use a microphone to capture the sound. There’s no longer a three-dimensional sound field in which you can move around as a listener—only a source that consists of the direct sound and all reflections that were recorded along with it, all coming at you from the same direction.
This makes it a lot harder for your brain to separate direct from reflected sound, which is why a microphone can’t cope with the same amount of reflections as elegantly as your ears can. That means you will usually need to place the microphone closer to the source than you would expect after listening in the room.
One method that can work well in determining the best distance is to stand in the recording room wearing headphones that are highly isolated, and listen. (Preferably in mono, should you be using more than one microphone.) From there, you can better determine the direct-to-reflected ratio your microphone picks up in a particular position and better gauge the ideal distance for your mic.
In headphones, you can also make more precise decisions about placing microphones laterally. You’ll quickly hear the impact of moving a microphone closer to the center of a speaker or drum head, for a brighter tone, or closer to its edge for a darker, more resonant tone. You’ll also be able to better hear the sometimes drastic changes in tone that can come from positioning a microphone closer to the body or fingerboard of a stringed instrument. More on this in step 5.
3. Find the right perspective.
The most important thing to get right at first is where this sound should fit in the bigger picture. Should it be relatively far or close? Small or big? How much ”air” should you be able to hear around it?
If you want to increase the perceived size of the instrument in question, you can place the microphone closer, or choose a narrower pickup pattern.
These kinds of moves can work well up to the point where the microphone is so close or narrow, that it isn’t capturing the source as a whole anymore. If you go too far, it may begin to sound smaller in size, because you aren’t able to reference the source to its surroundings anymore. It fills up the entire picture, and perspective is lost.
The opposite also applies: if you wish to reduce the perceived size of an instrument and hear more of its surroundings, you can place the microphone further away or choose a wider pickup pattern. This can work well, up to the point where you lose your sense of foreground. That can also kill the perspective. If nothing is comparatively close, then everything in the picture just seems far away and gets lost.
You’ll want to think about your foreground and background not only for the instrument in question, but also in relation to the other elements in the mix. Should this new mic placement help create a tone that is closer up or further away than other sounds in the arrangement? Should it feel bigger or smaller than other sounds in the recording? Brighter or darker? Make these decisions first, and then move the mic to help realize your vision.
4. Control the tonal influence of the reflections
The next step also involves taking into account the effect the acoustics have on the sound; this time, in how they change the timbre of the source.
Your overall perspective may be in check, but it’s possible that the instrument simply doesn’t sound good because the microphone is in an acoustic “dead spot”.
Such dead spots exist in practically all rooms, because some lower frequencies will resonate due to the dimensions of the space, forming a pattern of high pressure zones (antinodes) and dead spots (nodes) at fixed locations.
If you are unlucky, you may find that the microphone is placed where an important frequency can’t be heard, or where a particular frequency sounds much stronger and more resonant than other frequencies.
Looking for the best locations is very similar to finding the best place for your speakers and listening position in the control room: just move them around to where the low end sounds most even. In doing so, you try to maintain the perspective you came up with in step 1, by moving the microphone and the source together. (See figure 17 below.)

Figure 17: Room modes create zones of high pressure (black) and dead zones (white) at frequencies corresponding to the room’s dimensions. Two of the primary modes for a rectangular room are pictured here. The recording setup in example A is unable to properly register the two frequencies since they cancel at the microphone position. Setup B gives a more even-sounding result, since the places where the room’s frequency response is most skewed are avoided. In reality, so many of these modes exist in a room that it’s impossible to take them all into account; it’s mainly a matter of avoiding obviously bad spots and then experimenting to find the best set of compromises.
The process of looking for the most even low frequency response is less of a science than you might hope it would be. Without some serious computer simulation or rigorous measurements it’s impossible to know the exact location of all nodes and antinodes.
However, there are a couple of notoriously bad spots to avoid, particularly in rectangular rooms. Near a wall or in a corner you’ll always find antinodes, and dead center between two parallel surfaces there will always be a node (and an antinode at a higher frequency). You can also expect nodes a quarter of the way between two parallel surfaces.
The effects of room modes can most easily be heard on a low frequency sound source. If you have an afternoon to spare, you could play some band-limited (20-200Hz) pink noise in your recording room and map out the most striking differences you come across when walking around the room. And don’t forget to listen at different heights! It’s best to use multiple speakers (two, or better yet, four), to increase the odds that they’ll excite many different room modes.
After walking around for 15 minutes, you’ll have a good idea of your room’s low frequency behavior. Where does it sound balanced, where does it sound thin, and where does it get out of control?
Room modes aren’t the only acoustic phenomenon to take into account when setting up for a recording. Short reflection paths that allow the source to reach the microphone via one nearby surface are just as important to avoid.
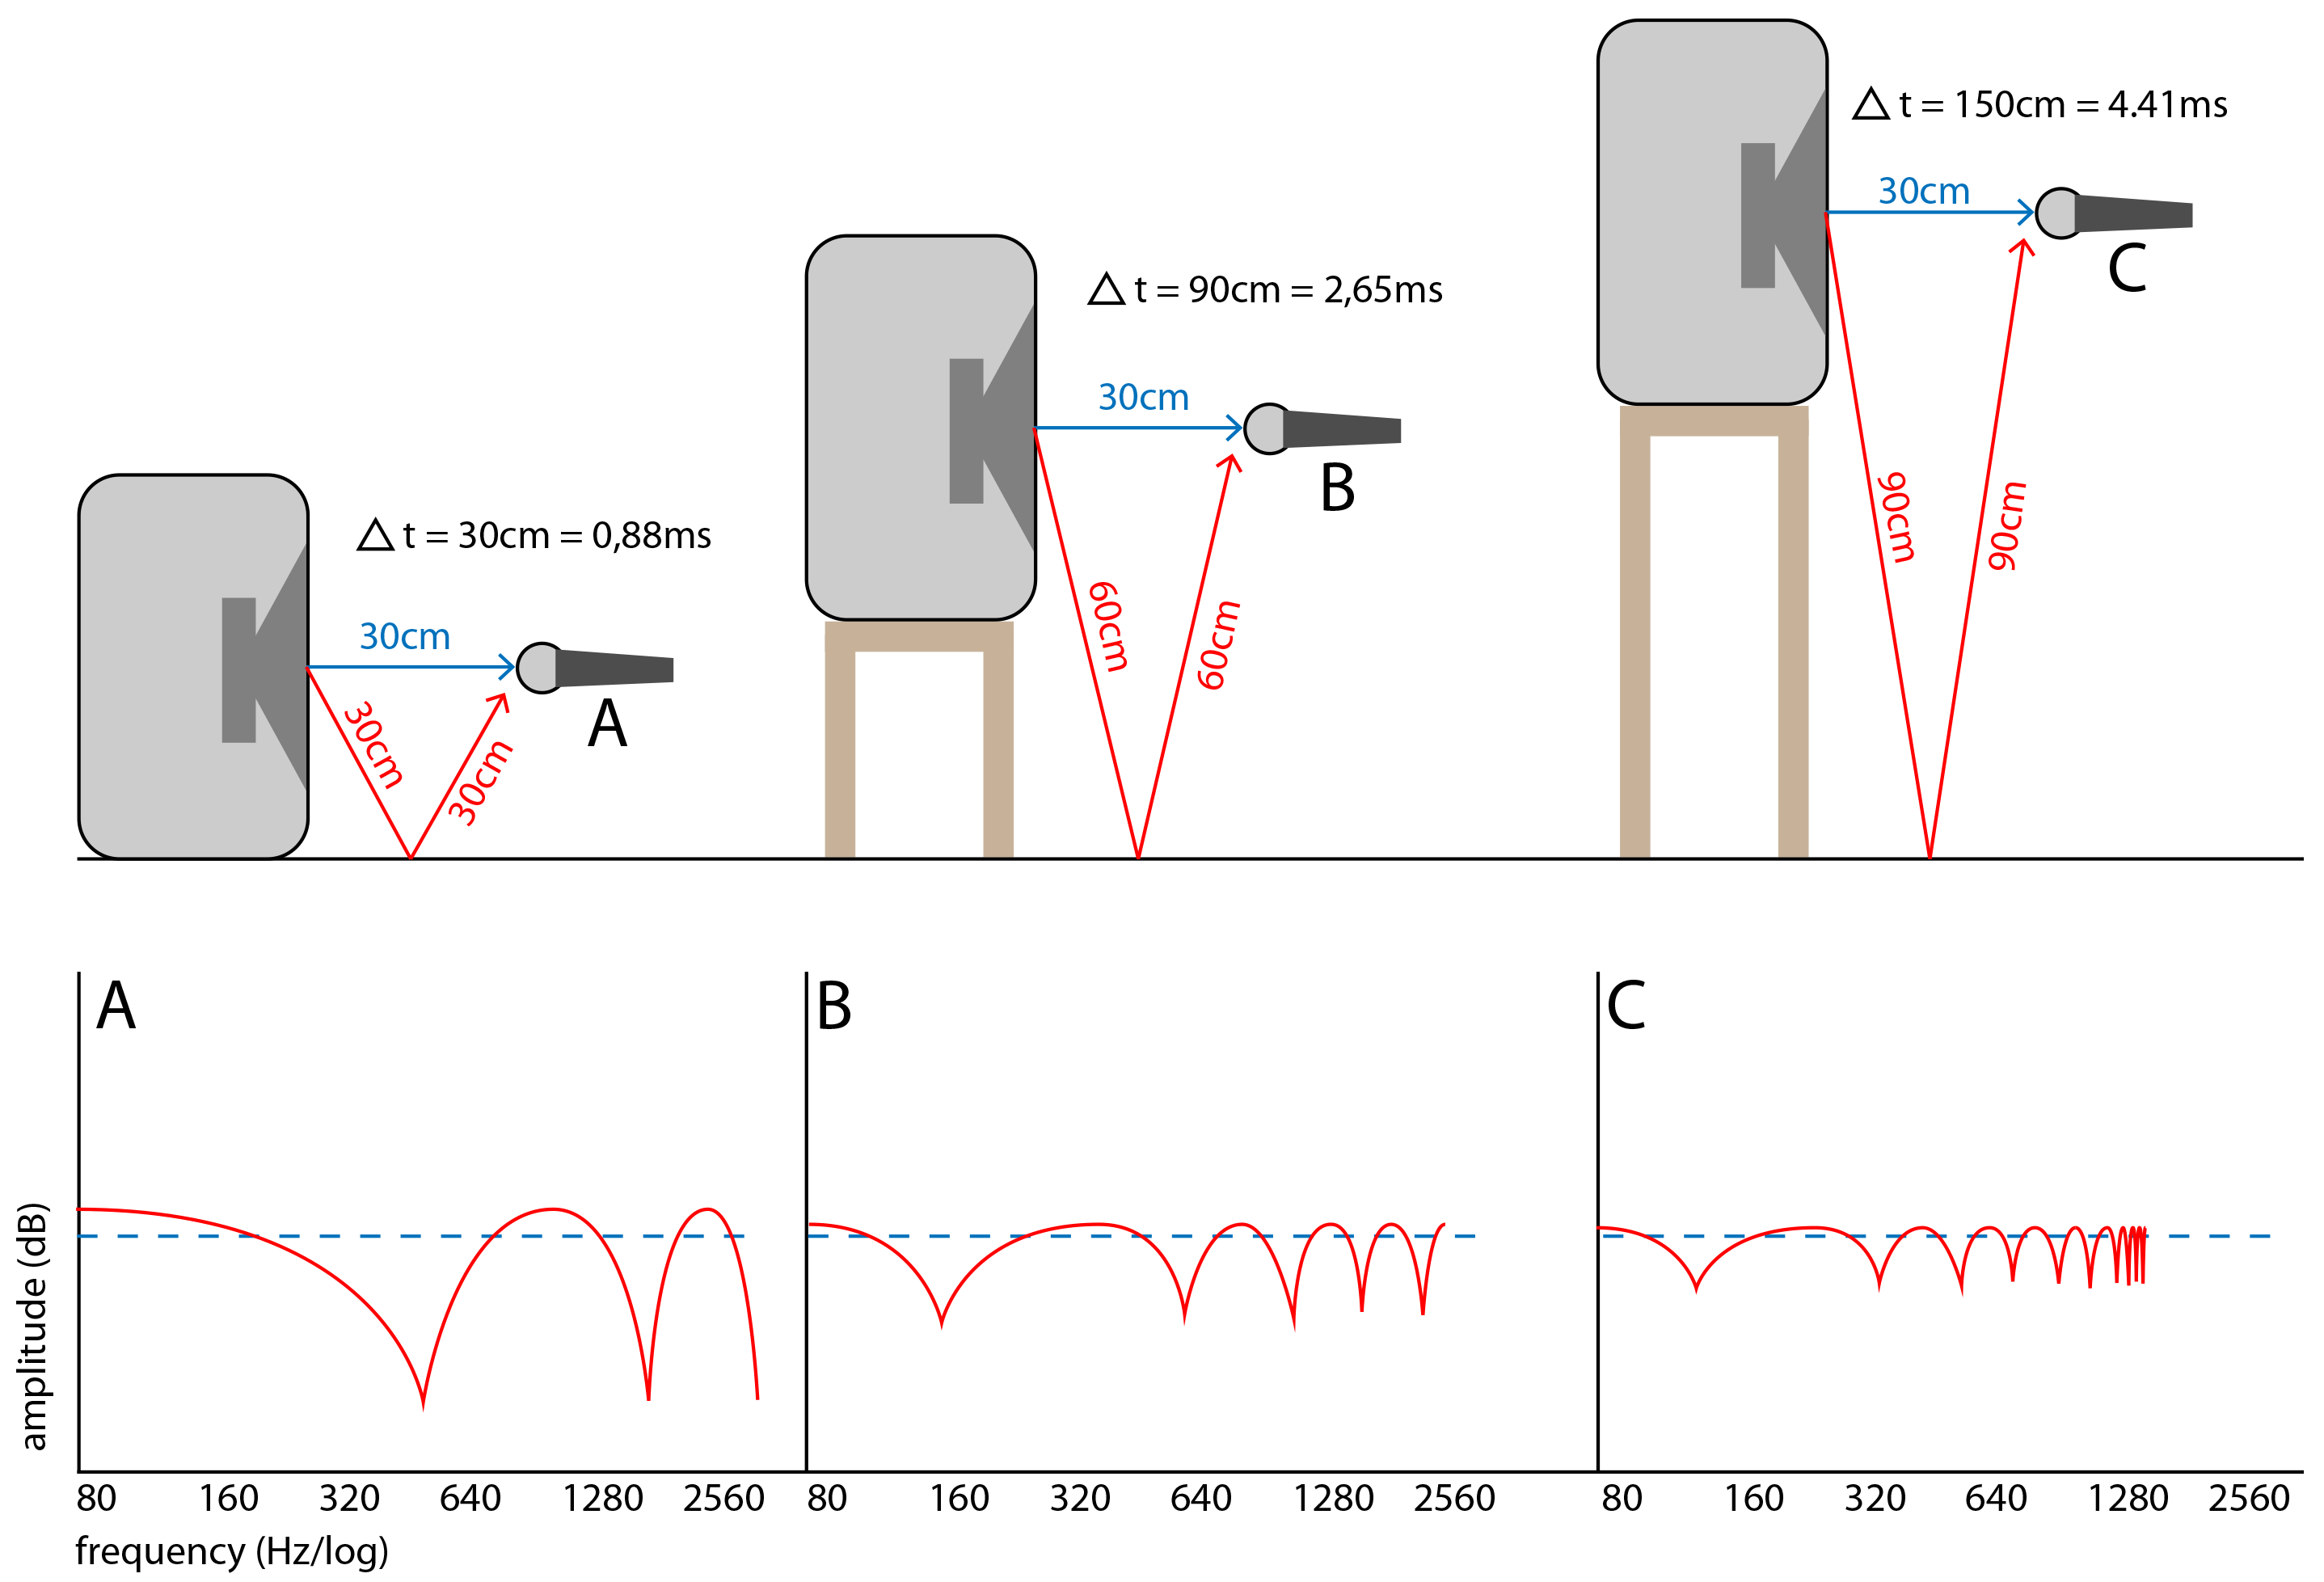
These kinds of reflections are particularly strong, because they’ve only had to travel slightly further than the direct sound, and have only been partly absorbed by one surface on their way over to the microphone. This means that short reflections affect the source sound more severely than longer ones, and their interference can produce an annoying “comb filter” effect. This will make your recording sound unmistakably small, no matter how hard you try to correct it afterwards.
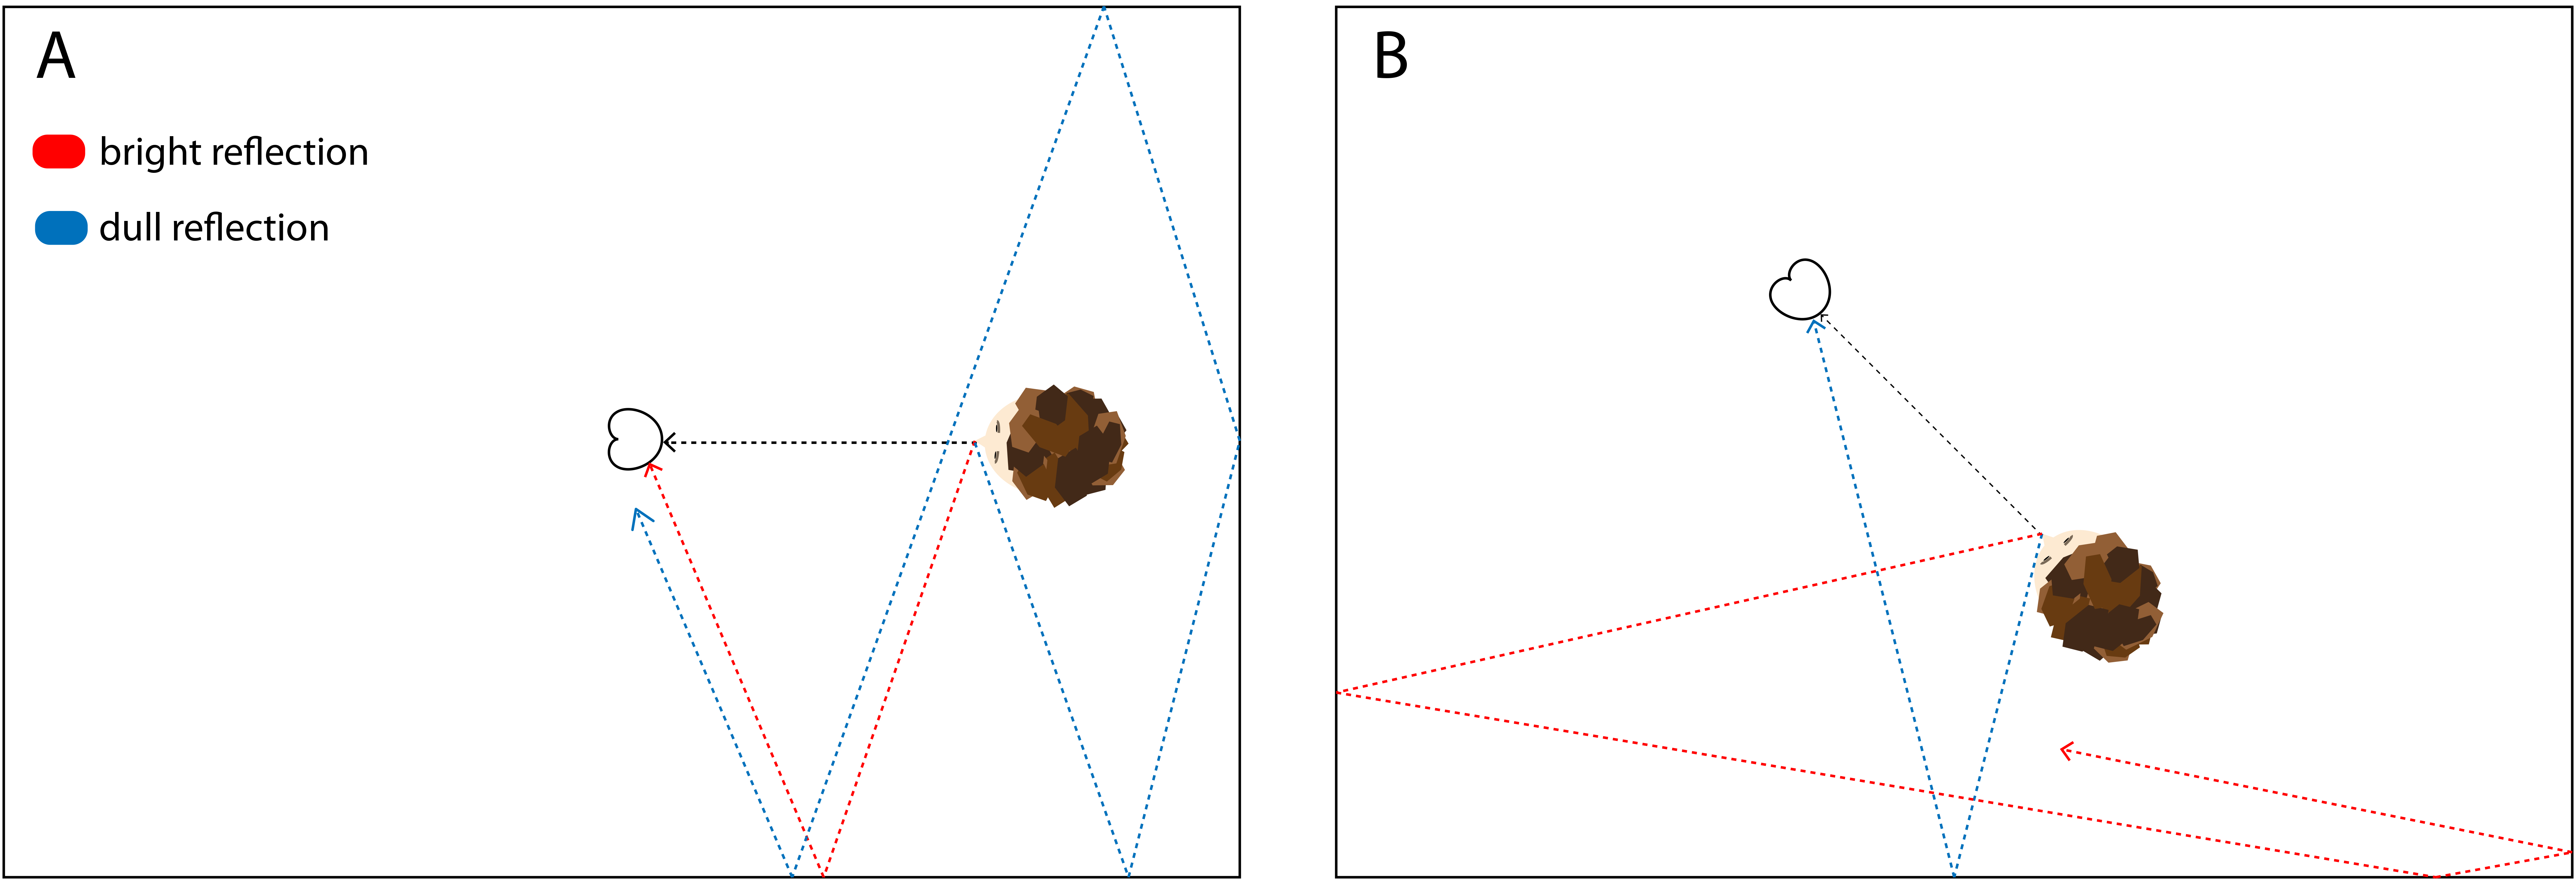
Short reflection paths can be avoided by not recording in small rooms, by placing the source and the microphone as far away from nearby surfaces as as possible (while being careful to avoid the exact center of the room because of room modes), and by carefully aiming the source and the microphone as seen in figure 19.
Finally, acoustical aids such as movable absorbent panels (called “gobos”) or diffusors can help to tame short reflection paths.

Figure 18: Reflections that arrive at the microphone an extremely time after the direct sound—within 5ms—can cause severe comb filtering. By placing the source (in this example a guitar amplifier) further from a nearby boundary (the floor), you influence two things: the time it takes for the reflection to reach the microphone, and how loud it will be at the microphone, because sound intensity drops with distance. The frequency response of the resulting filter is shown below each setup.

Figure 19: Reflections that arrive at the microphone shortly after the direct sound (between 5 and 20ms) give the impression of the sound source being in a small room (A). If you want to lessen that effect without moving to a bigger space, you can try steering the brightest reflections away from the microphone. Because most sound sources radiate directionally at higher frequencies, it is possible to aim them so that these frequencies reflect away from the microphone (B). Just like in playing billiards, you can use the angles to your advantage.
5. Fine-tune the foreground
By now you’ve come a long way: you’ve figure out the optimal position of the source in the room and the right microphone distance and angle to capture it. The next step is to listen in detail to how the source sounds and make any needed adjustments.
Are you capturing it with the right amount of detail? How does the internal balance of the instrument sound? Do you hear too little or too much harmonics? Are the lows as powerful as the highs? Are you getting enough ‘meat’ in comparison to the noise, and minimizing and distracting rattling or squeaking sounds you may pick up?
All these questions (and more) can lead to a refinement of your recording setup. Try not to touch it too much. You can angle the source and the microphone differently, and make slight adjustments in the height of the microphone without changing its distance to the source. This can help to balance different aspects of an instrument’s sound.
The angle of the microphone and sound source is very important for that, since most instruments radiate a different frequency spectrum at each angle. You can imagine the microphone angle as being a kind of complex equalizer, which lets you change its settings by aiming the microphone at a different angle.
In this stage of setting things up, minute changes become more and more important, so it’s important that the source remains in the same position.
A vocalist that turns his head away from the microphone sounds a lot duller than when singing straight at it. Marking a position on the floor using gaffer tape or taking a picture can help a great deal to keep the sound consistent between takes.
6. Fine-tune the background
If you record multiple instruments with one microphone, a sixth step is needed. Because the microphone is now in the best position for the main instrument, you don’t want to touch the setup anymore. If you need to improve anything in the sound of the other instrument(s), it’s best to move them around until you find what you need.
The way you position the instruments is important for the timbre the microphone picks up as well, and where you position them determines how loud they will be compared to the main instrument—as well as how deep the perspective will be.
Sometimes you can’t get there with instrument placement alone, and the sound of an instrument, or the way it is played, need to be adjusted to make a balanced-sounding recording.
If you hit a wall, meaning you can’t make the changes you need with placement, playing style and acoustic aids alone, it’s time to place an extra microphone. That changes the nature of the challenge you’re facing completely, because now sound can travel from a source to twomicrophones and arrive there at different times. In a word, you’ve introduced microphone “bleed”. For this reason I try to postpone this scenario for as long as I can.
7. Reflect on the results
The times that I use this roadmap without ever looking back are rare. It happens way more often that I discover the limitations of step 3 making themselves known when I arrive at step 5.
That’s no problem. I see it as a process of learning. Sometimes you find out as you go that moving a microphone horizontally doesn’t affect the balance of one instrument at all, but makes a world of difference in how another instrument sounds.
That is valuable information for when you later need to change the balance. You find out more and more about how the source, the microphone and the room behave. Using that information you can try a new approach and revise some of the earlier steps you took.
A roadmap is no bible by any means, but having one can help prevent your setup procedure from becoming a game of chance—something the artists you work with will quickly grow tired of. Rien ne vas plus…
Wessel Oltheten is a producer and engineer who lives and works in the Netherlands. He is the author of the new book Mixing with Impact.
Please note: When you buy products through links on this page, we may earn an affiliate commission.


[…] The 7 Steps of Ideal Mic Placement — SonicScoop […]
[…] to placing microphones everywhere so you always have “something to work with”. Read part 1 and part 2 at […]