Acoustic Treatment for the Small Studio
As high-quality audio gear becomes ever more affordable, software emulations nip at the heels of some of the most coveted audio hardware, and much of the basic knowledge of the audio field becomes widely disseminated through the web, professional studios still offer more than a few major benefits.
The first among them is the skill and experience of their engineers. But not far behind is the quality of their rooms. There’s no easier place to make good mix choices than a well-tuned listening environment, and no better place to do a performance justice than a comfortable and well-balanced live room.
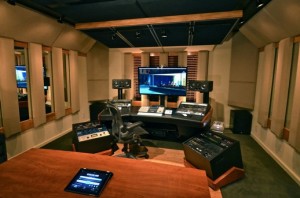
Carl Tatz Signature Series used to treat the Dream Room in Nashville, TN
If you are building or upgrading an existing studio, it’s always always a good idea to set aside ample resources for room treatment and construction, as good tuning can improve the sound of any microphone and the accuracy of any set of speakers.
Meanwhile, in an acoustically neglected rooms, the nicest of mics can sound like rickety imitations, and the best of speakers are plagued with all sorts of misleading resonances and smeared imaging issues.
One of the best ways to make sure you get the most out of your studio is to find other spaces that you admire in your price range, find out what contractor or acoustician contributed to the design and construction, and enlist their help.
Of course, not every production room can justify the budget for an elite acoustic designer or luxurious wood-paneled construction. But any room, from a converted den to a full-time commercial space can benefit from some strategic treatment.
For anywhere from a few hundred dollars on up, it’s more than possible to make real improvements to a studio or listening space that may outshine any high-end gear purchase.
Before you continue on, know that acoustic treatment is not the same thing as soundproofing. It is intended to improve the quality of sound inside your room – not to stop it from getting in and out. If you’re curious about soundproofing, see our recent article Soundproofing the Small Studio. But if you’re ready to take your recording or mix room to the next level, read on.
Where to Start: Speaker Placement
The first thing to consider in any listening room is monitor placement. If your more concerned about a live room, once we get past this section, all the essential information remains the same.
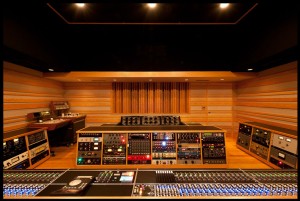
The Wes Lachot-designed control room at Strange Weather Recording incorporates both absorption an diffusion for an incredibly wide “sweet spot.”
If you’re dealing with a rectangular room, as most small studio owners are, it’s often easiest to get good results by setting up your room longways, so that your front and back walls are as far from one another as possible.
This is because rectangular rooms tend to have the biggest bass problems at about the halfway point of a room, as well as near your back wall, far from the speakers. Although it’s certainly possible to set up a room so that it’s oriented to be wide rather than deep, you may find it more difficult to create a wide sweet spot without incorporating plenty of extra treatment and creative design solutions.
Veteran studio designer Wes Lachot, who helped develop the rooms at Manifold Recording and the new Strange Weather Recording, has been credited with popularizing the “38% Rule.” More than a hard-and-fast law of physics, it’s a general rule of thumb that suggests most rooms will have a fairly well-balanced listening spot just over a third of the way in from the front or back wall.
If you’re just setting up a new room (or questioning your existing layout) this can be a good place to start. Once you select a starting point some of the most often-repeated advice in the studio world is to set up your speakers so that they form an equilateral triangle – where the distance between the speakers is equal to the distance from either speaker to your head when you’re in the listening position.
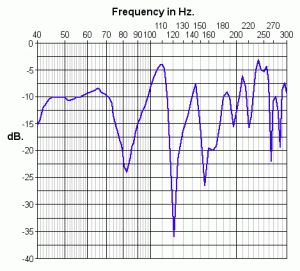
Huge peaks and nulls in the low frequencies are typical of small, insufficiently treated rooms. This real-world graph comes courtesy of RealTraps.
But don’t just trust this 38% figure blindly. Move around the room while listening to low-end focused music that you are familiar with in order to find a spot that seems the most even, and adjust your speaker placement again if needed It’s advisable to do this before installing any acoustic treatment panels, as they may mask problem areas, which can end up netting you less bang for your buck in the end.
If you’re really serious about making the most our of your room, you might consider buying or renting an affordable measurement microphone, like the dbx RTA-M, which sells for just $100.
There are also even less expensive models, like those from Nady and Behringer, that are workable options, as well as super high-quality measurement mics like those made by Earthworks.
Overall quality may differ, but at least as far as the bottom-end is concerned, they’ve all been found to have similarly accurate frequency response.
Once you have a decent measurement mic, or even a particularly flat condenser mic at your disposal, all you have to do is use a simple tone generator like the one found in Pro Tools and play some pink noise through your speakers. Then, you can move around the room with your mic, sending its output to a frequency analyzer to help find the most even and uneven points in the room.
If you don’t have a frequency analyzer, check out our recent roundup of free and affordable options.
Step Two: Bass Management
Once you’ve found a listening location that has some natural balance, it’s time to start working on the low end.
If you’ve ever been working in your space and found that your bottom-end changes dramatically depending on where you put your head, know that this is an affliction that plagues all insufficiently-treated rooms. Luckily, it’s not terribly hard to subdue the issue.
Although high-class studios are sometimes designed from the ground-up to incorporate custom-tuned bass management solutions like membrane absorbers or even Helmholtz resonators, in the small studio your best bet is likely to be broadband absorption.
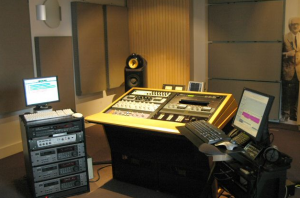
RealTraps MiniTraps installed at Sterling Sound, NYC.
At its most basic, a broadband absorber is a simple acoustic panel made of rigid fiberglass (such as Owens Corning 703 or 705) and wrapped in some kind of fabric. The difference between a broadband absorber and any other high-performance acoustic panel is that it will be thick enough to be effective at extreme low frequencies – not just the highs and mids.
A really effective broadband absorber might be as much as 6” thick, capable of dampening major resonances well below 100Hz. It’s also possible to get away with more narrow absorbers so long as they are hung across corners, where bass tends to accumulate.
And no matter what thickness works for your needs, that’s generally going to be the first place to look at adding broadband absorbers: in the corners, starting at the front of the room, and working your way from the ceiling on down.
If you like, you can also use your ears or a measurement microphone to find out if the major bass accumulation areas in your specific room lie elsewhere, but it’s hard to go wrong starting here. In fact, if you can only do one thing – particularly in your control room – adding 2 to 6 broadband absorbers can help make for a huge improvement, and not just in the low end.
Broadband bass traps are available from a variety of specialty manufacturers like RealTraps, Primacoustic, and ATS Acoustics, and there are even some companies, like ReadyAcoustics that specialize in making affordable DIY kits. If you’re really handy, you can even build your own from scratch.
Step 3: Controlling Reflections
Once you’ve got your low end is in a workable place, many acousticians will recommend that you focus on high and mid-frequency absorption to create a “reflection-free zone” in the listening position of a control room.
The idea here is to use absorption panels that are just like the broadband absorbers already discussed, only thinner, as to lower the cost and gain more coverage.
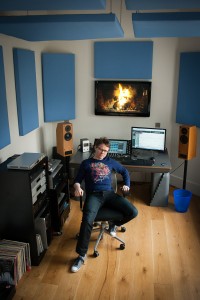
A White Mark “Fast Studio” acoustic system installed in Peregrine Andrews’ London studio.
Instead of going with rigid fiberglass panels up to 6” thick, you might opt for panels that are 2′ x 4′ or so and only 1” to 4” thick. 2” seems to be a pretty common choice, especially if you’ve already done a good job controlling low-frequency resonances.
The first goal is to eliminate first-order reflections – that is, sound waves from the speakers that bounce one off the walls, and then make a beeline straight for your ears. A small handful of strategically placed panels can help accomplish this quite well: one or two panels each on the walls adjacent to your listening position, on the ceiling above it, and behind the speakers themselves.
There are a couple of ways to figure out exactly where to place these absorbers. The ones you place on the side walls should be around ear level, naturally, and you might want to ask a friend to walk around with a mirror up against the wall. Any point along the wall where you can see the speakers in the mirror from the mix position is a potential place to put a panel.
Another way to figure this is to calculate a distance halfway between you and the speakers, and put absorbers there.
This is the first, and most essential step to controlling high and mid frequency reflections. If you want even more control, you can add additional panels from there, but even this alone can make the most reflective rooms into workable environments.
A similar approach can be taken in a live room. It’s never a bad idea to throw up some evenly spaced 2”-4” panels in a rectangular room, in addition to a few broadband absorbers.
If you continue to have problems with flutter echo, you can now add in 1” panels in problem areas to clean up any high-frequency slapback.
Step 4: Diffusion
Once you’ve treated your low end, created a largely reflection-free zone in your listening position, and cleaned up any significant flutter echo, you can think about adding diffusion.
Usually, diffusors are place on the back wall of a control room to scatter reflections, making the back wall practically “disappear.” All the companies mentioned earlier offer diffusion solutions, and some companies like RPG, Delta H Designs and Carl Tatz Design specialize in making custom, sometime breathtaking options.
But diffusion isn’t just for control rooms. A small live room can be made to sound larger, more open and less “boxy” thanks to a few well-placed diffusors. They can also be incorporated into a “live end/dead end” type of design, where one side of the live room is surrounded in thick absorption panels, and the other is accented by wood diffusors to help scatter the sound.
And once again, for the handy studio owners among us, there’s always the DIY route. All that takes is some wood, a good saw, a ruler, and plenty of patience.
Justin Colletti is a Brooklyn-based audio engineer, college professor, and journalist. He records and mixes all over NYC, masters at JLM, teaches at CUNY, is a regular contributor to SonicScoop, and edits the music blog Trust Me, I’m A Scientist.
Please note: When you buy products through links on this page, we may earn an affiliate commission.


ott0bot
January 31, 2013 at 4:21 pm (12 years ago)thanks for organizing this material in a informative and concise article.
Mike Sorensen
February 3, 2013 at 3:22 pm (12 years ago)Hey Justin,
Speaker placement and low frequency management in today’s physically small project studios is a large issue and must be placed one and two.. Broadband absorbers do provide a smooth, in most cases, absorption curve and are good performing units for frequencies above 80 – 90 cycles up through 400Hz.
Smaller project studio rooms have absorption needs above 90 Hz. but also have what I think is a larger need below 90 Hz. Just the room volume in our smaller project studios dictates we address this area This frequency range below 90 and down into 30 cycles requires a certain treatment type. This frequency range requires a more powerful sponge.
Diaphragmatic absorbers, as you point out, are readily available in a new construction scenario, where they have the space and the location to build them into. However, they can be built to be portable units that can be easily placed into positions required within the room.
Diaphragmatic absorbers can be designed to go to 30 cycles and this rate and level of absorption will give more definition to the attack and decay of low frequency energy In our smaller rooms Yes, they are heavy, but that issue seems to resolve itself when one first hears how well they perform below 90 cycles. More bass definition is always welcome within our recordings and musical rooms.
Regards,
Mike
TrustMeI'mAScientist
February 4, 2013 at 4:12 pm (12 years ago)Sure thing Mike! If a studio is having a lot of low-end trouble particularly at one low frequency area, then a tuned membrane absorber can be a superb addition.
What we tried to outline here was a great and effective place to start. From there, there’s a lot you can still do to get closer and closer to perfection — and yours is a fine recommendation in my book.
Acoustic Panels
December 14, 2013 at 4:41 am (11 years ago)Decorative wall panel art are usually installed for commercial use like in Hotels, Office lobbies, Retail outlets, Restaurants, Trade show exhibits and the likes. One interesting use is to install on ceilings.
http://mixmasteredacoustics.com
Ken
December 30, 2013 at 9:41 am (11 years ago)A good starter’s article, but I found this misleading “A really effective broadband absorber might be as much as 6” thick, capable of dampening major resonances well below 100Hz” Based on 1/4 wavelength theory, 6″ would not offer significant absorption below 100Hz. Mike Sorensen makes a similar point.
Justin Colletti
May 4, 2015 at 8:47 am (10 years ago)Interesting theory, but I’m not sure the evidence backs up your suggestion: Even 4″ panels can be reasonably effective down to 50Hz, as long as they’re mounted in corners. 6″ can do a lot below 100Hz as well, especially when placed in corners.
There are plenty of real world measurements to back that up, readily available on the web. Can you point me to any real-world testing data to the contrary?
That’s not to say that frequency-specific absorbers can’t be even more powerful in their narrow range. But corner-mounted 6″ rigid fiberglass can definitely be quite effective, well below 100Hz.
stephan
May 27, 2016 at 9:22 am (9 years ago)would it work well to only use wood diffusion panels in a room? I have a bedroom studio which occupies approximately a quarter of the entire room and my monitors are not typically placed. they are on separate walls and my studio space takes up half of the half (of which side it’s n equalling roughly a quarter of the room) with a sole window on my right side. it’s tough to explain with just but in addition to the monitor placement not being ideal, I have. ery little funds to put towards acoustic treatment. so I need to maximize my effectiveness for the cost.
that’s why i thought having two diffusers – one on the long wall behind me, and one on the short wall that’s to the far left of me.
an additional question: what happens if you place diffuser panels in the room’s corners?