How to Better Organize Your Sample Library
 Does the thought of organizing your sprawling sample library make your stomach churn? If it does, then perfect, because I’m going to be showing you how you can turn that horrible nausea-inducing mess of Vengeance and Cymatics samples into a neat and tidy sample library.
As the size of your sample library increases, organizing it can become more difficult. So it’s essential to find ways of organizing a massive number of sounds, while still allowing yourself to access the information you’ve stored easily. Fortunately, there are some techniques and tools that you can use to accomplish this monolithic task with much less pain.
There is always a tradeoff, however. Regardless of which method you choose to organize your samples, you’ll tend to see better results with the more time you invest. I spent 10 hours one day cleaning up my sample library (it was really unorganized) and it’s now in tip-top shape. It wasn’t exactly a “fun” experience, but it was definitely necessary. Fortunately, I only had to do it once. The time I invested that day was worth it, and I’ve been working with an organized sample library for the past 3 years because of it. When I get new samples, I immediately add them to my organization system, and everything remains in check with very little work.
I believe that the way a music producer needs to organize their sample library is different than the way a sound designer needs to organize their sample library. Most centrally, music producers will benefit most from a library that is easily browsable, while sound designers will benefit more from a library that is easily searchable based on keywords.
Today, we’ll be looking at three different methods for cleaning up your sample library once and for all. The first method uses manual folder organization, the second method uses a program called Sononym, and the third method employs a program called BaseHead.
Manual Folder Organization
Manual folder organization is free and will be suitable for most music producers. This method requires you to stay on top of your organization game, but it allows you to store your audio files in a clean, browsable format.
Even if your sample library is a mess, searching for a specific sample that you know the name of is usually not an issue; most DAWs and operating systems have a search function that allows you to sift through your sample library this way. Problems arise when you want to browse through your library and audition different samples on the fly. Trying to find the perfect kick drum can be a real pain when you’re diving into different sample packs, and looking for the “Kick” folder—and then maybe coming to find that the kicks are mixed in with snares and other samples!
I’ve created a custom folder directory for my own library that’s structured as follows:
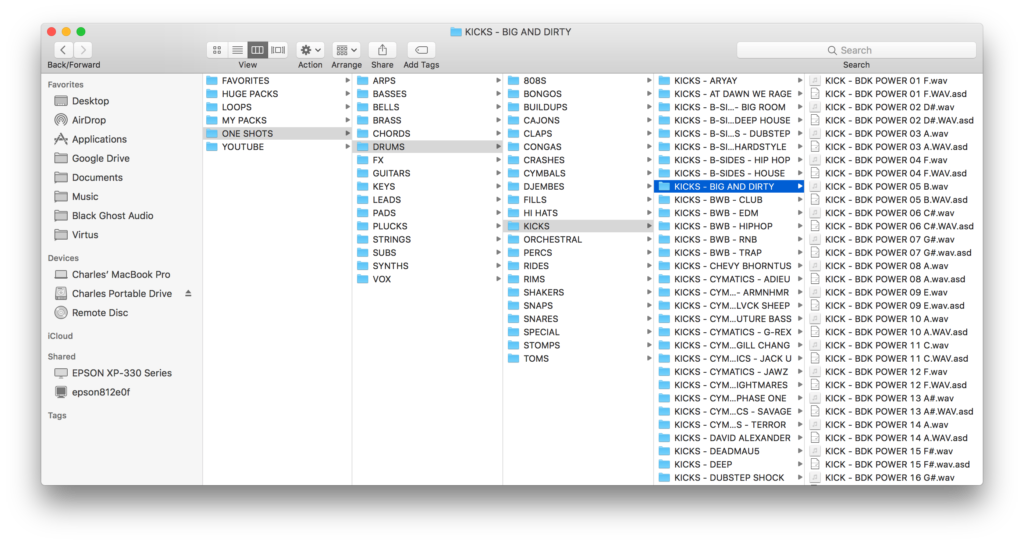
Category > Instrument Type > Instrument Sub-Category > Sample Pack > Tuned Sample
For example, if I’m looking for a kick, the file directory will look like:
One Shots > Drums > Kicks > Sample Pack > Tuned Kick Sample
I have a general sense of what I’m going to find in different sample packs, and by structuring my file directory this way I can quickly cycle through the parts of each sample pack that exclusively contain kicks. This significantly speeds up my browsing experience.
You’ll notice in the above image that my kicks are also labeled with the note they’re tuned to. This is relatively simple to do if you run your samples through a program like Mixed in Key or Melodyne—the latter of which is slightly more accurate and slightly more time-consuming when it comes to tuning drums.
Using tuned samples slightly speeds up my workflow, but I wouldn’t say it’s essential for all producers. I ultimately end up trusting my ears when I mix samples into my songs, and I tune the samples accordingly.
Here’s a cheap hack to make this process even better: I use an app called File Rename Pro that allows me to batch edit the names of my audio files. It’s effortless to use, and it’s going to allow you to edit file names quickly. There is more advanced file naming software out there, but I like this one because at $6.99 it’s relatively cheap and gets the job done. If you can adopt this approach and avoid jumping into the world of sample browsing software, it’s going to save you a lot of money. As a music producer, there’s a good chance that a majority of your sound clips are drum samples that can be sorted relatively easily. I usually turn to ROMplers like Kontakt for playable multi-sampled instruments; these instruments result in a sound that is much more realistic than if I were to drop a sample into a sampler.
The one section of my manual sample library that’s tedious to search through is my FX folder. There are so many sub-categories in this folder that it pushes the limits of what’s practical from a browsing perspective. Once this section of my sample library grows some more, I may consider upgrading to a dedicated sample browser specifically for my FX.
If you want to try this approach for yourself, you can download an empty version of my file directory here and start populating it with your own samples. The most effective way of doing this is to simply clear out one sample pack at a time and drop each of its samples into its respective folder in the new file directory. You can either try to do this all in one day, or make it a long-term project that you work on for perhaps an hour or two on the weekends.
It’s crucial that you don’t get lazy while you’re sorting your samples, and that you consider deleting samples you know that you won’t use. Having a small library of high-quality, accessible samples, is much more important than having an extensive library of low-quality, inaccessible samples.
Sononym
For those who have a little less time and a little more money to invest in their studio, there are programs that can help speed up the process of sorting your samples. Sononym is one inexpensive sample analysis program that automatically categorizes your samples and allows you to browse and search the custom library it creates. If you have no intention of putting any effort into organizing your sample library manually, this may be the solution for you.
When you add files to Sononym, they’re analyzed and assigned a Class (Loop or OneShot), Category (Bass, Lead, Acapella, etc.), Length, RMS, Pitch, BPM, “Brightness”, “Harmonicity”, and “Noisiness”. On top of that, there’s a search bar that allows you to search for samples by name.
One of Sononym’s most robust features is “Similarity Search”, which is a unique search mode that accepts any sound as the input and finds relevant sounds throughout your sample collection. This search function can be initiated from your desktop, from the results-table, from the waveform-panel, or from a collection. The software is built around this feature, so it was designed to be accessible from multiple places.
Sononym does a pretty decent job analyzing audio samples—though it’s not perfect. On occasion, it can categorize samples inappropriately, although it often does this in a way that makes some sense. For example, it may confuse a bass growl that sounds like a voice with an acapella; this can actually result in creative sample suggestions. Although Sononym doesn’t perform it’s primary function flawlessly, it definitely provides relevant, out-of-the-ordinary sample suggestions, when it fails.
Manually organizing samples yourself would be the safe path to take, but many people don’t want to invest the time to do that. Sononym often gets things right, and when it gets them wrong, provides creative sample suggestions, and a good starting place for further manual organization. As far as automatic sample sorting tools go, this is one of the best solutions I’ve found. The software costs $99 via Sononym’s website.
BaseHead
BaseHead is equipped to manage truly massive sample libraries. This is a software that professional sound designers use to organize sound libraries intended for commercial use. There’s even a BaseHead Database Server you can purchase that allows you and your team to share and edit the same sample database. BaseHead is indeed the cream of the crop when it comes to sample management software.
This program works using a boolean paradigm, which means that you can search for samples using AND / OR / NOT modifiers. (Google’s search engine works in the same fashion.) This is one of BaseHead’s strongest features because it produces highly-relevant search results.
I still don’t recommend tossing a bunch of mislabeled samples into a program like Basehead because it’s not going to miraculously tag and label them correctly. If you’re working with Basehead, ensure that you’re importing quality sound libraries that have been tagged appropriately to begin with.
Pro Sound Effects offers many different sound effect libraries, as does Boom Library. These libraries tend to be highly searchable because the samples have been appropriately tagged right out of the gate. This means that if you type “Spooky” into Basehead’s search bar, you’ll have many appropriate sounds appear in your search results. These libraries aren’t cheap, but if you’re using them, you’re either a company that does sound design work or a freelancer making a profit off your work.
The tooltips within the software are funny, and it appears as though they were added by socially awkward programmers. BaseHead’s website is also riddled with grammatical errors, but don’t let that turn you off. The BaseHead program performs exceptionally well and is one of the best sample management solutions available. You can pick up a copy of BaseHead for $199, and a BaseHead server for $899.
Summing It Up
As I hope I’ve made clear, there isn’t a one-size-fits-all solution for sample management. Whatever your budget, you need to take your needs and workflow into consideration when selecting the sample management solution that’s right for you.
If you’re a music producer, there’s a good chance that you’ll want to head down the manual file management route. If you’re looking for software that will provide some level of automatic sample organization, a program like Sononym could be worth exploring even if it won’t get the job 100% done on its own.
If you’re serious about sound design, stepping into the world of pro sound libraries and audio file management systems like BaseHead might be the way to go. Both Sononym and BaseHead are free to demo, so I recommend checking them out for yourself to find out if they can improve upon the sample organization system you currently have in place.
Charles Hoffman is a Mixing and Mastering Engineer at Black Ghost Audio. After graduating from the University of Manitoba with an English degree, Charles completed his education at Icon Collective in Los Angeles, CA.
Please note: When you buy products through links on this page, we may earn an affiliate commission.


