New Gear Review: RMP-D8 by Rupert Neve Designs

The RMP-D8 by Rupert Neve Designs offers massive headroom, mastering grade conversion, and AES/Dante outputs.
When I learned of the Rupert Neve Designs RMP-D8, I was very excited to try it out. I initially came across it at the 2017 NYC AES show and was enthralled with what it might mean for my sessions.
The RMP-D8 is a remote controlled 8-channel mic preamplifier with AES and Dante outputs. Like many engineers, I love recording in big rooms. And like the same amount of said engineers, I love some microphones that tend to be on the lower side of the output spectrum. Those two things coupled together can lead to less than stellar results, especially when magnified by the multitude of connections and interference one might encounter in a large facility/recording session. A mic level signal is weak, and has trouble surviving a long trip to the preamp without picking up some noise along the way.
But things could be different. I could place a set of preamps right next to the mics in the live room and send the signal digitally all the way to the computer. In a large enough studio, and using shorter mic cables, this could easily cut the distance your signal travels by 75%, and do so using way fewer connections.
Since last year’s AES show, things have changed. The marketing campaign for the RMP-D8 has rolled out, and it turns out that studio work isn’t even the main purpose of this preamp. The RMP-D8 is primarily designed for live sound engineers to give them a quality, networkable preamplifier that can be controlled from the Front of House via computer app.
But I don’t care. I still wanted to see what Rupert Neve Designs have been up to and how the RMP-D8 would fare in the studio. So the very nice folks at RND sent over a pair (16 channels!) to the lovely Firefly Studios for me to work with on the new Dry Clean Only record.
Features
Like other preamps, the RMP-D8 offers 8 analog XLR inputs. However, this unique piece does not offer any analog outputs. Instead, it allows you to interface via Dante (which utilizes an RJ45 Ethernet connection/cable), or AES (via 4 digital XLR connections). In a nod to the importance of having a backup solution, especially in a live setting, there is a secondary, redundant Ethernet connection in case the first goes down for any reason. Not leaving anything to chance, the unit even has a secondary backup power supply with its own IEC connection, and it also comes with a neat IEC cable that locks in place!
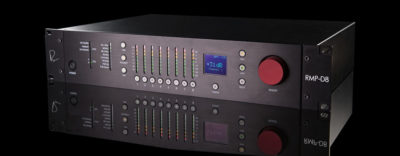
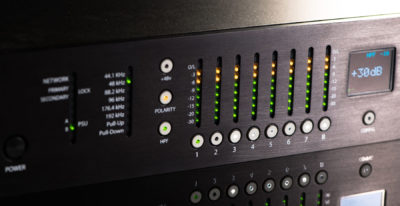
The front panel is clean, clearly laid out, and feels solid as can be. Absolutely everything on this device feels like it will last a lifetime. On the left side are indicator lights to show a locked connection, and a working power supply (for both primary and secondary). Next to that are the sample rate and pull-up/pull-down indicator lights.
The remainder of the front panel consists of all the controls and access points for each preamp. The middle of the panel has 8 sets of LEDs to indicate level. Each 8-segment meter is referred to as quasi-PPM and shows digital full scale audio level, post-conversion. To the left of the meters are buttons for phantom power, polarity inversion, and an 80Hz high-pass filter. Buttons underneath each LED segment select that channel as the one being adjusted by any parameter changes.
To the right of the main panel are buttons for the pad, line/mic toggle, and a Reset control (which disengages all front panel settings on all channels). A large, red wheel sets the gain for each channel, and a bright, clear OLED display indicates the parameters engaged on the currently selected channel. Finally, a “CONFIG” button allows you access to deeper menus. In a smart touch, the front panel can be locked, so no changes can accidentally be applied.
A quick side note here about Dante and computer connections: I initially thought that hooking up and employing this preamp would be no big deal, but it isn’t quite that simple. Many computers do have at least one Ethernet port, so you can connect the RMP-D8 directly to the computer via any Ethernet cable. However, usage of the Dante format for carrying AoIP (Audio over Internet Protocol) requires Dante Virtual Soundcard or Dante Via. It works and is very easy to do at the cost of adding significant latency (for these purposes – specifically for making cue mixes for the artist). In order to be able to use this seamlessly and not experience latency issues, an interface that accepts Dante and connects to the computer via PCIE card is required.
The very gracious folks over at Focusrite (many thanks to Dan Hughley) were kind enough to promptly ship over one of their new RED 4PRE PCIE/Thunderbolt interfaces (itself a killer piece of gear… review coming soon!) so we could connect directly to Pro Tools with lower latency.
In Use
After receiving all of the above interfaces, we unboxed them and set about hooking everything up. The signal flow was as follows: mics to RMP-D8, (both RMP-D8 modules were connected to an Ethernet hub—mandatory, at least for initial setup), which was then connected via Ethernet cable to the Focusrite. Lastly, the RED 4PRE was connected to the Pro Tools HD card via digilink cables. Additionally, once this was all in place, a virtual Dante controller (like the app we used, made by Audinate) must be downloaded as that is the only way to set up and make certain changes to the RMP-D8s while in use. While this was a lot to set up in terms of getting some mic pre’s going, all worked seamlessly and was very quick and intuitive to get running.
Once all was ready, we called our drummer in a started getting levels. For this session, we primarily used the RMP-D8s on drums (although some guitar tracking and bass re-amping was done as well). We utilized all types of mics here: moving coils, ribbons, tube condensers… you name it. And the verdict… stunning.
Quite simply, these mic preamps sound amazing on literally every source we tried them on. Myself and the other engineer on the session (we have both worked in this room multiple times) agreed that we simply pulled better sounds than we ever have before here. Since this device has mastering grade converters in it, it’s impossible to discuss the sound quality without including that factor in. No matter what we recorded, I never heard any hint of jitter, or any other potential digital issue. All sounds were rendered as huge and solid in every way.
On a related note, the RMP-D8 has massive headroom. I dialed in the levels of the preamp to make sure we were consistently hitting the highest green LED (-9dBFS), but rarely hitting the first amber LED (-6 dBFS) and went back into the control room. Pro Tools was very close to overloading on every channel. In another smart move from RND, the RMP-D8 has a setting on each channel (selectable via the Audinate application) called GC, or Gain Compensation. This feature simply drops the output level by 6dB. I loved this feature as this meant I could drive the preamps a bit for some real transformer saturation and still ensure ugly digital clipping doesn’t occur.
To Be Critical
While these pre’s performed above and beyond in every way when it comes to sound, I do have some reservations to pass on. Initially, the red gain control knob seemed awkward to dial in. Slowly rotating raises the gain in 1dB steps, as do quicks spins. This means dialing in a decent amount of gain by hand can take a while. It occurred to me later that this seems to be more of a safety feature since this piece of gear is primarily designed for live usage, and huge swings of gain there could in fact be dangerous. So while occasionally frustrating, I understand this design.
I attempted to use the included app to make adjustments via our computer, however the app was still in beta for Mac at the time of these sessions, and we couldn’t get it to work. I’ve been told since then that the app is now working, and I’m sure that makes it much easier to control.
Also, since this device only has digital outputs, the ability to process the signal on the way in using analog gear is essentially non-existent. I always enjoy using some compression and EQ in the channel path; it’s more fun and easier to grab the sounds I want ahead of time and make choices prior to mixing. Using the RMP-D8 makes that an impractical workflow. To accomplish that, I would have to route those signals back out of the DAW, through any gear, and then back in, which adds two extra steps of conversion.
My only other reservation is the price. This is really less of a reservation and more of a limitation that many of us face. The hefty price tag of $5,995 can be daunting, especially when you factor in the need for another interface and an Ethernet hub. But this is a purpose-built piece of gear and is specifically not designed to meet the needs of most.
Summing it Up
Pricing aside, the new RMP-D8 is a winner for those who need a unit with this particular feature set. To be honest, if I had the money, I’d put 2-3 of them in a rack and bring that with me to wherever my session may be. For those that can afford it, and need a high-quality remote controlled set of preamps, I’d highly recommend trying out the RMP-D8. You won’t be disappointed.
Please note: When you buy products through links on this page, we may earn an affiliate commission.


