New Software Review: Nuendo 8 from Steinberg
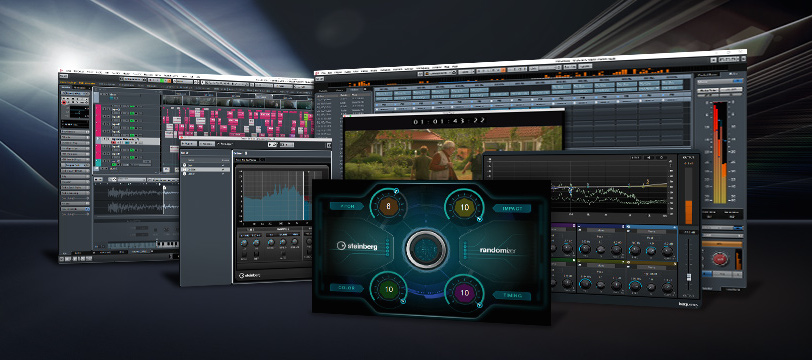
Now in its eighth iteration, Steinberg’s Nuendo is a powerhouse DAW with capabilities that stretch far beyond the traditional demands of simply capturing, editing, and mixing music.
In the world of professional audio, Pro Tools has long been king.
This has been especially true in the U.S., where it has become the de facto standard of music production, much like 2” 24-track tape was from the 70s to the early 2000s.
Today, even the average hobbyist musician is likely to have a Pro Tools license and be somewhat adept at using it. And, if you look around the internet for tips on recording, the likelihood is high that it will be taught within the Pro Tools environment.
That said, there is no end to alternate options when it comes to DAWs these days. They are available at just about any price point, and these competing workstations will usually have most, if not all, of the same capabilities as Pro Tools. (Sometimes, more.)
This proliferation in accessible software has been a big force in the “democratization” of the recording industry. Today, everyone has access to the same tools. The biggest difference in results lies largely in who is charged with delivering them.
But that’s not to say that all digital audio workstations were created equal.
Steinberg’s latest offering of their flagship workstation is Nuendo 8, and I must say, it is a beast. Available for $1,900, the amount of functionality, customization, and power built into it are quite staggering. No matter how comprehensive a review I write, I could never do more than scratch the surface of what is possible with Nuendo 8.
Steinberg has always paid close attention to the workflows and standards of the huge and growing sound-for-picture and game audio industries. In Nuendo 8, they’ve included numerous features that speed up the processes for delivery of assets for TV, motion pictures, video games, and other multimed-related audio.
Although all of this capability comes standard in Nuendo 8 (albeit capability that I may never use in my own work), it also turns out to be an incredibly powerful workstation for music recording, editing and mixing. It’s this fact, that may be more pertinent to the average SonicScoop reader, and so that’s where I’ll focus the bulk of my review.
While glossing over some multimedia-focused features in this review may be a bit of a disservice in describing Nuendo 8’s enormous capability in serving audio post engineers, my hope is that it will make this review of particular interest to others who, like me, work primarily in music.
Nuendo and I: A Brief History
I am neither a lover nor a hater of Pro Tools. It is what it is, I use it, and it can certainly get the job done. However, long before I started using Pro Tools in my own studio on a daily basis, I had a little bit of (ancient) history with Nuendo.
I first started using Nuendo 1.6 around 2002. I had only started recording digitally a couple of years prior with the excellent iZ RADAR system, which proved to be the perfect bridge between my (soon to be) past analog life and my digital future. I found RADAR to be easy, transparent and fast.
While in the midst of my RADAR Love, I was not enamored with the thought of adopting any other particular workstation as my main platform, even though the music industry trends (and client expectations) were pushing me in that direction.
At the time, I had used Pro Tools a little bit, but was never really happy with its sound, which I mostly attributed to the proprietary hardware made by Digidesign—Pro Tools’ parent company at the time.
I wanted to ease into a life in digital audio through a different and more customizable path. When I discovered that unlike Pro Tools in 2002, Nuendo could work on any computer with any hardware, it seemed to be the way to go.
I ultimately set up RADAR as my front-end to Nuendo 1.6, using the program as a supplemental recorder and mixer whenever I exceeded RADAR’s 48 tracks. Not long after, I upgraded to Nuendo 2 and then, around 2006, I adopted Nuendo 3 as my exclusive mixing DAW, and used it until about 2012. With an eye on universal compatibility, I moved over to Pro Tools in 2012 and have used it exclusively ever since.
Considering my earlier positive experiences with Nuendo, and the relative ease of collaborating across DAWs today, when the opportunity arose for me to give Nuendo 8 a try, I jumped at the chance.
Pro Tools vs Nuendo?
When I started thinking about writing this review, my first thought was to compare and contrast Nuendo and Pro Tools, thinking that it may cause a loyal PT user to consider another option.
The problem with this is that, from my experience, a loyal Pro Tools user will almost always be a loyal Pro Tools user, and there is practically nothing I can say about Nuendo that would change that.
I have no skin in the game as to whether people to switch to Nuendo from Pro Tools (just as I don’t care if you use PC or Mac), so why bother? Instead, I will focus on the things that I have found to be uniquely powerful and useful in my experience with Nuendo 8 over the last several months.
I may refer to Pro Tools as a point of context (since most of you know it intimately), but not as a direct comparison, and not in the efforts of trying to inspire a conversion.
Getting Started
Since I had not laid eyes on Nuendo since its 4th iteration, I was pleasantly surprised with what I saw once I completed the installation. It was familiar enough that I (and my mouse) still kind of knew where things were, but I still had to search to discover other features and functions.
I am more of a “change is good” kind of recording engineer, rather than the “tried-and-true” type, so I welcome having to learn something new. I think it keeps me fresh and forces me to think differently, rather than having my approach become stagnant.
Nuendo installed with ease; it painlessly recognized and interfaced with my Avid Artist controllers and my ancient Metric Halo ULN-2 (which still sounds wonderful). Nice.
As with most things in audio, I prefer to hunt and peck to figure out what’s where, and would rather just mix a song to see how everything works before consulting the manual for guidance. By taking this approach, once I do choose to refer to the manual, it has more meaning with the benefit of context. With that approach in mind, I imported some audio files from an earlier PT session and started mixing.
Once I’ve worked for a little while using the defaults, I usually start wondering what I’m missing and head straight to the preferences.
As with any software, you have to know the specific terms and nomenclature to even understand what half of the preferences do, so I made sure that the user manual PDF was open and ready to view. I didn’t find myself referring to if often, and used it as more of a “where’s the…?” locator.
Features and Use
The first thing that really stood out to me was just how much you can customize Nuendo. For some this may be a nightmare, but I welcome this feature with open arms.
You can infinitely change the color scheme of the windows, the default colors based on track type (including the fader caps), the meter colors and ballistics, waveform appearance, along with many, many other functions.
In fact, you can even change the keyboard shortcuts to whatever you’re comfortable or familiar with. If you’ve used Pro Tools for 15 years and live and die by those shortcuts? Just use those. They’ll take a little bit of time to input, but at least your familiar workflow would remain relatively unchanged.
Over several discovery days, I played with the overall look and feel of Nuendo until I arrived at something comfortable and functional, and haven’t returned to the preferences since.
Nuendo consists of several configurable windows from which to work, much like Pro Tools or any other workstation. There is a Project Window (like the Edit Window in Pro Tools), the MixConsole (like the Mix Window in Pro Tools), and the Sample Editor, which floats on top of any other open windows when double-clicked. I will examine each section in more detail and expand upon the most notable features in each.
The Project Window
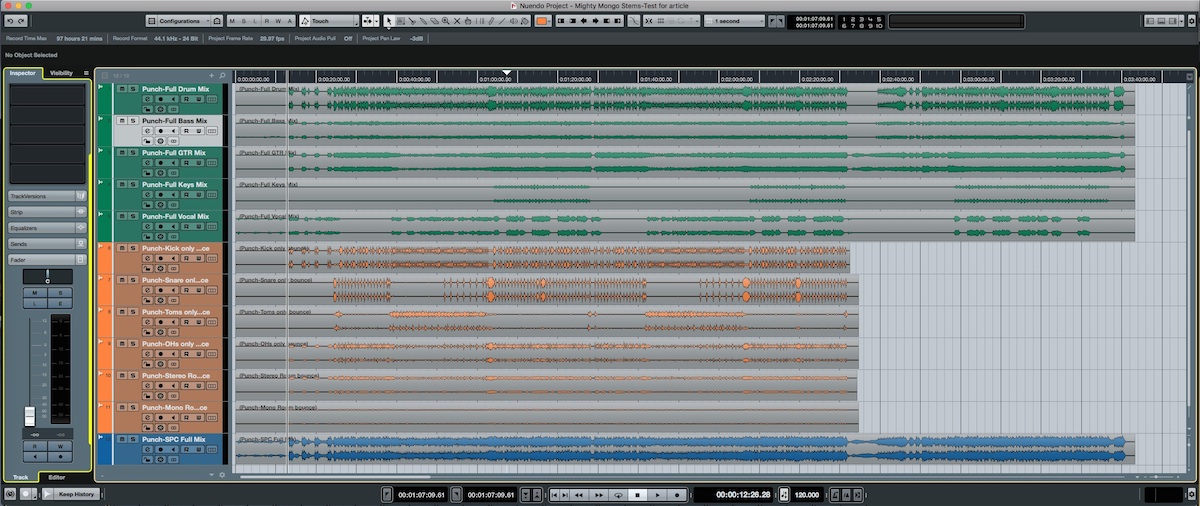
As with nearly everything in Nuendo 8, the main Project Window is vastly customizable to suit your specific workflow.
The Project Window is the main work area where you can do almost anything that Nunedo is capable of. It has zones that are selectively visible and configurable based on your workflow and needs.
The toolbar along the top of the Project Window is fully customizable and can display numerous functions clearly. You have complete control over which functions are visible, along with the arrangement of those functions within the toolbar. It has all of the common editing and navigation tools, plus the counter, locators, various mode displays, a performance meter, and more. This was something that took a few days for me to refine, but it now displays all of the things I like to see and gives me quick access to the functions that I use most often.
When you select an “Event” (any audio clip) in the Project Window, the Info Line above the project work area displays the information pertinent to that Event. Values here can be edited numerically, if you so desire. I find this to be incredibly useful, particularly if I want to turn an Event up or down by a specified amount. Click “volume”; enter the value (in dB); done. The Info Line also shows you the start and end points (along with overall length) of an Event, snap point, lengths of fades, and a few other parameters, depending on the track type.
The Project Window has an Inspector on the left zone, within which are tabbed Editor and Track Inspectors. The Editor Inspector gives you access to many of the editing functions in the lower zone of the project window (which I never used), but for me the Track Inspector is critically important. This gives you direct access to all of the primary functions and mixer features on the selected track, including the inserts, EQs, a channel strip (included on every channel!), sends, fader, panning and routing, plus a notepad and Track Version tab (which is similar to Playlists in Pro Tools).
Next to that is the Visibility tab, which allows you to show and hide any type of track, group, instrument, input or output. Within the Visibility tab are visibility agents, which give more specific and powerful ways of deciding what you want to show or hide. For example, you can choose “show only selected tracks” or “show tracks with data”; and so on. The number of options here is so extensive that I can barely get my head around it, but I can say that in sessions with 100+ tracks, this can be a huge boon in overseeing what’s going on across your project. You can also link this behavior with the MixConsole so there is agreement between the Project Window and the MixConsole with regards to visibility (more on the MixConsole later).
On the right side of the project window is another inspector which gives you access to VST instruments and the Media Bay. The Media Bay is a central location where you can search and add instruments, loops, and apply workflow and processing presets to your project.
While this looks incredibly deep and powerful, I haven’t had any use for it (thus far, anyway). I could see it being more useful for those doing video or TV post production, or for people who would use Nuendo for music composition, as you could quickly locate and utilize common instruments and processes.
At the bottom of the Project Window is the Lower Zone, which can selectively show different parts of your project, including the Mixer or the Sample Editor. The power here is that you can have everything viewable and accessible from one window, which precludes the need to switch back and forth between the Mixer and Project Window. While I see the appeal, I am more comfortable having two separate dedicated windows. To each his own!
At the bottom of the Project Window is another toolbar which includes a standard transport, along with a bevy of other selectable and configurable functions.
Of course, the main work area is much like any other workstation with waveform views and a selectable grid. There are zoom and navigation sliders on the right side and bottom, plus a Waveform Zoom slider. The zoom controls include presets which can (surprise, surprise) also be configured to your liking. The zoom presets titled “Zoom Tracks Full”, “Zoom To Locators”, and “Zoom To Project” are easier to use than a scrolling zoom. I got used to that quickly!
As in Pro Tools, this is where I do most of my work, as it often helps to be able to see the waveforms to know what’s coming. It’s also simple to navigate, edit and rearrange things, much as you would expect. You can view waveforms all the way down to the sample level in the Project Window, though a finer resolution is available in the Sample Editor (more on this in a minute). There’s nothing groundbreaking here, but to me, the appearance is easy on the eyes, and it was easy to work quickly and efficiently.
The MixConsole
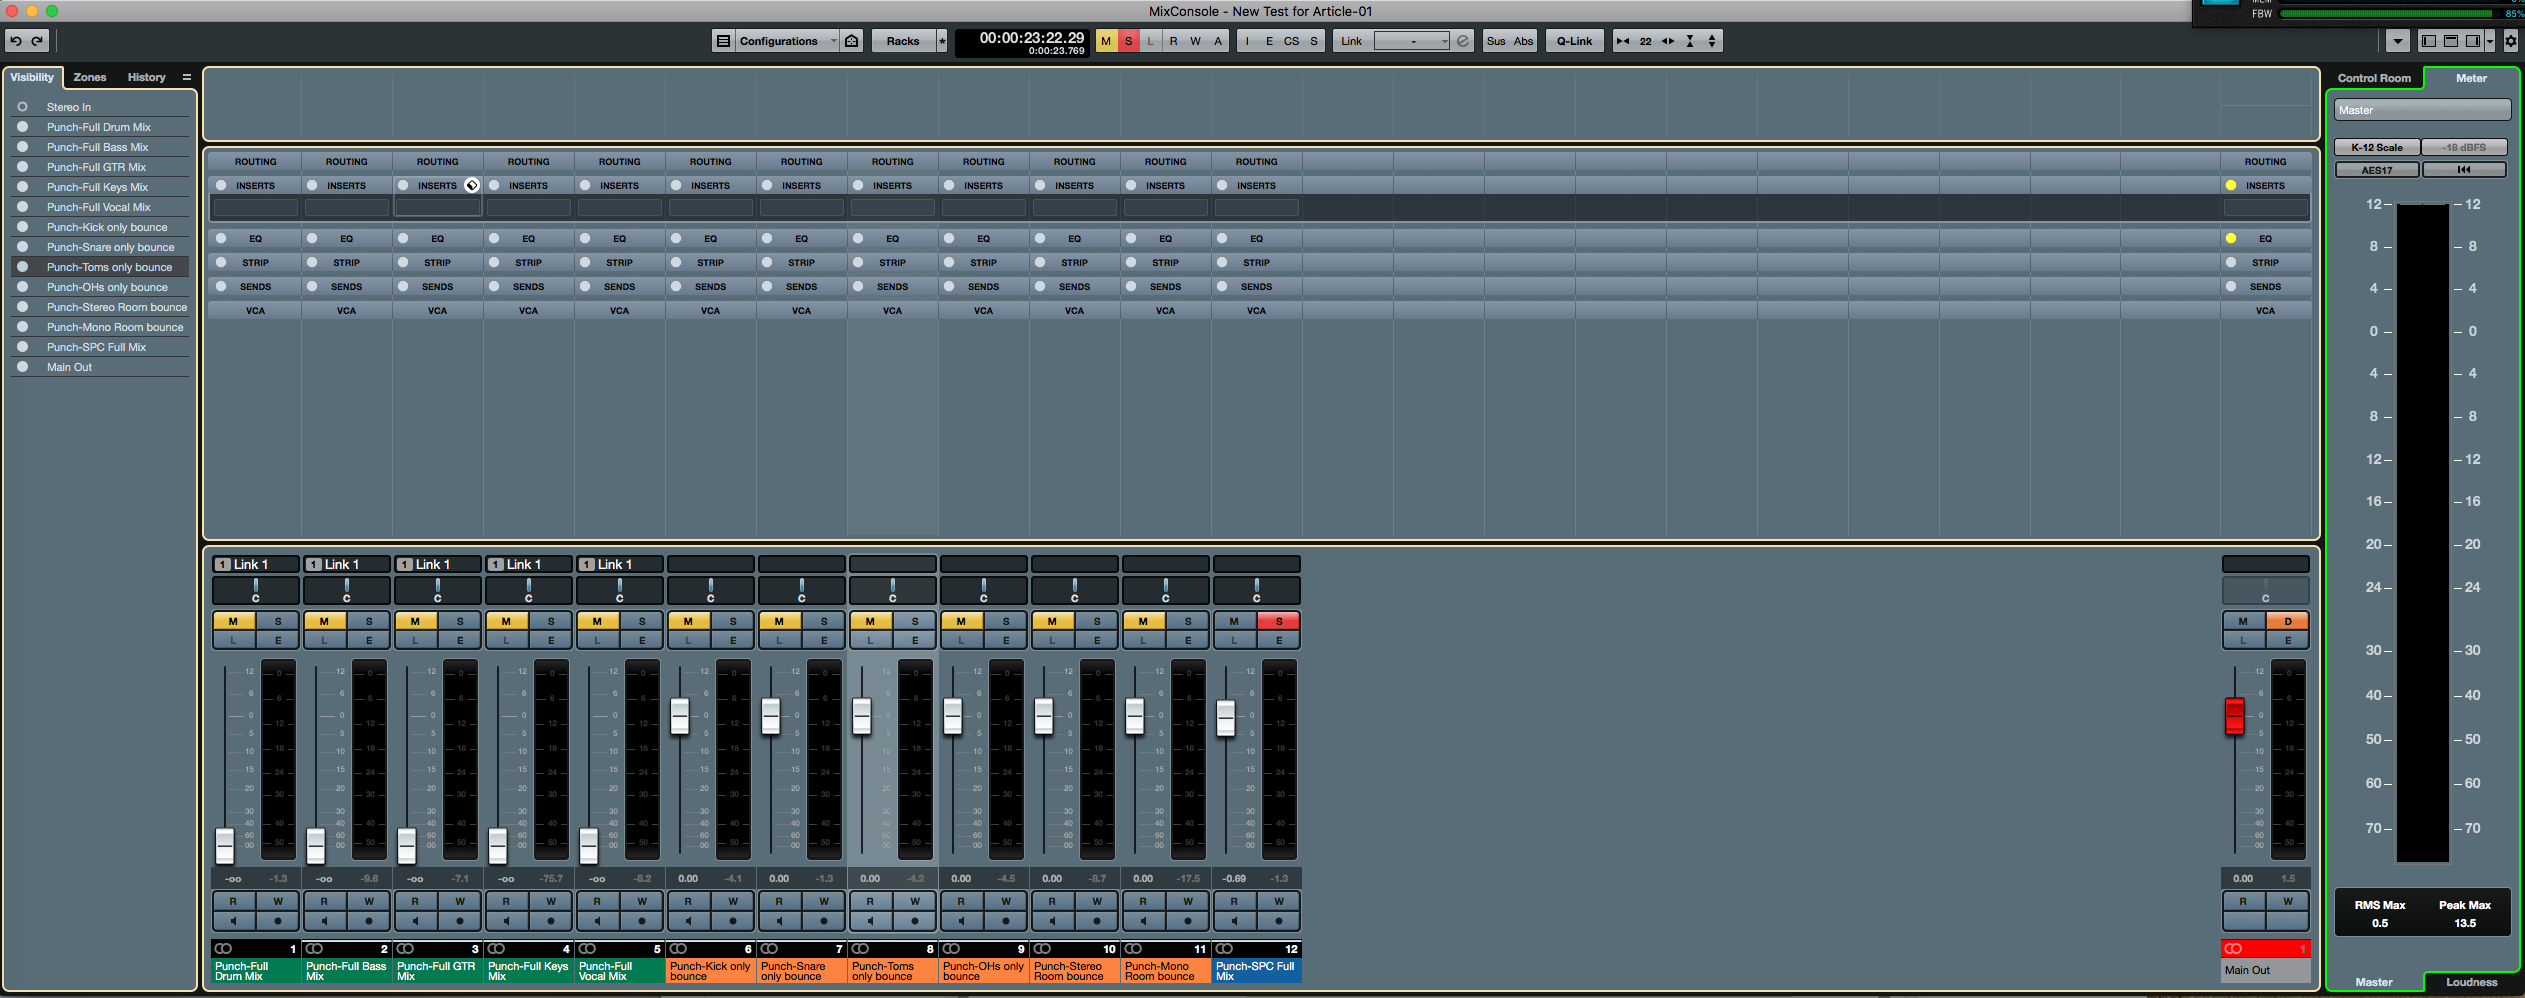
Nuendo 8 offers the unique ability to save specific MixConsole configurations, enabling you to quickly access areas of your mix you need to revisit frequently.
The MixConsole is the Nuendo mixer window.
Since the mixers in most workstations are relatively similar, I will only highlight the features that I think are unique or significant in Nuendo 8.
It has all of the obligatory features that you would expect on a console: Inserts, EQ, channel strip, sends, panning, routing, VCA assignments, mute, solo, automation modes, a nice-looking meter, and more.
You can scale the size of the faders and the mixer window above, plus, you can use normal zoom controls to resize the width of the channels. Pretty handy with track-heavy mixes.
Nuendo 8 gives you the ability to save four different MixConsole window configurations. This allows you to set up four different “snapshots” of the mixer for repeated quick access, without having to zoom or relocate therein. You could have a drums window, a vocals window, a 2-mix window, etc., each accessible with a single click. This can be a big time saver.
If there’s a headline in the mixer (to me, anyway), it falls under the “Pre” tab in the mixer. There is a high-cut, low-cut, gain and polarity reverse available on every channel. You heard me right: No need to insert a plugin to change the gain or reverse the polarity.
This is big for me because of how I set up my mixer. I like to keep my faders near unity gain if at all possible because of the finer resolution available in that range. It makes precise automation rides more… well… precise! The gain function allows me to optimize the track levels to work within this self-imposed requirement, and also makes sure that I maintain adequate headroom through my plugins and mixer.
There is a full EQ on every channel with a graphic display of the curve at the top of each channel strip. It’s neutral, highly versatile, and easy to use. And while I’ll always use my chosen plugins where I want to, the included EQ is up to any task and gets a ton of use.
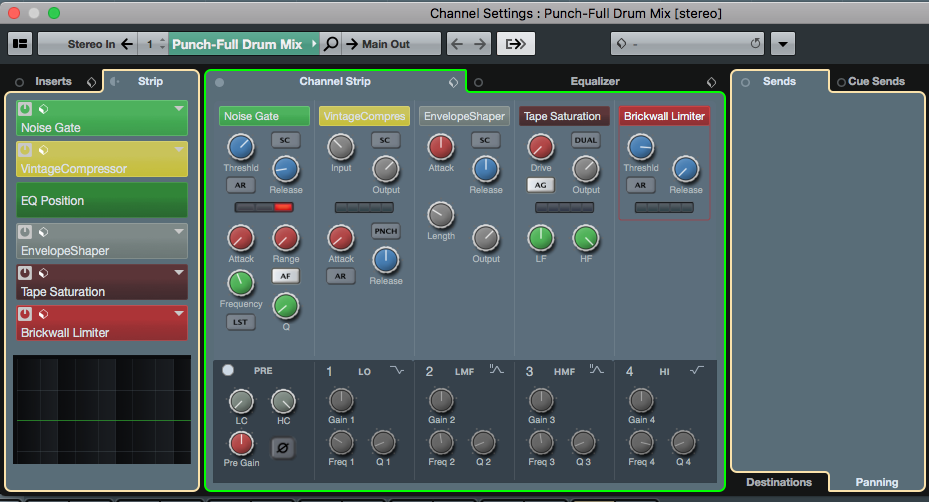
Just about any tool you would need to construct a complete mix comes standard with Nuendo 8, all of which can be accessed with ease via the Channel Strip window.
There’s also a channel strip available on every channel, which includes a full complement of Nuendo plugins (all of which are good, and at times, great!). These include a noise gate, a compressor (three types), an envelope shaper or de-esser, a saturator (three types), and a limiter (three types). They are all directly accessible in the MixConsole window, or can be opened in a separate window (as pictured). Again, we all surely own plugins and love them, but what is available as standard with Nuendo 8 is enough to mix a record without any help from a third party plugin.
Like the Project Window, the MixConsole has a Visibility tab as well as a Zones tab, which allows you to separate the mixer into three separate zones (with space between each zone), based on your preference. The Visibility behavior is mostly similar to the Project Window, but a right-click on a channel in the inspector reveals (among other things) a “Show Channels that are Connected to the First Selected Channel” feature. It doesn’t take much thought to realize how useful this could be in a track-heavy mix with complex routing. Initially, features such as this may seem a bit too specific, but when used over time they can become indispensable.
The “Link” function at the top of the MixConsole allows you to selectively link most of the functions of the mixer. This can be helpful with two sides of a stereo pair or any other groups of channels that can benefit from being adjusted simultaneously. I use this feature mostly to solo and enable automation with groups of channels in guitar and backing vocal groups, which can be painfully slow when there are dozens of such channels to deal with.
Metering is not something many people get too excited about, but to me, the included metering is so exceptional that I just may throw a party. At the end of the mixer (the right zone) is a large bar graph meter with so many “extras” that it can practically nullify the need for any other metering plugin.
This peak program meter has a selectable scale (including the “K” meter standards), some of which have a selectable reference level, plus a Peak Reset. At the bottom of the meter are numeric displays for RMS Max and Peak Max values. A separate tab on the meter reveals a Loudness meter, which gives even more detailed information necessary for assuring your mix conforms to different broadcast standards.
Within the right zone is another tab for the Control Room, which is exactly what it sounds like: a complete control room section within Nuendo. The idea here is to be able to replace the typical external control room monitoring control needed to interface with your monitors and cue system. It has the capability to control monitors in practically any format you can dream up, and allows you to solo and mute different sets of speakers within each setup. You can even add chains of plugins to these monitor paths if necessary.
This is a feature that, once it has been set up (which takes some time), is amazingly powerful. You can align your system to a specified reference level, feed multiple outputs for alternate speaker sets, and even feed external meters and cue systems if you so desire. There is a Monitor Dim button (programmable), and an Auto-Dim feature for use with a talkback mic. The Control Room can be accessed via the MixConsole, or can be a floating window within your Nuendo project.
For this review, I played around with the Control Room a bit and really loved what it seemed to be capable of, but have not yet included it in my everyday workflow. It is worth noting that the Control Room interfaces perfectly with Avid/EUCON controllers, which makes it even more attractive and useful.
I could go on and on about the mixer, but I think this should give you a pretty good idea that it is as full-featured as any that is available out there. I have yet to find anything that I am unable to do, and with more familiarity and experience, I am finding easier and faster ways to do things I have always done.
The Sample Editor
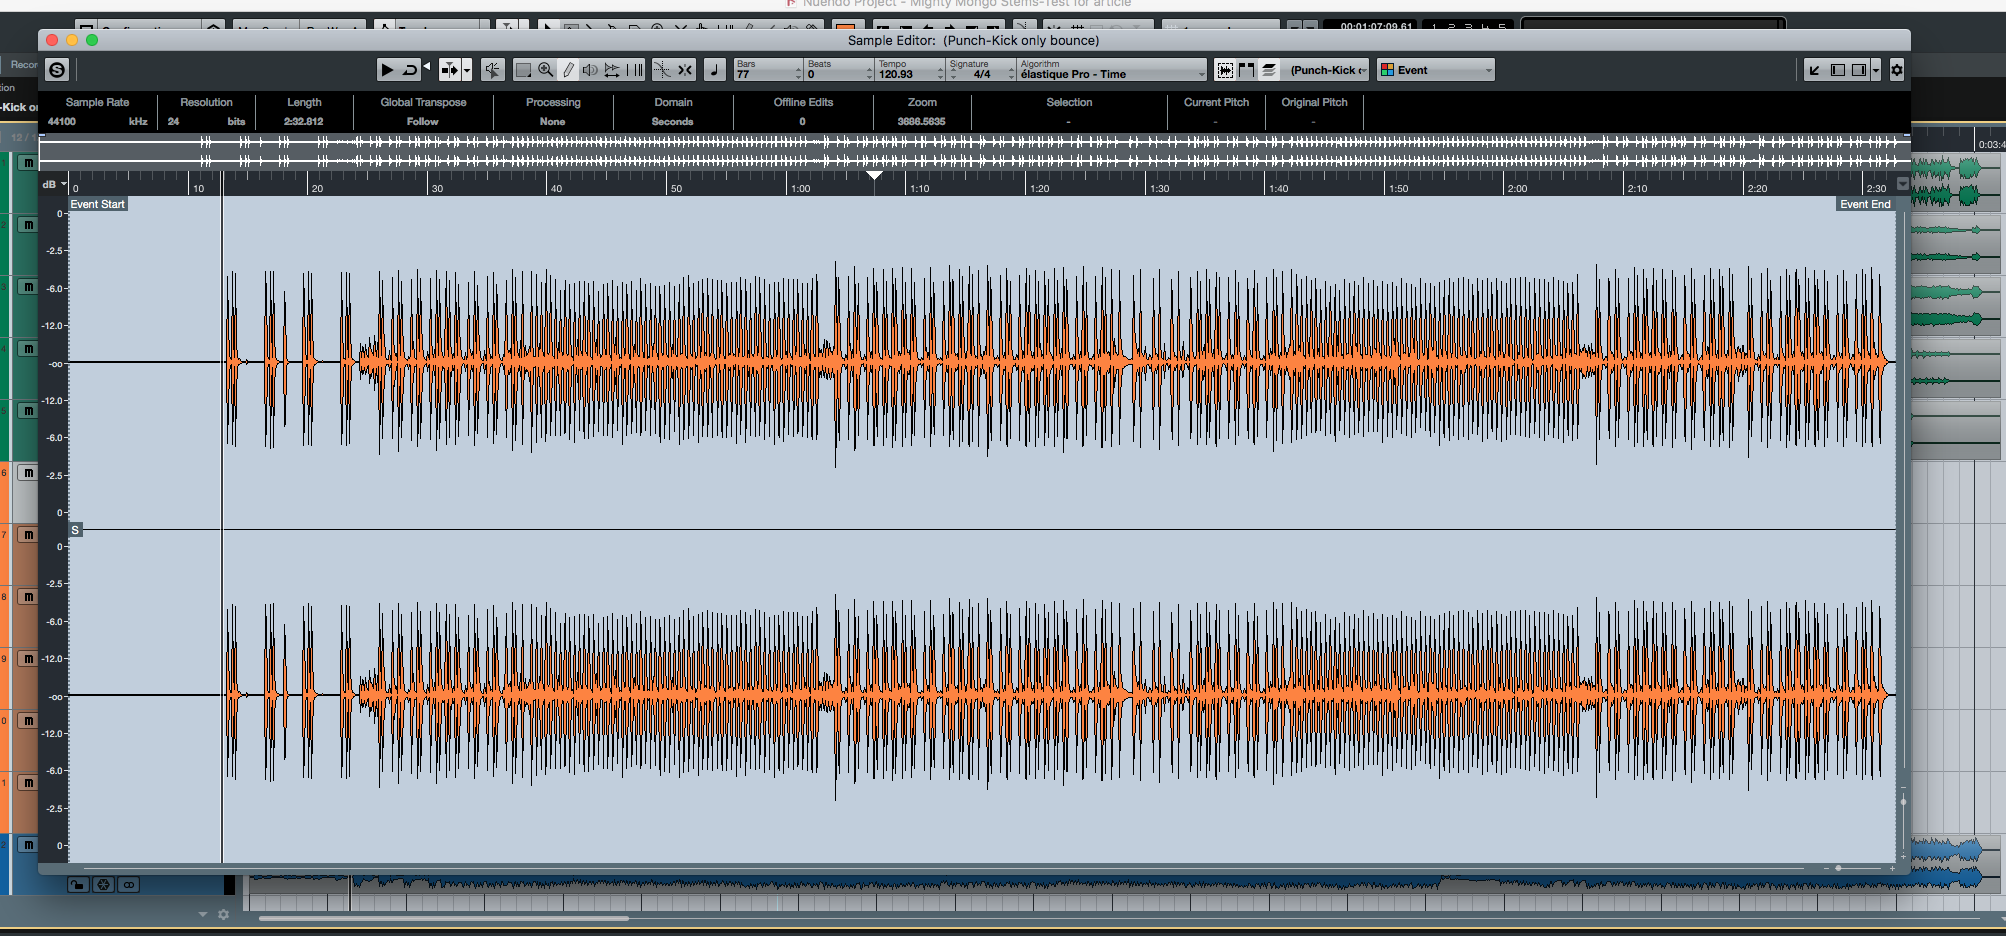
Though many editing duties can be handled from within the main Project Window, the Sample Editor provides deeper flexibility and additional, more advanced processing capabilities.
The Sample Editor is a separate floating window which opens when you double-click an Event.
As easy as it is for you to edit in the Project Window, finer, more precise and powerful editing, and advanced processing can be performed in the Sample Editor. This window has a toolbar along the top, plus an Info Line, much like the one in the Project Window. The tools available include Range Selection, Zoom, Draw, Play, Scrub and Time Warp. It has snap and audition controls, along with many other useful editing functions.
The inspector on the left side of the Sample Editor reveals the advanced processes available, which include: AudioWarp (an advanced time-stretching/compression algorithm), VariAudio (like “Auto-Tune”), Hitpoints (like “Beat Detective”), and Range and Process, which are exactly what they sound like they are.
The Sample Editor is of most use to me when I need to perform edits at, well… the sample level. You can zoom in much, much further than you can in the Project Window, and can actually view each sample of a waveform in great detail. It’s not often that I need such resolution except to remove clicks and small transient noises that may show up unexpectedly on vocal tracks or when there are bad edits. By zooming in this far, I can easily re-draw the waveforms and remove the clicks transparently.
VariAudio looks, to me, like any other tuning software, though admittedly, I don’t have much experience with any of them. I usually leave those tasks to engineers and clients who do it often. From what I’m told, Nuendo’s take on this is more akin to Melodyne than Autotune.
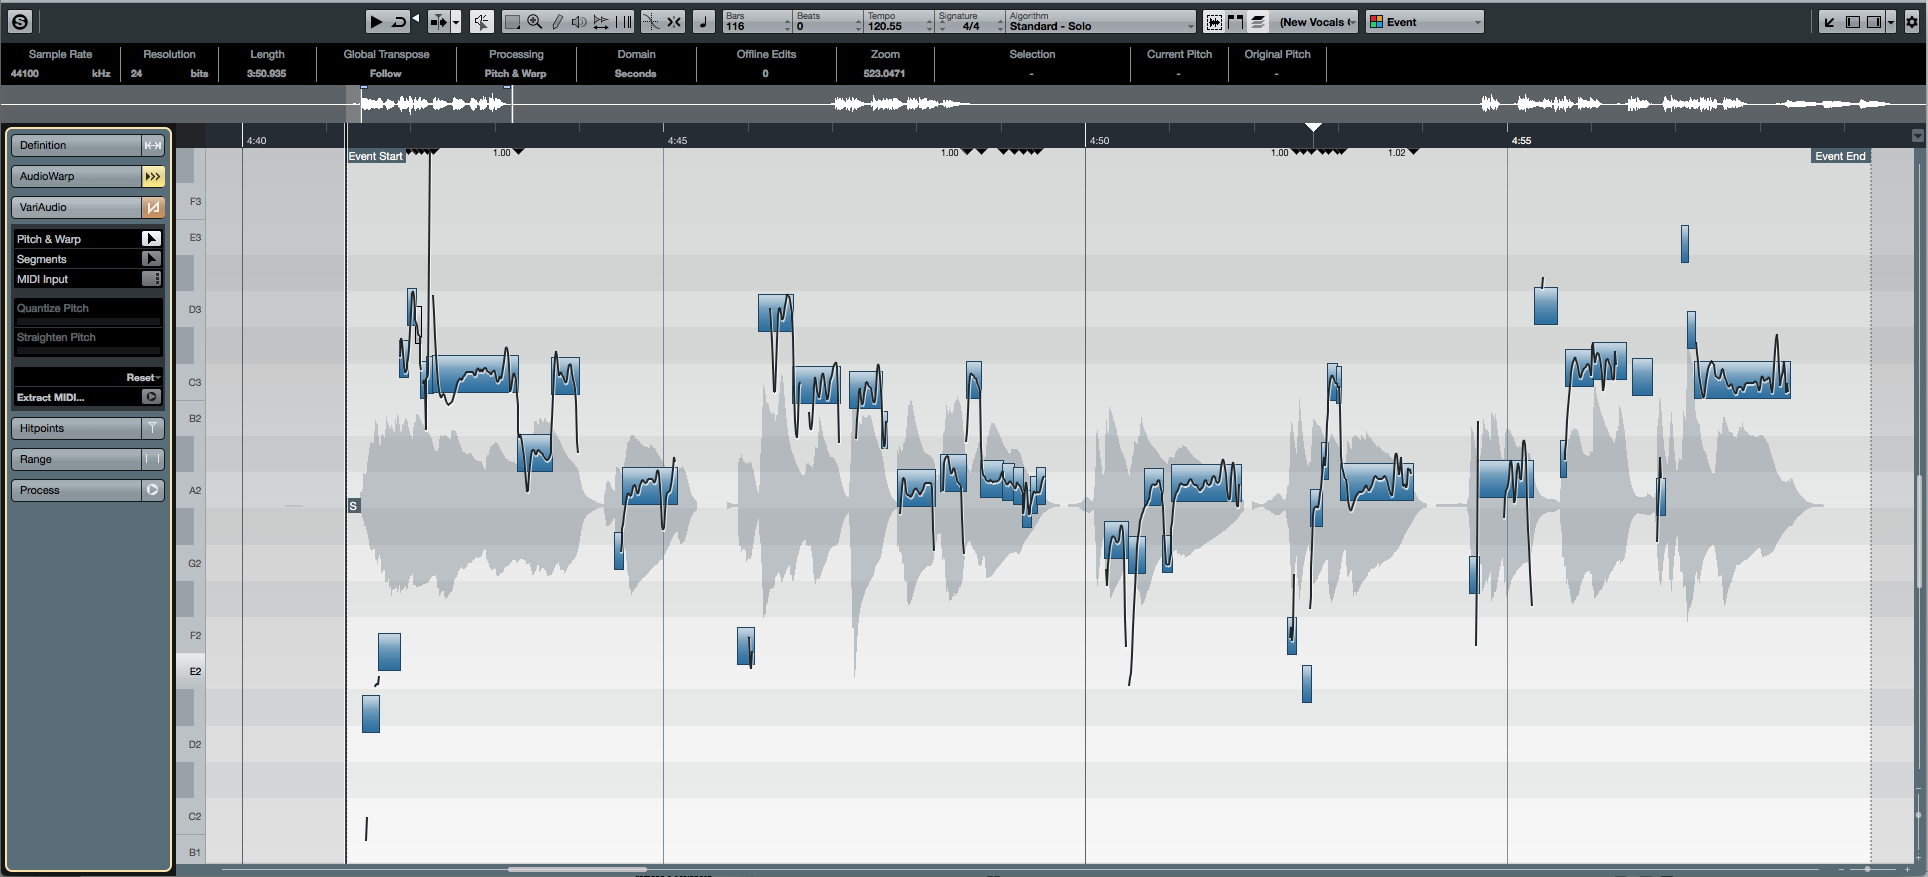
The ability to apply pitch correction without third party software is yet another winning feature that comes standard in Nuendo 8, as seen with VariAudio.
I messed with VariAudio a bit and found it to work well. It was relatively easy to navigate, and not difficult to figure out how to manipulate the audio effectively.
The graphical editing keeps you aware of where you started and where you’ve ended up. I could also see VariAudio being useful for correcting the occasional out-of-tune note on a guitar or bass. And it’s included.
Hitpoints works very similarly to Beat Detective in Pro Tools, once you figure out the terminology. It finds the “hitpoints” based on your threshold settings, then “slices” the audio based on the location of the hitpoints. You can slip and slide freely, lock it to a groove, or lock it to the grid. Nothing completely new here, but it’s very easy to use and completely integrated.
Some Other Things
There are certain features and functions that don’t necessarily fall under the specific windowed categories, but are worth a mention to further understand Nuendo 8’s heightened capabilities.
“Move To”: This was a feature I learned about when I started using Nuendo in my first life. Move To allows you to relocate any number of selected files simultaneously to the Cursor or, ingeniously, to Origin, which places the audio files at their original timestamp. This is a lifesaver if you accidentally move some audio files to an unexpected location or if you receive files that were not exported correctly with regards to the starting location. I love this!
The Automation Panel: This gives you global control and access to the modes and behavior of the mixer while writing and reading automation. I’ve found this to be super helpful.
Effect and Group Busses: When you add an effect or group channel, Nuendo automatically creates the buss. All busses appear under their respective categories when you choose to route something.
The Plugin Manager: This allows you to create your own layouts for how you see your plugins in the inserts lists. You can create folders or sub-categories based on your preferences.
For example, do you want all of your compressors together? Create a “Comps” folder and drag them in—in any order. Do you want things grouped by manufacturer instead? Easy to do. At first, it seemed a bit inconvenient to create but once I started doing it, I realized that I could put the stuff I use the most within a category at the top of the list for quick location. I could even put the same plugin within two separate categories. For example: a tape emulator could be placed in a “Tape Emulation” folder and a “Distortion” folder.
Another cool thing: the search function with the Plugin Manager. If you know what you want, just enter it in the search field and voila! There it is.
Freeze Channel: This creates a new processed file on an audio track with the current plugin settings applied, and is a great way to free up CPU power. The plugins are greyed out (and deactivated), but their settings remain unchanged, so if you have to go back and make further tweaks, it’s easy to do so.
Direct Offline Processing: This is yet another way to free up CPU power that differs from Freeze Channel in that the processing is applied to specific Events, rather than the entire channel. A dialog box allows you to add plugins or effects chains to the Event and a new, processed Event replaces the original one in the Project Window. This is also a great way to deal with problems that occur occasionally—like resonances in a vocal, or single loud notes on a bass guitar—without having to negatively affect the audio the rest of the time.
There are so many other features that I probably won’t ever use, but may be of interest to those who compose music in their DAW, including: full MIDI recording and editing, Chord Track, Harmony Generation, Radomizer, numerous included VST virtual instruments and loops, ReWire, and a Score Editor which can generate notation and tablature.
And don’t forget all of the Sound for Picture functionality that is part of Nuendo’s DNA. There is an advanced ADR Panel and the ReConform function for navigating ongoing Movie/TV/Video projects. There is also Game Audio Connect, Wwise Integration, Perforce Version Control and other functionality, which makes transferring files to a game audio engine relatively painless.
Phew!
Advanced Tutorials
I had a big advantage in learning more about Nuendo (aside from my earlier experience) in that I know a guy named Ashley Shepherd. Ashley is a product specialist for Yamaha and the owner of the fabulous Audiogrotto recording studio in the Cincinnati area. He has written manuals and other associated materials related to Nuendo for at least the last decade, and was a valuable resource for me when I tried to get back on the Nuendo horse.
If you are interested to learn more about how Nuendo can be used, Ashley and Yamaha put together an incredible tutorial for Yamaha’s Nuage series of controllers, which are designed to work with Nuendo (and most other DAWs). In fact, they even shot a short film to show an Audio for Film workflow using Nuendo and Nuage. There are audio/video files and Nuendo Projects that can be downloaded and worked on in Nuendo to give the user some “practice” at mixing Audio for Picture.
If you have never worked in this field of audio, it’s quite eye-opening and fascinating. The downloadable PDF has links to YouTube videos showing different parts of the process. It’s a remarkable piece of work.
If you care to simply watch the videos to see Nuendo/Nuage in action, you can go directly to their YouTube page here.
To Be Critical
I don’t have many gripes about Nuendo 8, and to be honest, anything that bugged me was merely because I had not figured out how to do what I wanted to do!
The way Pro Tools can save templates without any media is a better implementation that what Nuendo offers in this regard, but there are workarounds that ultimately give you the same result.
I also prefer the Import dialog box in Pro Tools over Nuendo, though it’s not difficult to get the same result with a little thought and experimentation.
I don’t really miss Clip Gain in Pro Tools since there are volume handles on the Events in Nuendo (plus the Gain control in the mixer), but it’s not quite the same, since Clip Gain allows you to draw volume curves within the clip.
Nuendo uses an envelope editor to draw volume changes within an event, but it is displayed more as a “0-100%” value, rather than in actual dB within the event window. Sometimes I prefer to know that I turned something down exactly 1.4dB… but again, the results end up being the same.
Summing it Up
As I stated at the beginning of this (very long) article, I don’t believe I can convince anyone to suddenly switch from Pro Tools to Nuendo 8, especially if you’ve been using Pro Tools for any significant length of time. In fact, why would I want you to?
However, if you’ve ever considered moving to a different workstation or are looking for something that has enormous capability to do any kind of audio project efficiently and powerfully, I can’t image that there is anything as capable as Nuendo 8.
I’ve switched… and I’m not going back!
Major is the author of the book Recording Drums: The Complete Guide and is the creator of the video series “The Method to the Mix”.
Please note: When you buy products through links on this page, we may earn an affiliate commission.


