Plugin Review: iZotope RX Final Mix
The world of pro audio plugins is an ever-expanding marketplace. New products arrive almost every day it seems, fighting for our attention and our dollars.
When it comes to the tools we use day in and day out, there are a select few companies whose products are universally trusted within the industry. For me, and many of my colleagues, iZotope is one of those companies.
Their products are so crucial to my workflow, especially in post-production that I can honestly say that I would be completely lost without them at my disposal. I use iZotope Insight for my metering display and RX 4 Advanced for all of my audio cleaning and noise reduction needs. It would be fair to say that the three most used tools in my studio are my computer itself, Pro Tools, and my iZotope plugins.
So, when I found out that iZotope was releasing a new tool called RX Final Mix, designed for post-production mixers and audio editors, I knew I had to check it out.
Before we dive into this product, I’d like to mention briefly a couple things about what RX Final Mix is not.
This plugin is not an auto-mix tool. There are no presets that will automatically make all your tracks sound perfectly blended and broadcast ready. No one’s job is at risk because of this plugin.
Furthermore, RX Final Mix is not a tool that should be considered an acceptable alternative to a professional mixer when used by filmmakers and video editors.
There are of course, many instances where RX Final Mix can and should be used by editors and filmmakers, but this product in all likelihood will not bridge the divide between the editing bay, and the mixing room. Having said that, lets dig in!
Compatibility
RX Final Mix is a native-only plugin compatible with audio and video editing software and retails for $299 USD.
Formats include Audiosuite DPM and AAX, RTAS 32 bit, AAX 64 bit, AU, VST 2 and VST 3 32/64 bit. Available platforms include:
- Pro Tools 10-12
- Nuendo 6.5
- Premiere Pro CC 2014 and 2015
- Media Composer 7.0.4 & 8.4
- Final Cut X
- Audition CC 2014 and 2015
- Logic X
- Cubase 7.5 & 8
RX Final Mix offers support for mono, stereo, 5 .0, 5 .1, 7 .0 and 7 .1 audio formats.
What It Does
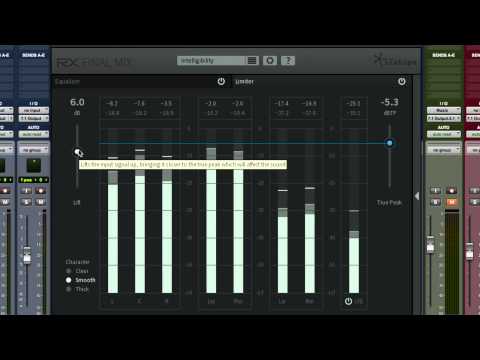
RX Final mix is a combination Dynamic EQ and True Peak Limiter, offering users of all technical skill levels the ability to quickly and easily shape their audio mix for film and TV, while providing a consistent level that is compliant with all current broadcast standards.
RX Final Mix is comprised of two different modules:
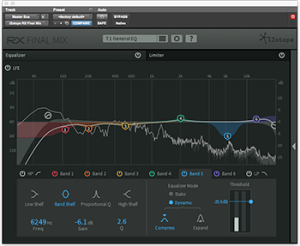
Dynamic EQ
The EQ module in RX Final Mix affords you an incredible amount of control over the source material.
There are six EQ bands as well as high pass and low pass filters. Each band can be set up in one of two modes, Static and Dyanmic.
“Static” mode is a traditional ”set-it-once-and-it-stays” type of EQ. “Dynamic” mode offers you the ability to work in either an “Expand” or “Compress” mode, with each audio band behaving similarly to the way a multi-band compressor works.
The difference between a dynamic EQ and a multi-band compressor is that the multi-band compressor works with a series of crossover points to process audio, where RX Final Mix uses familiar EQ filter shapes on each band to instead.
The controls here allows users to set peaks or nodes that either boost or cut, as well as set a threshold, which lets audio to pass freely through the module un EQ’d unless it passes the threshold point, at which point the EQ is applied. More on that in a minute.
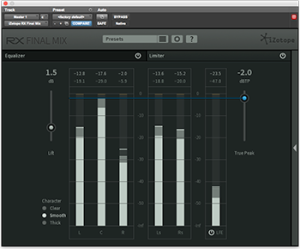
Limiter Module
The limiter module provides intelligent peak limiting for individual tracks, busses, or your final mix bus. Simply set the desired true peak level and use the “Lift” slider to boost the overall gain. Three different tonal character options are available: “Clear”, “Smooth” and “Thick”, flavors depending on your program material.
I’ve had the chance to use RX Final Mix on a few different short documentary projects as well as a dramatic film. I also worked closely with Boston-based editor and Filmmaker Jon Mercer to get his take on RX Final Mix from the point-of-view of an editor working mostly in Adobe Premiere.
There are a few different ways to work with RX Final Mix depending on your workflow and whether you are primarily an audio or video professional. In my studio, I tend to use RX Final Mix on separate aux busses set up for Dialogue, FX and Music before they hit my main mix bus and stems. This allows all the processing I do in RX Final Mix to be uniform across my final mix and split tracks.
On the video side, editor Jon Mercer found RX Final Mix useful on both individual tracks, and across his main 1-2 mix output depending on the project. Mercer explains:
“This morning I was working on a pitch video we’re dong for an agency—the kind of thing that mostly stays internal right up until the pitch meeting.
Usually these kinds of things aren’t fully mixed. So, I’m gathering assets from different people and cutting really quickly, trying to figure out what’s working and what’s not. Part of that process is recording scratch VO.
In this scenario, I dropped RX Final Mix on a single clip of VO in the timeline, choose the preset that sounded closest to what I wanted, dialed out a little noise on the high end, and then cut-and-pasted that setting onto the rest of the VO tracks in my timeline. I chose to work this way because it’s super quick and I’m not locked into making track-level adjustments if I need to move audio up or down a track while I’m editing.
“Speed is key here. Right away, I got the sound I was looking for and was able to increase the loudness using the built in limiter rather than messing with a bunch of volume adjustments or stacking multiple mono clips (a really bad habit most editors have).
“On a second project, a director needed a longer piece cut down for his reel. Splits weren’t available at the time this needed to be completed, so the mix had to be done in the edit in Adobe Premiere. In this case, I have a locked edit, so I’m applying the plugin on the 1-2 mix output track.
“Again, the VO was EQ’d individually with RX Final Mix, starting with a preset and then making some minor adjustments. In this case the source was also pretty bad, so I ended up using a little more compression than I might normally. There was also some minor de-noising done before the EQ.
“The music ended up working just fine with the default “Space for Dialog” preset in RX Final Mix. I didn’t have to mess with it any further. On the master track, I choose one of the mastering presets, in this case adding more mid clarity to fit the tone I was looking for.
“Overall, I found everything to be incredibly intuitive. I have some minor experience using Ableton, Logic and a little bit of Pro Tools, but nothing really past a recreational understanding of each.
“Typically, I’m working on pieces that are going to be mixed professionally so I don’t tend to do a lot of audio mixing and cleanup myself. Because of this, I’m usually making adjustments using the built in tools in my NLE (non linear editor) as needed.
“Having something like RX Final Mix available while editing adds a lot of value because I’m able to get things a lot closer to final mix levels with very little effort. I found the GUI more intuitive than the usual sliders and the presets to be very effective.”
My thanks to Jon for test driving RX Final Mix on the video side. On the audio-post side, I was able to use RX Final Mix on a number of projects. I found myself using the dynamic EQ module more frequently than the limiter since my post-production templates are set up with their own limiters on various busses and split tracks.
There are a couple really fantastic features of the dynamic EQ module that I’ll touch on briefly:
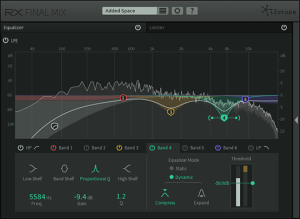
Proportional Q
This is a killer addition to this plugin. Essentially, Proportional Q creates variable bandwidth that changes based on how much boost or cut is applied to the frequency. In practice, the width or “Q” on the selected EQ band will be a bit wider at low boost or cut levels, and grow narrower the more boost or cut is applied.
Dynamic Mode
Dynamic Mode is really the heart of what RX Final Mix is all about. Think of Dynamic Mode on each band of the EQ as a sort of compressor or expander for each individual frequency band you choose to work on. You sets your boost/cut amount, choose your frequency, and then adjusts a threshold slider to determine at what level has to be reached before Final Mix will engage the EQ band’s settings.
The implications for this feature are enormous. It allows you, for instance, to set a gentle scoop in the 3-5K range to take some of the harshness and sibilance out of dialogue tracks, but only when it becomes a problem. At lower levels, the clarity that frequency band provides passes through unscathed.
When used on music tracks and stems, the dynamic EQ module can be used to subtly compress only in the frequency ranges where certain instruments and arrangements would compete with dialogue.
Conversely, using a narrow Proportional Q and the expand setting on an EQ band set to a low frequency can be used on FX tracks to add impact and boost to explosive and percussive FX tracks.
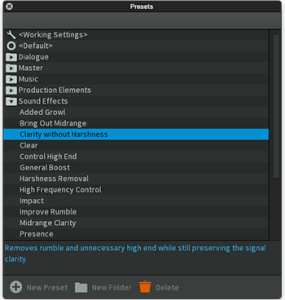
If all of this sounds a bit too technical for you, fear not! One of the benchmarks of iZotope’s great products over the years is the presets section. As always, RX Final Mix delivers with a huge array of presets broken down into five main categories: Dialogue, Master, Music, Production Elements and Sound Effects. These presets are an excellent jumping-off point for finding uses for RX Final Mix on your project.
In the Dialogue presets folder for instance are settings for Added Clarity, Bass Impact, Cheap Mic Removal, Female Dialogue, Presence, Intelligibility and many more. The Music folder includes presets for Dynamic Impact, Mix Space, Space for Dialogue and many more.
Each of these presets will engage both the Limiter and the EQ by default. Each module can then be turned on or off individually simply by selecting the power button on each module.
To Be Critical
My main critique of RX Final Mix was the processing power and delay compensation needed to run the plugin. However, since this writing, iZotope has released a free update for RX Final Mix users (V1.01) that addresses both latency and CPU usage. The new update includes the option to switch between the existing limiting algorithm and a new ultra low latency algorithm, which reduces latency by up to 97%. With the new low latency mode, users can now run RX Final Mix with as low as 120 samples of latency at 48 kHz.
iZotope has also improved CPU usage for the EQ module with up to 60% less CPU usage with certain node shapes. This is all to say that RX Final Mix will now be significantly less taxing on your CPU than the original 1.0 version.
Personally, I would really like to see a sidechain input for RX Final Mix. Sidechain capabilities would provide a fantastic way for mixers to use the Dyanmic EQ feature more surgically when it comes to the interaction between say music and dialogue tracks.
Summing it Up
Overall, I’m very impressed with what iZotope has brought to the marketplace with RX Final Mix. This is a fantastic tool for audio and video professionals, and allows both to get impressive results extremely quickly.
RX Final Mix performs brilliantly both sonically and logistically, allowing users of all skill levels to achieve fantastic results that add depth, character and space to their post production mixes.
Zach McNees is a Brooklyn-based producer/engineer/mixer and live recordist who’s worked with Björk, Rob Thomas, Julia Nunes, The Gregory Brothers, Pixies, Liars and Alice Cooper. Get in touch with Zach at zachmcnees.com
Please note: When you buy products through links on this page, we may earn an affiliate commission.


