Psyched on Sonics: Producing a Dance Track from a Spoken Word Recording
Every month, Matt McCorkle of EqualSonics.com brings you a day in the life of a New York City recording engineer.
THE MISSION: Creating a Dance Track out of a Spoken Word Recording
In the last “Psyched On Sonics” we took you on location to record some vocals in an unconventional space, The Hallmark of Battery Park Senior Residence in downtown New York City. This month we’ll be creating a dance track in which to showcase the captured vocals.
THE CALL
A few months after the initial spoken word recording and the live performance in which the recording was featured, Whitney Bryant founder of “Tuesdays At Four” contacted me again. This time she wanted to up the ante for Tuesdays At Four’s next live performance by creating a dance track featuring parts of the spoken word recording in the track.
Her plan was to trick the audience by letting them think they were listening to a classical piece of music, then BAM, they are hit sideways by an unexpected dance beat with the voices of her students in an intergenerational class – people varying in age from 18-101 – taking lead vocals in the track.
This was an interesting project because I was not re-recording anyone’s vocals for the production of the dance track. The track was to be created and then, through some crafty Pro Tools magic, parts of the spoken word recording would be manipulated into the lead vocal melody of the track.
After a lengthy discussion with Whitney and her team about the layout of the song, the song’s tempo, how the story would unfold and the logistics of getting it completed, I had a clear sense of what needed to be done. I accepted the job. Get to work!
TRICKERY!
The first part of this track was meant to throw off the audience. It began with Vivaldi’s Concerto Grosso in B Minor, Op. 3 No. 10 to contrast with the subsequent dance track. I searched Vivaldi’s piece for a clever out point, discovering that fifteen seconds into the track there was a slight pause. During the pause, I “Vari-Fi‘d” the track, giving it a record stopping slow-down effect, as per Whitney’s request. Once I had this accomplished I began building the fundamentals of the dance track.
BASICS FIRST
The track was going to feature the vocals, but first I needed to build the fundamentals of the musical track, starting with the rhythmic backbone. I used Native Instrument’s Battery 3 to program two different kicks, layered on top of one another. The first kick was to be kept low within the track, it was higher pitched and had some wetness to it. Alone it would fail miserably as a dance track’s kick, but mixed underneath a lower pitched, heavier kick it would add a nice texture to track’s bottom end…and this is just what it did.
I employed the same approach for the snares, choosing two snares – each varying in tone – mixed together to create a single snare that would sound fat and cut through the mix. The lower mixed snare was a tinny 808-sounding snare, centered around the higher mids, and the second higher-mixed snare was a fuller-bodied sample filling out the mid-low end.
The kick and snare beat was sitting nicely. Eventually, high hats, some cymbals and rides would be programmed into Battery 3 but for now the kick and snare were all I needed to help keep the rhythm and timing of the track. It was time for some bass!
HIRED GUNS
I had hired on talented producer and multi-instrumentalist Michael T to lay down the bass, synth and fill out the rhythm. We spent a good amount of time honing in on the bass sound, with the intention to make the bass fill out the low end in a pillowy way, while retaining an edginess to the tone. A slightly overdriven bass tone will help to contrast the vocals, particularly in dense mixes, electronic or otherwise.
Starting with NI’s Massive synth and the built-in sine wave generator, we began manipulating its base frequency, and through using its low pass filter we were able to get a nice full and rounded (pillowy) sound. This was great, but we still needed the edge! We returned to the wave generator, this time swapping sine for a square/saw tooth combo. We blended this on top of the sine wave and added more edge by using the resonance and cutoff control in Massive’s filtering section. The fundamentals were in good shape!
APPETIZING RHYTHMS
After the bass tracks were in place, I asked Michael to add some additional rhythmic elements. We played with various sounds in Absynth 5, FM8 and Massive, manipulating their sonic stamps in order to find something that would be fitting for the track. We settled on a few patches in Absynth and Massive, while we manipulated the patches further to conform to the track.
The first part of the track is a bit spare, with only the kick, snare and a deep synth sound to drive it. The deep synth sound was created with Massive by starting out with a stock patch and manipulating its LFO and Filter sections to make it sit above the kick and bass. I EQed a bit of high end out of the synth patch to leave room for other high-pitched rhythm and lead elements later in the track. The middle of the track onward is where most of the rhythm section and lead melody lie.
Once these basic elements were in place, I stopped adding instruments and focused on getting the vocals together. After all, that’s what this track was about.
THE MAIN COURSE
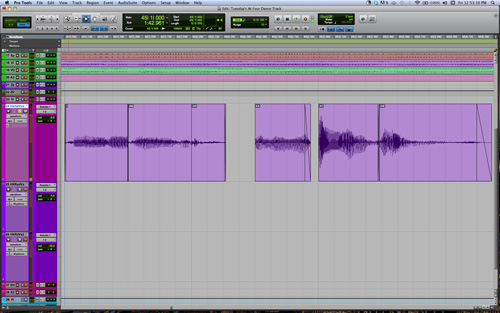
Getting the vocals into this track would be no easy task. I started by reviewing the layout that Whitney had typed out as a guideline for the vocal placement, measuring this against the arrangement that I had thus far. I pulled out the desired lines from the original vocal recordings, naming them and putting each one into the audio region pane for easy access.
Upon placing the vocals in the track, I chopped up each phrase and word into separate syllables so that I could put them on a grid. Depending on the phrase, what was happening in the track and the desired vocal effect for each idea — as outlined by Whitney — a 1/16 note to a 1/4 note space was necessary.
TIME ADJUSTMENTS
While chopping up the syllables assisted in creating some rhythmic cohesion with the track, at times it wasn’t enough to create a truly harmonious melody line. I had to employ some timing adjustments by means of TC/E (time compression and expansion). I like SoundToys “Speed”. It is my default TC/E algorithm on my Pro Tools rig. You can assign your Pro Tools rig’s default TC/E plug-in by Setup → Preferences → TC/E Plug-In Selector.
When placing the syllables on the grid that needed to be time adjusted, I would use the trim tool to stretch or shrink each one to make it conform within the session’s tempo grid. Listening back to each syllable I made sure that no strange audio artifacts were being added due to the TC/E processing. If there were audible artifacts the audio was cut into smaller pieces and then time-adjusted accordingly.
THE STORY
Much like the original spoken word recording, we wanted this track to tell a story with the vocals. The verses and chorus took on a happy light, positively reflecting on the class members’ lives. The bridge was designed to contrast the rest of the song, highlighting some of the class members’ past fears and anxiety. “I’m much better now!” proclaims a voice leading out of the bridge and returning to the positive resolve of the refrain.
The song, a reflection of the class’ motto, is meant to empower and promote healthy aging.
THE FINAL TOUCHES
Drums? Check. Rhythm section? Check. Vocals? Check. The last “to-do” was adding some other instrumentation to thicken the track up a bit. I settled on adding synths to bind and fatten the track.
Absynth has a great patch called “Dirty Saw” and with almost no tweaking this was a perfect sound for the outro. It was a flute-like sample, but had a gritty edge to it. Using SoundToys’ Decapitator on this instrument with a medium amount of distortion gave me the exact tone I was seeking. I had asked Michael if he could play around with the sound and make it fit. After a short while, we laid down the flute part. After the initial “Dirty Saw,” we doubled it to make it thicker and stand out within the track.
One other interesting element that was added in this end stage was a percussive clack sound to drive the rhythm. The raw sound of this clack was a bit thin and stale, but heavy compression really beefed it up. I added a 1/16th note slap-back delay with 25% feedback to liven up the sound and make it more exciting. The track had all the elements that it needed – time to mix!
THE MIX
My goal for the mix of this track would be to make sure the vocals are featured, especially since this was meant for a live performance. I kept in mind this track will be played through a P.A., in other words – be careful about the amount of bass I use.
Most P.A. speakers are not meant for dance music, and any extreme low-end could end up distorting the overall signal, thus making it a rather unpleasant experience for the listeners. This meant mixing the vocals into the track a bit higher than I normally would for a dance track and mixing the bass elements a bit lower than I normally would.
I started with the fundamentals by balancing between the different low-end instruments. I made good use of compression and EQ to balance all these elements together. I continued by balancing the additional rhythm section, the melody synths and the vocals. Wanting the vocals to stick out a bit more than they already did, I automated a Sans-AMP plug-in to give them a bit of crunch and drive on certain phrases, notably at the end of the track. This slight overdrive added some great texture that was different from the rest of the vocals.
It was time to add some FX to breathe some life into the track. I wanted my delays and reverbs synced to the track in regards to the timing so that their delays and decays would fall within the grid. Had I not done this, the track ran the risk of becoming a muddy mess!
A great way to convert note values into seconds for FX processing and timing adjustments is: 60 / (Session Tempo) = Quarter Note in Seconds.
Our session tempo was 130.
Since most audio FX and time processing is done in milliseconds, it makes sense to convert them first. Below is some shorthand from this particular session, detailing the formula in use. Multiplying the answer for the above equation by 1000 will give you a Quarter Note in Milliseconds.
Here is what the math looked like for this particular session:
60 / 130 = 0.461538
Every Quarter Note at 130 BPM is 0.461538 Seconds in length.
Now to Milliseconds…
Take 0.461538 x 1,000 to convert that into Milliseconds
461.54 Every Quarter Note at 130 BPM is 461.54 Milliseconds in length.
Keep multiplying your found number (ours was 461.54 ms) by 2 to get longer note values (1/2, 1) in Milliseconds.
Keep dividing your found number by 2 to get shorter note values (1/8, 1/16, 1/32) in Milliseconds.
Now, if I wanted the clack on my delay to be 1/16th notes, I would program in my delay at 115.4 ms.
For Triplets and other variations of note there are a few extra steps involved and a quick Google search will lead you to them.
A lot of plug-ins will do this conversion for you, but if your particular system doesn’t and you want your FX to be synced to your track, this formula is for you! This of course is an exact time and in turn will produce a very robotic, programmed sound. For this dance track, that’s what I needed, as the clarity of the words was paramount. For other genres, I would still use this conversion process but only as a starting point. I would rely on my ears to tell me how the delay was sitting, more than the math itself.
Now that I had my times, I set the decay on my reverb for the vocals to a bar and a half. For the vocal delay, I used the SoundToys EchoBoy plug-in with an eighth note delay, a hi cut filter and a bit of saturation on the output. I also created a delay specifically for use in the rhythm section, set to an eighth note with less feedback than the vocal delay.
After that, I wrote the instrumentation automation, panning elements in different ears for different sections and riding the fader to get life out of the various sounds. I then manually automated the vocals to ensure that they were always present in the track. The last thing that I did was sum all of the tracks into an SSL G-Comp stereo compressor to glue the song together.
Listen to the full Tuesdays At Four dance track here:
Tuesdays At Four Dance Track
THE DELIVERY
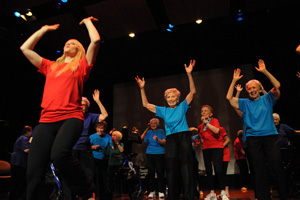
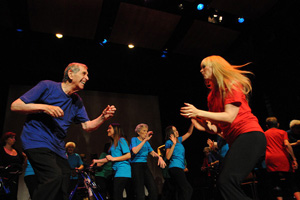
I met up with Whitney and her team for a final listening to the track. They approved of the work and they were thrilled to have their class’ voice used in an exciting fashion. The track was to be played at The NYU Medical Center Auditorium, accompanied by the Tuesdays At Four class performing their interpretive dance.
This was an exciting project to work on. It was interesting to utilize micro-editing techniques while employing time stretching in such a nuanced way to create something that retained the original’s integrity while all together creating something new. It was particularly rewarding to see the class perform to the song live on stage and the grandchildren dancing in their seats in the audience. Kudos to Whitney and her staff and the Tuesdays At Four class. I can only imagine what our next collaboration will be.
As the owner and operator of his own mobile recording studio, Matt McCorkle of EqualSonics.com is capable of bringing professional audio to anyone, anywhere, anytime. His specialties involve acoustic instrumental recordings, vocal productions, live tracking sessions, electronic music production and mixing. Whether in the studio or out in the field, Matt’s goal is simple: To create new music and sounds with passionate artists. To contact Matt, please visit EqualSonics.com
Please note: When you buy products through links on this page, we may earn an affiliate commission.


Gordon
June 11, 2011 at 6:40 pm (14 years ago)Excellent description of the recording technique and a great mix! Very enjoyable and
shines some light into older peoples lives. Well done, Gordon Rothbard
http://www.cdbaby.com/artist/GordonRothbard
Kcortes
June 11, 2011 at 10:08 pm (14 years ago)Awesome! Congrtas to Whitney, staff and all from Tuesdays At Four for their amazing work and dedication.