Psyched on Sonics: Recording LMFAO Live at the MLB Fan Cave
Every month, Matt McCorkle of EqualSonics.com brings you a day in the life of a New York City recording engineer.
THE MISSION: Recording an LMFAO Live Performance at the MLB Fan Cave.
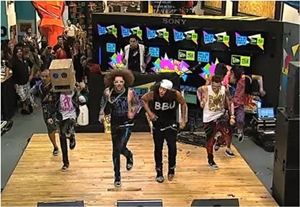
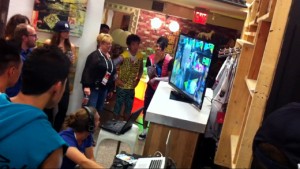
THE EVENT: A live LMFAO performance at the MLB Fan Cave located in Manhattan at 4th and Broadway. The MLB Fan Cave is a place where baseball meets pop culture — it was designed by Paul Dimeo of “Extreme Makeover: Home Edition” and within the Fan Cave lies a stage for live concerts. Art adorns the walls and a battalion of MacBooks line windowsills displaying pictures and baseball stats. There are enough games and televisions to keep a person occupied for weeks. Located in the old Tower Records building, it is the perfect place for hosting live concerts.
This particular event on August 18, 2011, featured the international duo, LMFAO, and their incredible dance squad. The whole extravaganza was filmed, recorded, streamed live on the Internet and to two baseball park mega-screens before their night games. This event was massive, and with signal being sent worldwide we needed to capture the sound with the best quality possible.
As well as streaming the event live, we also needed to record each instrument so the performance could be mixed, synced with video and posted on MLBFanCave.com.
See and hear some of the LMFAO performance Matt recorded right here:
THE CONCEPT:
Recording multi-track inputs of each instrument is critical for capturing a live performance correctly and having full control of the individual mix elements afterwards. Without these individual tracks of each instrument the mix stage won’t be utilized to its full capacity.
We also needed to record the audience and ambience of the show so we could retain the live element for the stream and the mix. This includes placing at least a stereo pair of microphones a distance from the stage near the audience or pointing the stereo pair from the stage towards the audience.
There are two traditional methods of achieving a multi-track recording of a live show. Regardless of which method is employed, one must bring a multi-track recorder.
THE SPLIT:
Not Enough Control
If you’re nice to the live sound engineer he/she might let you use the insert point, which is ideal because you will likely be taking your signal PRE-fader and PRE-EQ/dynamics section. If your live sound engineer is not so nice you might be stuck with an aux send or a direct out. These two options will work, but depending on how the board is set up you’ll probably be recording the engineer’s fader movements and/or EQ/dynamics adjustments.
Either way, once you gain access to the individual tracks at the live sound console you plug into your multi-track recorder and record the show. This method works, but it won’t yield the best quality. You are relying on the venue’s cable runs, pre-amps, and any other boxes that the microphone signal must travel through in order to get to the console.
The Ideal
The ideal method is to record as pure of a signal as possible, using our own microphones to mike instruments on stage running directly into the mobile recording studio.
However, musicians, live sound engineers and venues do not usually like this approach. Having more microphones on stage means more cables and more stands. Cluttering an already-cluttered stage is more often looked down upon. This is a completely acceptable standpoint, which is why we compromise.
The Compromise
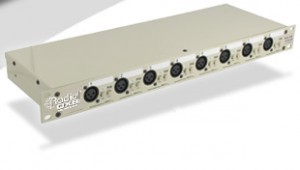
So how do we get around this? Using microphone-level splitters is the key ingredient. Plug a microphone signal into the splitter and in return you get three redundant signals on the output. The live sound engineer has a copy of the microphone signal, the recordist receives a copy and there is a third output for another party to get in on the action if needed. These microphone signals are independent of one another. There is no fear that adjusting my pre-amps will affect the live sound engineer’s gain stage, so feedback worries are curbed.
The method of splitting a microphone signal allows the use of just one microphone per instrument. This cleans up the stage and allows the recordist to receive everything the live sound engineer receives and vice versa. Of course, there are always things the recordist needs that the live engineer won’t ever use. Audience microphones are something that MUST be recorded, as they are crucial for the “live performance sound.” On the flip side, live sound engineers have little use for microphones pointed at their mains.
FORESIGHT:
As a location recordist you must think ahead to what the mixer — whether it’s going to be you or another party — might need come the subsequent stage of the process and over-prepare. This includes DI feeds, stereo DJ feeds and multiple miking on an instrument (i.e bottom of the snare or front of a cajon).
You must think in the mindset that you are recording the show much like you would in a recording studio: Perhaps the venue is small and the amps can blend with the drums onstage — live shows can then get away with having the guitar amps un-miked. If the recordist doesn’t mike the amps or take a DI feed, then the recording is relying on the audience microphones for the guitar tone.
You’re not there to provide live sound for the venue, but to come away with the best-possible-quality recording of the event. This may seem like an obvious statement, but once the show is over, it’s OVER. If you didn’t capture what you needed to capture, there are no second takes.
MICROPHONES:
For the microphones, most often we’ll use a mixture of the live sound engineer’s tool kit and Equal Sonics’ own microphone kit.
It’s always fun to see which microphones the live engineer likes to use, and to share our microphones. I’ve learned so much about microphones just by picking the brains of all the engineers I encounter and discovering their preferences. Perhaps they’ll mike the drum kit and I’ll mike the guitar and bass amps. Regardless, whatever we settle on using for microphones, we’ll patch everything that we both need a copy of into the microphone splitters. They’ll take their copy, and our copy will feed the snake that is run to the mobile studio.
Documentation is critical! Much like recording in a studio situation, it’s crucial to document every step of your signal flow. My assistants always have the input sheet, documenting every microphone placement, the channel on the splitter, the channel on the snake, the pre-amp it’s feeding and the A/D channel the signal is being converted through.
Communication is very important as well: if any problems arise in the signal flow either myself or the assistant can easily look at our documentation and make amends quickly.
FRONT-END SETUP:
The snake needs to be run from the stage to wherever we plan to setup the mobile recording studio. Having a snake is important because it reduces cable clutter and allows clean access from the stage to the mobile recording studio. The snake Equal Sonics uses is a Whirlwind 24 ch w/ 8 ch of returns with 50′ throw allowing a generous amount of room to roam around.
Once the snake box and throw is in place and taped down securely with gaffers tape we’ll patch one feed of the microphone splitter’s output into our snake, using Radials OX-8 8ch microphone splitter, which outputs each independent feed into 8 ch D-Sub to 8 ch XLR fan-outs. We take the XLR outputs and plug each successive feed into the corresponding snake inputs.
For ease of documentation, output 1 on the microphone splitter will go to input 1 on the snake and so on. Once the snake is securely taped down and the microphone splitters are patched in, our initial front-end setup is complete.
PLACEMENT:
At an event like LMFAO’s appearance at the Fan Cave, the spot we choose to place our mobile recording studio is obviously backstage, out of view from the audience. But close enough that I can peek my head around and see what is going on stage, if need be. A close power outlet is sought out as well. Only one electrical cable is necessary to power the Equal Sonics mobile rig, but it’s nice to have the source nearby.
A nearby power source is great because then the throw for the power extension cable can be much shorter. This helps eliminates problems that could arise such as equipment being moved over the cable, people tripping on it, etc. We attempt to find a spot that is out of the way of foot traffic, but it’s not always available.
PLUGGING IN:
Setting up the mobile studio requires one electrical outlet and hooking a laptop up to the mobile studio. Once we run a power extension cord, gaffe tape it down and plug it into our system it first hits an Uninterruptible Power Supply (UPS), which converts the AC current to DC current and back again to AC. This is to ensure all of our equipment is powered with a consistent and clean pure-sine wave that has no fluctuations. And as an added bonus, in case of an electrical blackout the UPS will power the mobile studio for 90 minutes on its backup battery — allowing me to safely save the session, then shut down the system.
The UPS distributes power to each component in the mobile recording studio system. If you’d like to read more about the logistics of how Equal Sonics mobile rig is configured, you can do so HERE.
BACK TO HQ:
Once all the microphones are plugged into the signal splitter and sent down the snake to the mobile recording studio we begin patching into the pre-amps via the snakes XLR end feeds. Depending on the size of the setup, anywhere from 4 to 24 pre-amp channels will be utilized. For this recording of the LMFAO performance we had a DJ booth feed, guitar, keys, vocoder, numerous vocal microphones and audience microphones. Utilizing 16 total inputs.
A smaller singer/songwriter set might include one or two acoustic guitar microphones, a vocal microphone and audience microphones. This smaller setup would utilize 4-6 inputs. An example of a larger setup would be a full 5-piece rock band, miking the full drum kit, bass amp, guitar amps, vocals and audience microphones. For this type of setup we’ll usually utilize all 24 inputs.
Once the microphone signals are patched into the pre-amps we’ll run them into mobile recording studios Apogee A/D converters. When recording live performances in hectic environments while only monitoring in headphones, I’ll usually stick with little to no compression nor EQ, except for some slight vocal limiting to control peaks. I tend to save heavier processing for the mix stage when I am in an acoustically controlled environment.
Once everything is patched in, Pro Tools is setup by routing, labeling and color-coding each track. It is within Pro Tools where I will initially monitor signal levels, check phasing issues, and determine if the placement of the microphone on stage is optimal. One last patch for this performance was a stereo mix feed for the live stream, this was accomplished by routing the signal from Pro Tools to a D/A converter. From the D/A converter we supplied the stereo mix feed via two balanced XLR cables.
BACK UP TO SAVE YOUR A$$:
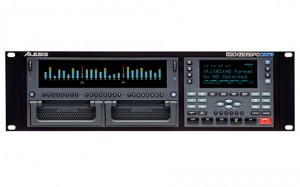
In conjunction with recording all inputs to Pro Tools, the mobile recording studio is outfitted to record a redundant copy of every microphone signal POST pre-amp & A/D converter but PRE-Pro Tools to an Alesis HD24 hard disk recorder via ADAT Lightpipe. This is to ensure never missing a beat of the live performance. The feed to the Alesis HD24 is independent of the feed going to Pro Tools. You could yank the computer out from all cabling and chuck it through the window (not recommended) and we’d still capture your performance.
Remember: You get one shot, one chance to please your clients. There are no redo’s, no second takes, no “sorry I forgot to hit ‘record'” when recording live concerts and performances.
RECORD:
Once we’re all setup with our microphone placement, cable runs, patching, labeling and documenting we wait for sound check to set our levels. All the other steps mentioned so far are to be done at the very minimum 20 minutes before the sound check. This is to ensure that you can fully utilize the sound check to obtain healthy levels and suss out any problems with signal flow quickly. The recordist should be the LAST person to hold up the grand production.
When LMFAO was sound checking I engaged “record” for a few minutes to ensure that everything was in working order. After sound check we waited until LMFAO hit the stage to perform. Once I got word that the time was near, I engaged Pro Tools and the backup recorder 5-10 minutes before the performance began to ensure that everything is captured.
During the performance I’ll monitor the levels in headphones, and by viewing my meters within Pro Tools and the Alesis HD24. If necessary, I’ll make adjustments, which is usually just a minor tweak, between songs. Once the performance is over and five minutes have passed, Pro Tools is disengaged from recording. I keep the backup recorder running for 10-15 minutes just in case something improvisational happens I want to make sure to have it captured.
Only once I’m positive that, yes, the show is over, we’ll stop all recording and begin immediate cloning of all session files. It is crucial to make sure that the session files exists in three places is crucial. One clone goes to the internal hard disc of the recording computer; one to an external hard disk and the third is kept on the external hard disk that captured the performance.
Once it exists in three places I carry one copy on my person, one external drive I put in the shock mounted mobile recording studio and the third copy is in the internal hard disk of the recording computer. Basically, I take every precaution possible to always come back to my studio with the recorded material.
This performance was tracked at 48 kHz with a 24-bit depth for video compatibility. The entire recording was one hour and five minutes. This equated to 8.5 GB of data.
HOMEBASE:
Once I’m back at the studio I begin to edit the recorded material. Here I’m taking out unnecessary pre- and post-show recording to reduce the overall session file size, plus making sure to leave a few minutes before and after the performance for audience ambience and clapping. After editing the session files, I export each track as its own .WAV file, making sure that they are all the same time length to ensure a time-coherent playback for the mixing engineer.
For this particular session, in conjunction with the live streaming, the files were to also be sent off to a mixer in upstate New York. He mixed the recorded audio captured during the performance. From there he sends the mixes to be synced with the recorded video so fans that missed the show can view it online at MLBFanCave.com.
I bundled up the multi-track WAV files in a .zip file, loaded them on Equal Sonics‘ FTP server and provided the mixing engineer with a username and password so that he could login to equalsonics.com and download the multi-tracks.
CONCLUSION:
Recording a live performance is an intense process; there are no two ways about it. It comes with elements of recording in a studio, with the added pressure of a strict timetable and no second takes. The adrenaline rush of successfully recording a live performance, especially one with big expectations, can be exhilarating.
You can check out a recap of the LMFAO live performance HERE. If you haven’t done so already, I highly recommend checking out the MLB Fan Cave.
As the owner and operator of his own mobile recording studio, Matt McCorkle of EqualSonics.com is capable of bringing professional audio to anyone, anywhere, anytime. His specialties involve acoustic instrumental recordings, vocal productions, live tracking sessions, sound design, electronic music production and mixing. Whether in the studio or out in the field, Matt’s goal is simple: To create new music and sounds with passionate artists. To contact Matt, please visit EqualSonics.com.
Please note: When you buy products through links on this page, we may earn an affiliate commission.


