Game Audio Production Tutorial: How to Create Audio Mixers in Unity 5
Game Audio Institute co-founders Steve Horowitz and Scott Looney are no strangers to SonicScoop. They’ve contributed numerous articles and insights on game audio here (like this one on immersive sound for VR, AR and 360 video), and now they’re back.
The reason for their return? They’re about to launch an eight-week course about Audio for AR and VR, a hybrid course of Zoom meetings and lecture material. In addition to learning core fundamentals about the game audio industry and what audio tool sets are available to use for different project types, students will work with Steam Audio and Unity, implementing sounds and music for a simple VR-based GAI Game Lesson project suitable for portfolio work.
Seats are limited to 10 students, in order to give maximum attention to each attendee. Visit here for more details on how to register (use the code “gai-vr2022-20” for a 20% discount).
For a big taste of the course materials, GAI has provided SonicScoop readers with this excerpt from the Looney-led module, “Creating Audio Mixers in Unity 5.”
These days, anyone interested in game audio always talks about using well-known middleware like Wwise or FMOD Studio. But what happens when a company decides not to use it? If you’re using the Unity game engine there are definitely some options available, and for audio pros one of these options is the ability to create Audio Mixers.
These debuted in Unity 5, and have really made the act of mixing in Unity tremendously easier to manage. Let’s take a look at a basic overview of the system.
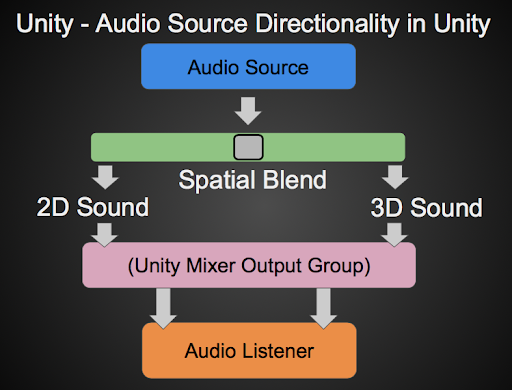
In effect, the Mixer stands between the Audio Source and the Audio Listener. The Listener has a 3D-oriented output bus and 2D output bus, and the Spatial Blend control on each Audio Source regulates how much of each output bus to balance between. However, this split signal shown here is non-viewable, and is simply assumed. When a signal leaves the Mixer, the 2D and 3D sources are mixed together at Unity’s main output.
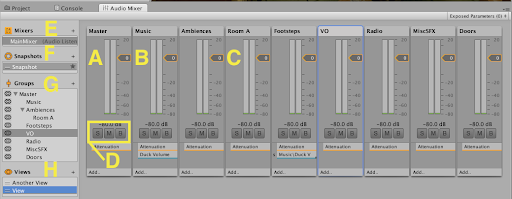
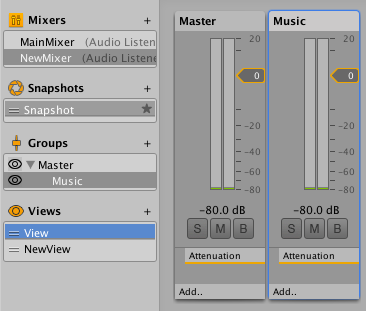
The Audio Mixer This item is the centerpiece of Unity’s mixing system. One very interesting thing about this new system is that it is not based on Game Objects in a scene which are volatile and can lose their changes if reloading or switching to other scenes. A mixer is instead an asset, which makes it both persistent and permanent to your entire game project. Here’s an overview of the different parts of a typical Mixer with some configuration already done. You won’t see this until you create an Audio Mixer yourself in a Unity project, which will be happening in just a bit.
As you can see, it looks suspiciously like a mixer you might find in a typical DAW, like Pro Tools or Logic. The Master Bus (A) is on the left of the channels (B,C), which is a little unusual, but all of the channels have the typical Solo Mute and Bypass controls (D). Also slightly unusual is that the plugins are placed underneath the slider and Solo/Mute/Bypass controls. On the far left are the four main areas for mixer assets available (E), Snapshots (F), Groups (G), and Views (H).
At any rate, you’re likely itching to actually get started, so let’s create an Audio Mixer and talk about what all these controls do in more depth.
Creating a Mixer
To create a Mixer asset, go to the Create button under the Project view and select Audio Mixer:
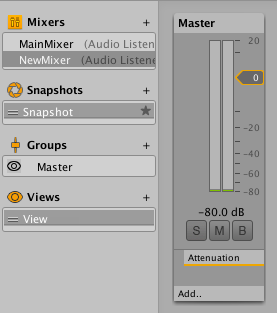
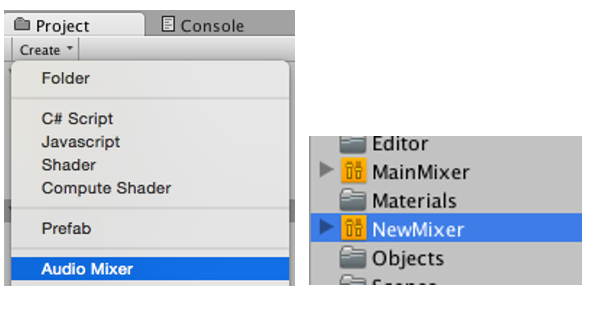 By default, Unity will name the created Mixer object NewAudioMixer. We’re renaming this one NewMixer. To see the new Audio Mixer’s contents, go to the Window menu and choose Audio Mixer. By default the window will open as an extra tab near the Project view. You can, of course, position this wherever you like. Here’s what you’ll see.
Now some channels for the Audio Mixer need to be created. Unity calls these channels Audio Mixer groups. Audio Mixer groups are created by clicking the plus sign on the upper-right corner of the Groups area on the far left. Here’s what you get when you do this.
Let’s rename this group to “Music”. Now look at the area just to the left of the names in this area. These eye icons set the visibility of that particular item in the window. Click on these to toggle the visibility of that item on or off.
Give it a try right now. You’ll notice one thing when you start up in Game mode:\
![]() You’ll get an extra button labeled Edit in Play Mode. You can click it, and you can move all the sliders in the Audio Mixer itself. Still nothing happens. Can you guess why? Well, all that you have done so far is created an Audio Mixer object and arbitrarily created a few Audio Mixer groups. The problem now is that there is currently no actual connection between the Audio Mixer and the Audio Sources that make the sounds themselves. Right now, all of the Audio Sources are connected only to the Audio Listener and are bypassing the Audio Mixer completely.
You’ll get an extra button labeled Edit in Play Mode. You can click it, and you can move all the sliders in the Audio Mixer itself. Still nothing happens. Can you guess why? Well, all that you have done so far is created an Audio Mixer object and arbitrarily created a few Audio Mixer groups. The problem now is that there is currently no actual connection between the Audio Mixer and the Audio Sources that make the sounds themselves. Right now, all of the Audio Sources are connected only to the Audio Listener and are bypassing the Audio Mixer completely.
Output Mixer Groups
Now you have to configure your Audio Source components to use Audio Mixer groups. You’ll need to have created a Game Object with an Audio Source component for this. Look at the top of the Audio Source component:
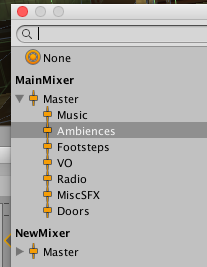
Now you get to finally use the Output field. This one’s been filled in as you see, but to attach yours simply click on the dot on the right and select it from the list (your list will likely be smaller, unless you created a lot of Output Groups) :
If you attach an Audio Mixer group to an Audio Source in the Output field, the volume of the original Audio Source is not bypassed. It simply means the Audio Mixer can now add its mixing to the existing Audio Source’s volume after which it passes the mixed signal to the Audio Listener for final output. Note that you can also feed the output of several Audio Sources to one single Audio Output Group if desired. This does mean that you do have to make sure that each object’s own Audio Source signal is roughly balanced with the other ones.
Using Plugins in the Audio Mixer
Unity can handle plugins in the Mixer window. Bear in mind that native audio plugins in a game engine doing audio signal processing or DSP is a somewhat recent concept. Games have to be very efficient with resources, and until the last few years, it hasn’t been easy to do this without taxing the processor. If you play around with these plugins and compare them to the Waves and McDSP or iZotope effects on the market in typical DAWs, you will find them adequate, but not stellar. Still, this is far better than having nothing. Let’s take a look at how to do this.
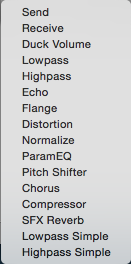
At the bottom of a channel in the Audio Mixer, you will notice that there is an Add… feature. Click on it for a list of the currently available plugins you can add.
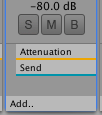
Let’s take a look at picking a Send plugin from the list:
You probably recognize the familiar S and M controls for Solo and Mute respectively. B does indeed mean bypass in this case, but not quite in the way you would think. The B button is a bypass control for all plugins on the Audio Mixer group, but does not deactivate the group itself.
Attenuation = Fader
Attenuation is the equivalent of a fader. Which means you can add plugins before (above, meaning pre) attenuation and after (below, meaning post) attenuation. If you click the Add… heading and select a plugin, it will add itself to the end of the list in a post fader position. However, if you right-click or Ctrl-click on the Attenuation you will get this option:
 You cannot delete the Attenuation heading, and only Sends and Receives have the option of connecting to other plugins. Most of the more standard effects like EQs, modulation effects, etc., look like this:
Here’s what the Inspector shows for Sends and Receives:
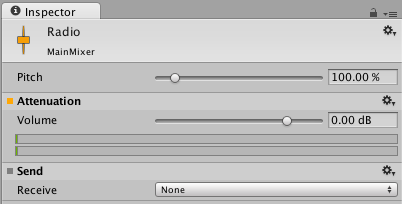 .Note the Pitch control at the top. This means that when a number of Audio Source outputs have been sent to an Audio Mixer group, the pitch of all of the mixed elements within that group can be controlled. Pretty nifty! This Pitch control is the same type of Pitch control that is found in the Audio Source, which means it controls speed as well as pitch, so any musical material will both raise up in pitch as well as be shorter in length and faster in tempo. Its range is rather large: 1% of original pitch/speed on the far left and 1,000%, or 10 times, normal pitch/speed on the right.
The Attenuation plugin is exactly the same as the slider on each Audio Mixer group, and the Send has a menu where you can select which plugin will receive the send. Unity seems to be picky about sending to specific objects, so you can’t use the plugin to simply route to another group, unless that group has a receivable plugin type to handle the signal.
That’s it for now, folks!
— Scott Looney is co-founder of Game Audio Institute, an educational resource on producing audio for games.
Please note: When you buy products through links on this page, we may earn an affiliate commission.


