Rick Slater’s Deconstructing the Project: Part III – Mixing
Third in a series of in-studio tutorials by Rick Slater, NYC Producer/Engineer/Warrior. Check out Part I: Pre-Pre-Production and Part II: Tracking.
Of all the aspects of engineering, mixing is my favorite and the one I consider to be a black art. The ins and outs are no real mystery, but how great mixes come together is all about the engineer’s relationship to the music. You can have five different people, using all the same gear and get five very different mixes in return.
For me, mixing a record is like stepping inside a movie and being able to create a multi-dimensional world that exists around me. To do this, I have to be able to let go of everything else in my head and sink deep into the material I am mixing.
People have asked me many questions about mixing …and I really feel like the skills I have are the result of years spent watching great mixers work, listening to great mixes, and mixing for a long time myself. Fortunately, I spent a few years assisting Michael Brauer who, as I later realized would greatly affect my thinking in terms of a mix. There have been others I watched and learned from, but Michael certainly got deep in my head. I consider myself lucky to have been a staff member in major studios where I had the opportunity to learn from many talented folks.
Today, the DAW offers many powerful tools and I use many of them in the course of a mix. Digital technology has made some things easier and the previously impossible, possible. I couldn’t imagine frequency dependent compression/expansion until digital came along. Things like pitch correcting the last half of a syllable weren’t really possible till digital. Flying a vocal in, meant transferring it to ½” tape and then playing it back as you recorded in the new spot on the 2” machine. As you can imagine there would be a lot of trial and error as you had to have time for the ½” to come up to speed which meant finding the correct location from which to play it each time.
Personally I use many of these new tools and techniques but I am not ready to trade in great hardware of years gone by for their digital models. Certain delays and digital devices, like the Eventide Harmonizer, have great plug-in versions which I prefer but I still love old tube and early stage IC compressors and EQ’s for the color, depth, and punch they bring. I would rather have more tools, and the best one for every job. This is a great time in our industry for gear heads!
APPROACH: THE SONG WILL TELL YOU WHAT IT NEEDS
Although I’ve added many new tools to my arsenal in recent years, my approach to a mix remains the same. When I listen to the song, I identify those elements that propel the song and make sure to feature them prominently. It might be a beat, it might be a hook, but whatever it is I look for that first. Remember to be open to the song because it will tell you what it needs!
I often hear mixes that don’t hold my attention and each time, I ask “why is the vocal obscured by a certain instrument?” or “why is the element that would make this track jump (and me the listener as well) tucked back in the mix?” Whichever platform a song is mixed on, this principle still holds!
There have certainly been some in-the-box mixers who are quite successful but it is my personal opinion that summing is best done in the analog domain. I have tried mixing a song in and out of the box and found that the sense of depth is diminished when I stay in-the-box. I suppose there could be debate on this and I welcome your responses but, for now, 95% of the time, I mix out-of-the box.
When possible, I typically use boards with multiple stereo busses like SSL J/K series boards. Awhile back while working with the group Cherry Suede, I decided to use three of the stereo busses in an attempt to compress certain elements without affecting the other elements. I wanted a modern in-your-face sound that still had dynamics. I used the “A” buss for light, “just glue it together” compression on vocals, pads, and strings. I used a Neve 33609 at 1.5:1 while I strapped a pair of Distressors across the “B” buss. I used this to make the drums and bass pump. Across the “C” buss I used an old pair of Neve 3354 compressors on guitars and anything slightly percussive.
Two weeks later I found an article in Tape Op where Brauer described this very same technique! Well all I can say is, thank you Michael for the influence.
COMPRESSION: KNOWING YOUR LIMITS
Compression is a handy tool but once you go there you can never undo it, so be warned. It took me years of experimenting just to learn how far I could push it. When I took the Cherry Suede mixes to UE Nastasi at Sterling for mastering, they had to turn down the output of the ½” machine so as not to overload the console. At one point UE said to me that it was very dynamic yet he knew I had used a lot of compression. I asked if he thought it was too much, and he replied “no it’s just right, but I can’t add anymore!”
With just a little subtle EQ, we were ready to press but if I didn’t have the experience I could have ruined the mixes.
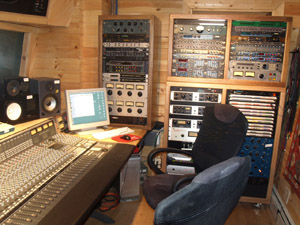
Not all my projects have the budget for big console studios so I like to use Quad Lakeside with the SSL AWS 900 and Area 51 Studios, where I mix on a Euphonix S5 Fusion.
Since I have a deeper understanding of compressors I like to set up the console with the compressors in place before I begin to mix. Mixing to the compressor helps me to reach a radio-ready, finished sounding mix quicker. I will also set up all of my effect sends and returns so that once the ideas start to flow, I can hit the ground running.
It is important to balance all your sends and returns as you set up. Some patches can seem unbalanced at times so setup your gear in bypass mode. By setting up before you mix, you might find unwanted noises you might have otherwise missed until it was too late. Doing this I have also discovered gear and speaker cross-overs which had been wired out of phase!
MIXING: DRUMS
Now on to the fun! I start with drums, which if I didn’t record, I often find myself supplementing with samples for kick and/or snare. I make sure to sample any drum I’m working on that I like for my collection so I can use it again later when needed.
These days I use Drumagog and SoundReplacer to fly my samples under the original drum. I don’t really want to replace the original sound as much as add to it. When doing this, it’s important to check for any flamming between signals. I bring the drums up on the console hot but you have to know your board’s headroom. This gives them punch. Pushing the “line in” signal will work fine with an SSL but not so on some other boards or when in-the-box.
For EQ, I’m all over the map — from Digidesign’s EQ3 or the Jack Joseph Puig Pultec emulations to the console or the hardware Pultec, Neve, or API EQs. Aside from doing the job of equalizing, I’m looking to add color and dimension to the track.
I start with the kick and move then to the overheads, seeking to balance the overall sound of the kit. From there I add the various close mics. For pop and hip-hop, I exaggerate the snare, while other forms of music depend more on the overheads for a big part of the snare’s sound. Once I get the kit together, I buss elements of it to a pair of Distressors adjusted for the particular song and returning to a pair of faders for parallel compression. (If mixing a jazz record you may skip this step.)
Using parallel compression gives the drums a powerful-in- your-face sound while still letting them breath. I often compress the room mics while tracking so they may not require anymore compression, but each situation is based on the needs of the song. If the room mics sound good but are too messy for the track, I will put an expander on them and trigger them from the snare and/or kick.
Once the drums are set, I buss certain elements to an Echo Farm plug-in set so that you don’t hear the snare repeat but it makes the sound longer. A little of this up under the drums makes them dance and you can greatly affect the groove of the track. The settings of your parallel compressors will affect the groove also! Personally, I setup my drum reverbs at this point while others add reverb once they get the sounds and balances of all the tracks, but it is your choice.
MIXING: BASS
For bass tracks I most often buss to a master fader and insert one of my modified LA3A’s and then my Moog 3 band parametric EQ. I’ll try other things at times like an old RCA BA-6A compressor or a smoother sounding EQ, but usually I go with my go-to setup.
The important thing here is for the bass to have its own space which lets it be heard separate from the kick yet still work hand-in-hand with it. OK, I also buss kick and bass to an old DBX 120 originally built for home stereos to get the jeeps jumping but let’s keep that a secret.
MIXING: VOCALS
Once I have the groove established through bass and drums it’s time to get to that all-important vocal. I want it to sound important and I want it to grab the listener’s ear and make them feel a strong emotional response. I will take the time to try every available compressor on the lead vocal and assess which one helps not only to compress but also to help convey that emotional impact.
If there is some sibilance I will pull up Digidesign’s de-esser plug-in. I feel that plug-in de-essers are much better at preserving the original sound of the track then most hardware pieces. Again for EQ, it’s whatever is working best.
One trick worth mentioning is frequency dependent expansion. If your vocal is sounding a little thin in spots but EQ is just not doing anymore than building up nasty frequencies through out the mix, it’s time to whip out the frequency dependent compressor.
First, identify the frequency range that is deficient and set up your parameters in the compressor. Now instead of setting it to compress, set it to expand when the signal falls below threshold. This is a much more elegant solution than EQ in these cases.
Remember that delay I set up for the drums? Well the vocal is getting a little of that mojo too.
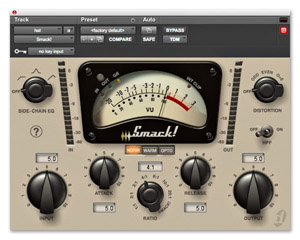
Next up is some parallel compression. I most often use an 1176 in “British” mode but I’ve also had fun with certain Joe Meek compressors as well. Mainly, again, I’m talking hardware but I have used the emulations of these pieces as well as Digidesign’s Smack! compressor, which for the record, I love!
Depending on how in-your-face you like the vocal you will need to adjust the balance between the original vocal track and the parallel compressor’s return. In general, the lead vocal gets a short plate or room sound and when the song calls for it, some radical vocal throws to reverbs, delays, or chorusing. You might want to try out an old TC Electronic 2290 in “duck mode” for some cool effects on vocal or a lead line.
Another cool trick is a ton of short delay with heavy feedback, gated and triggered by the vocal. Note: I use longer pre-delays before an effect process when I want to keep the vocal present and yet married to the back of the sound field.
MAKING SPACE, ADDING DEPTH & KNOWING WHEN ENOUGH IS ENOUGH!
Now that I’ve established groove and melody I bring up the other tracks. I usually add percussion in at this point and then guitars, keys, etc. I’ll scoop out frequencies that compete with drums or vocals and sometime bring up other ranges that accentuate the part.
Panning is important too. Between panning and creating frequency ranges for each part, you leave room for it to be heard while not having to chase your tail turning everything up. Of course, automation helps to shine the spotlight where it needs to be focused, just remember sometimes it’s about pulling something else back opposed to turning a track up. If the track is dynamically static, I will create small micro shifts in the automation to help push or pull back sections of the mix and make a track dance more.
On more rhythmic parts I tend to use short room sounds or early reflections. I’ll use larger reverbs with less rhythmic tracks to create a sense of depth. I have come to love convolution reverbs for their natural sound and am using them more and more of late. With short stereo multi-tap delays, I can make tracks move through the sound field. Add reverb to one return and make it move backwards.
Recently, while mixing at Bi-Coastal Music, I was given a track with a very pedestrian guitar track. I re-amped it into a Fender Deluxe set up in their excellent sounding studio. I used a close mic and a room mic. It sounded so good that I set up a speaker and re-amped the background vocals and some string pads! [What are some of your effects tricks? Leave us a comment!]
One of the biggest questions that comes up when mixing is: “When is it done?”
Well, I sit and listen until something bothers me, and then I fix it. If I can listen a few times with no problems, I take a break. One of the mistakes young mixers make is to over-mix and kill the feel of the track. Always ask yourself if your latest move made it sound better or not. If after the break it sounds good, then I print it.
For certain styles, like rock or pop, I like to mix to ½” RMG 900 @+5 but I also record back to the Pro Tools rig. I let my client decide which source to master from. And the winner is…
Rick Slater is a NYC-based producer/engineer who’s recorded and/or mixed with Chuck D, Robben Ford and James Chance, and worked in NYC studios such as Mediasound, Quad and Sony. Check him out at http://www.slatermix.com.
Please note: When you buy products through links on this page, we may earn an affiliate commission.


Robert "Void" Caprio
April 22, 2010 at 8:15 pm (14 years ago)One classic trick I find myself using more often due to drum replacement (or augmentation) is to:
Place a small speaker face down on a real snare drum.
Pump the sampled sound though the speaker.
Mic up the real snare.
This gives the sampled sound more realism and depth. Sometimes I also use an ambient mic for some room sound. I remember using this technique a long time ago to make drum machine snares (or sometimes other pieces of a kit) sound less robotic and more natural.
Robert "Void" Caprio
April 22, 2010 at 1:15 pm (14 years ago)One classic trick I find myself using more often due to drum replacement (or augmentation) is to:
Place a small speaker face down on a real snare drum.
Pump the sampled sound though the speaker.
Mic up the real snare.
This gives the sampled sound more realism and depth. Sometimes I also use an ambient mic for some room sound. I remember using this technique a long time ago to make drum machine snares (or sometimes other pieces of a kit) sound less robotic and more natural.
Rick Slater
April 23, 2010 at 1:49 am (14 years ago)That one is a definitely a classic. Do you use an Auratone?
Rick Slater
April 22, 2010 at 6:49 pm (14 years ago)That one is a definitely a classic. Do you use an Auratone?